

I'm Mickey Rountree from Chattanooga Tennessee, and I'd like to thank Rick for giving me the opportunity to write a guest blog post. Rick asked me to do the post after seeing some of my Old Car City images.
Rick asked me to give you a few tips on Old Car City in Georgia because I've been a regular visitor there for years – and because Rick is leading a photo workshop to this location in October. You can register here.
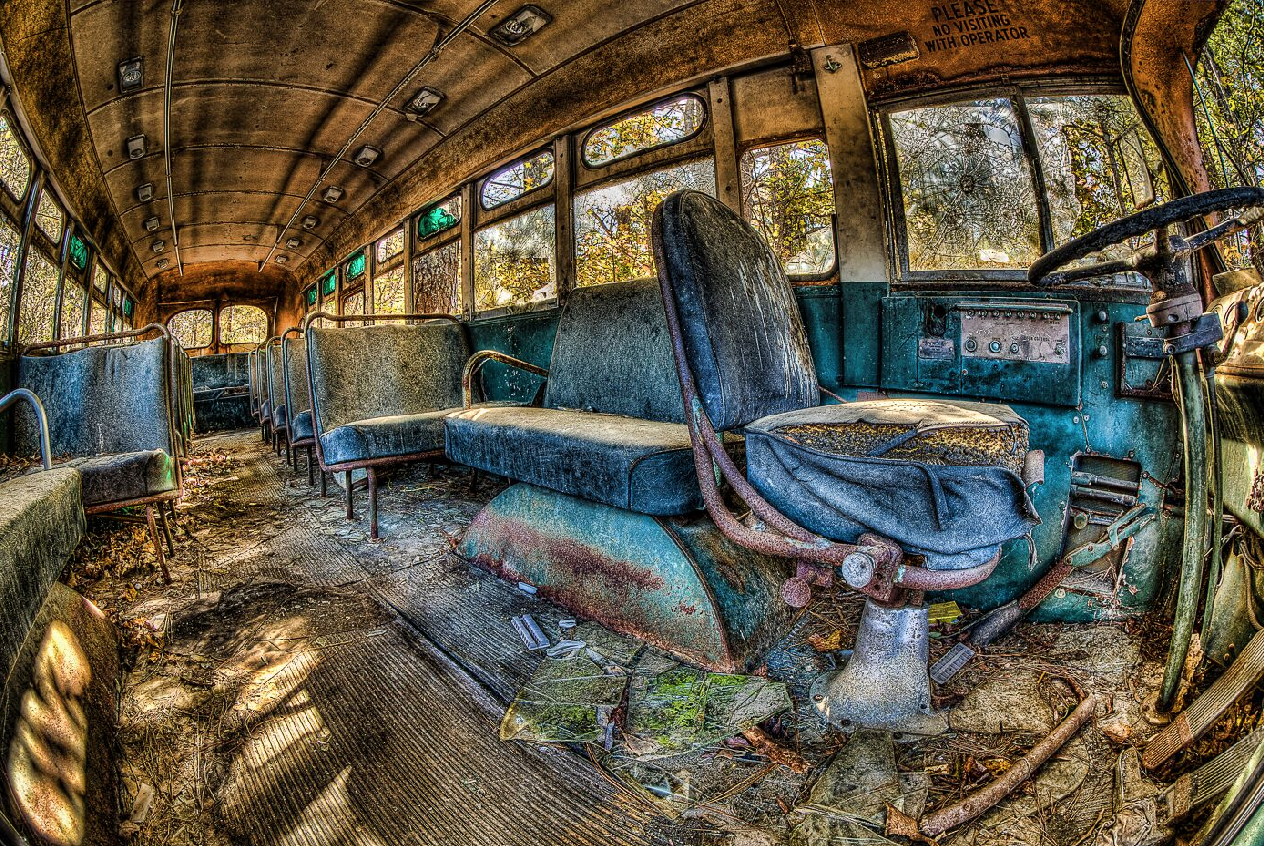
It's forty acres of cars from the 1920's through the 1970's in conditions from relatively undamaged to totaled, and in various stages of being reclaimed by nature. If you like rust, decay, and the interplay between nature and machine, this is your place.
So, in no particular order, here are a few tips based on my experiences.
1) Forty acres and thousands of cars can be totally overwhelming. Don't feel you can see or shoot it all in one day. Pick a smaller area and work the scene. Broaden your areas on successive trips. I've been there twenty times and still don't feel I've covered it all.
2) Do your homework! Research Old Car City images and you will finds thousands of images. Look at what others have done, and try to find a style that interests you and plan to work on those kinds of shots. Try not to make copy images, but put your own style and personality into shooting and processing.
3) You can literally use every lens you own here. I have shot with my Canon 8-15mm fisheye, my 70-300mm and everything in between. However, I suggest that you don't carry every lens you own. Pick a viewpoint you want to work on, and carry one or two appropriate lenses. My all purpose lens for walking around OCC is my 24-105mm on a Canon 5DM3. When I'm doing a project with a specific viewpoint in mind, I only carry one or two lenses to help keep me on task. My last shoot was interiors, so I only carried a 17-40mm and my 8-15mm fisheye. I spent a couple of days solely working on hood ornaments and badges and only used my 70-300mm and occasionally my 100mm macro.

4) This place just screams HDR! If you have never shot in HDR, the range of textures, tones and colors is perfect to make your first HDR shots amazing. I tend to shoot almost every inanimate subject in HDR, or at least shoot the required brackets. I then have the choice of doing HDR, or just picking the best single exposure and working with that. On an overcast day, shooting a whole car or large scene, three brackets at +/- 2 stops is probably sufficient. Shooting an image that goes from very dark areas to very bright sky, such as a car interior that has bright sunny sky visible may require 7 or even 9 brackets. In those cases I'm also usually shifting my exposure compensation down to -2 or -4. Check all of your bracketed shots to see that you have a shot with good detail in the shadows and a shot where the highlights are just barely visible. When in doubt, it's better to over-bracket than to get home and find that you don't have the range you need. It's easy to delete the extremes that you don't need, and much easier and cheaper than having to go back and re-shoot.

5) I Often use the in-camera HDR just to help me see if a shot is worth pursuing or not. If your camera will do in-camera HDR you are usually limited to three exposures and 4 or 5 styles. I find I can usually do much better in Photomatix with a wider range of brackets, but it's an useful check. And when the in camera HDR looks good, I really get excited and motivated, because I know my edits will be great.
(If you don't have Photomatix, you can get a discount here.)
6) Some essential equipment to bring would include a sturdy tripod, a right angle finder, extra cards and batteries, a brush or microfiber fiber cloth to clean your lens (hey, it is a junkyard after all!), and a loupe for viewing your screen. The loupe can be very important. Everything looks sharp and pretty on the small screen, and it can be disappointing to see out of focus shots when you get home. Better to fix it in the field.
And last, a few non-photographic tips:
7) Watch where you put your hands! I went to lean on a boulder that turned out to be a compacted ant hill containing thousands of very upset ants. I have seen several snake skins, but thankfully no live snakes. I'm betting some snakes have seen me though. Also there are lots of sharp edges of old rusty metal.
8) Unless you're there in the coldest months, long sleeve shirts, long pants and bug repellent are a good choice. There are lots of hungry mosquitoes, and chiggers are waiting in the high grass. Check for ticks when you get home. Sturdy shoes or hiking boots are a must, and it's good if they're also waterproof when you're walking through wet grass and mud.
9) A good pair of contractor's knee pads will be useful if you like getting down for those low perspectives (and you should). Carry a large plastic garbage bag to lay on for ultra low shots.
10) I like to carry a small first aid kit for minor cuts and scrapes.
11) If there's a particular car you want to find, ask Dean Lewis the owner.
12) If you like down home Southern cooking (or need to try it), Wesman's restaurant across the street is part of the experience.
• • • • •
Thank you Mickey for a great blog post! Nice work.
Again, readers can register for my Old Car City workshop, which also includes shooting at the South Eastern Railway Museum, here.
Explore the light,
Rick
What's new? My 36th book: Creative Visualization for Photographers.