

Welcome back Rob! It's great to see your wonderful work here again. Take it away. - Rick
After my previous guest blog appeared here, Rick asked me to do another post showing how I processed the opening image. I realized that showing each adjustment could result in a very long post, so I’m breaking it down to the essential steps to keep it from becoming a novel.
The workflow I used for this is fairly typical of my process, although it can vary depending on the image. It all starts with the RAW file that you see below. Usually when I begin working on an image I have a clear idea of the final print. In this case I had originally envisioned a color image and hadn’t intended to convert it to black and white. After working on the color version, I decided to open it in Nik Silver Efex Pro. I instantly saw the potential as a black and white and continued in that direction.

I imported the RAW file into Adobe Photoshop Lightroom where I made global adjustments to white balance, levels, contrast (using the tone curves) and exposure. Although Lightroom has some tools for targeted adjustments, I prefer doing those in Photoshop where I have more control.
I exported the file and opened it in Photoshop and began the cleanup phase. With a 314 second exposure, noise will almost always be an issue, so the first step was reducing it with Nik’s Dfine plug-in. Going through the image at 100% magnification I removed dust spots and any other artifacts that were present. Then I needed to remove everything that I felt didn’t belong in the image: The sign on the dock, The boat moored to the right of the dock, the pole in the water, the lights on the shore of the lake and other minor distractions were all carefully removed using the healing brush and clone tools.

The next step was making and saving selections of each area of the image in which I wanted to make targeted adjustments. The four main components of the image are the sky, mountains, water and the boats and dock, so each component was selected as you can see in the channels window on the bottom right. I also made additional selections for the interiors of the boats as well as the interior and exterior of the yellow boat in front. By saving these selections, I could later apply adjustments to specific areas of the image without affecting the other areas. All of these selections greatly increase the size of the file, but I feel it’s a worthwhile tradeoff.
Above is the image converted it in Nik Silver Efex Pro. The image was beginning to take shape, but still far away from the final image I envisioned. This is where all of the selections from the previous step come into play.

Using the selections I made earlier, I made curves and levels adjustments on each area of the image. I also added adjustment layers to reduce some halos around the bottom of the dock and in the sky. A luminosity mask was also added to fine tune the highlights. (Luminosity masks provide a powerful way to make adjustments based on brightness levels. For an introduction to these techniques see the tutorial by Tony Kuyper at http://goodlight.us/writing/luminositymasks/luminositymasks-1.html)
One of the most important effects I was aiming for with these adjustments was to create more depth in the image. Since a photograph is a two dimensional representation of a three dimensional scene, shaping the light in processing can give the illusion of depth by guiding the viewers eye through the image. Many of the adjustments were done to accentuate the distance between the dock in the foreground and the mountains on the other side of the lake.
Some of these adjustments were just small tweaks while others were stronger and more obvious. When combined, they dramatically alter the tones in the image. Vincent Versace likens Photoshop to a sledgehammer that should be used as nail file. It provides many powerful tools that it’s easy to go overboard and destroy your image. Using it to carefully fine tune an image with several subtle adjustments will often get more satisfying results.

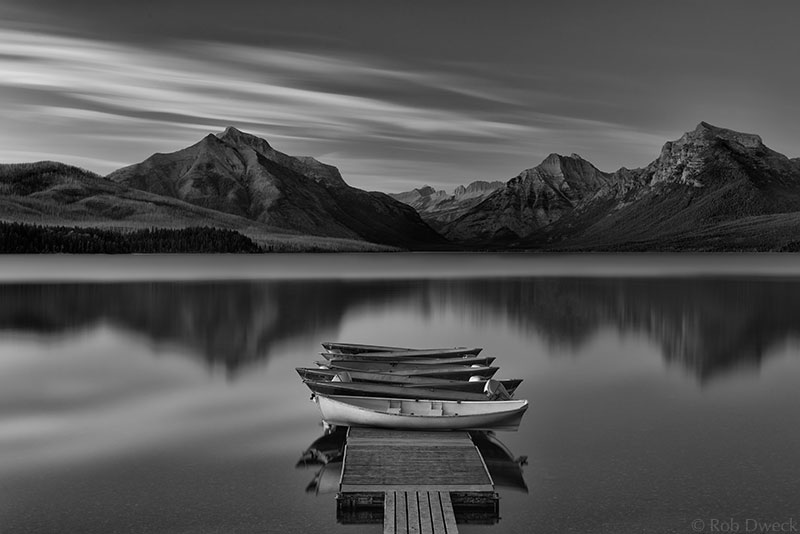
The finishing touches were some dodging and burning on the mountains and a vignette around the entire image. The important considerations here were getting a good balance of tones between the mountains and the sky and keeping the subtle texture of the rocks in the water at the bottom of the frame. If the vignette was too dark, that texture would be lost.
The process from RAW conversion to finished print took over 10 hours – maybe even closer to 20 hours. The RAW file provided a jumping off point for me to create my own interpretation of the scene. I actually have several versions - there is a color version, which I initially preferred over the black and white, but I soon came to like the black and white version better. I have been fine-tuning the color version for a while after I realized that it wasn’t fully cooked yet. Maybe you’ll see that one in a future post.
To see more of my work, please visit my website.
• • •
My site is hosted on Squarespace. Give these guys a try. Awesome sites and customer service.
