Guest Blogger: Canon Explorer of Light Lewis Kemper

  © Lewis Kemper
My guest blogger this week is fellow Canon Explorer of Light Lewis Kemper. I am sure you'll enjoy Lewis' photographs from Yosemite, as well as his tips on where and when to photograph.

In this post, Lewis specifically talks about where to photograph from sunrise to sunset.

If you plan to photograph inYosemite, Lewis' book, Photographing Yosemite Digital Field Guide, is a must.

If you are participating in my "In the Footsteps of Ansel Adams Photo Caravan," this post is for you.

If you are looking for some gear recos, here's my list.

Take it away Lewis!
Sunrise Locations

My all time favorite sunrise location is Cook’s Meadow (above), just east of Yosemite Lodge. From here the sunrises behind Half Dome, and depending on time of year illuminates Yosemite Falls, Yosemite Point, Sentinel Rock, and Glacier Point. There are many oaks and one elm tree, as well as Cow Parsnip in summer that you can use as foreground elements, in your images. If you cross the footbridge you can get reflections of Yosemite Falls, in the Merced River. I also like the view from the footbridge looking down the valley with Sentinel Rock on the left. From this one area you have a wide variety of photographic options so plan to spend a lot of time here!

 © Lewis Kemper
Another area I like at sunrise is along the Merced River on the south side, opposite from El Capitan. As you walk the river west of the El Capitan Bridge (where you can cross over to the Northside Drive), you get great reflections of El Capitan as morning sun strikes the monolith.

  © Lewis Kemper
And now with HDR, I like going to the areas that are typically thought of as “sunset” locations, which include Gates of the Valley and Tunnel View (above and below).

© Lewis Kemper

Sunset Locations

© Lewis Kemper
Off course no visit to Yosemite is complete without witnessing sunset from the Tunnel View on Highway 41. This is the classic view with El Capitan on left, Clouds Rest Rest and Half Dome in the center, and Cathedral Rocks and Bridalveil Fall on the right.

© Lewis Kemper
Outside the valley I like the views from Glacier Point and Olmsted Point. From Glacier Point you are approximately 4000 feet directly above the valley with Half Dome looming in front of you and a great view up Tenaya Canyon. From Olmsted Point, on the Tioga Road, you have an interesting view of Half Dome from the north side as it catches the last rays of the setting sun.

© Lewis Kemper
Because Yosemite Valley is so deep there really are no “Golden Hours” the sun is high in the sky before it hit anywhere in the valley and sets quickly over the valley walls. The only time you get “golden” light in the valley is if there is a great cloud cover overhead (but not on the horizon) around sunrise or sunset. But if you venture outside of the valley, especially up to Tuolumne Meadows you can find “Golden Light” that last can start about and hour before sunrise and last until about an hour after sunrise.  In the evening the nice light can last about 1½ hours before sunset and last about 45 minutes after sunset. 

Low Light Ideas

© Lewis Kemper

A nice place to visit when the light is low would be the sequoia groves. There are three in the park, two require a hike and one is accessible via a shuttle. Early in the morning or late in the evening the trees are more evenly lit and much easier to photograph.


Midday Ideas

© Lewis Kemper
If you are in the valley mid-day then I suggest you concentrate on details and close ups. There are Cow Parsnip and milkweed in Cooks, Meadow, azaleas near Gates of the Valley, and many interesting lichens and rock patterns around Happy Isles. If you leave the valley mid-day is a fine to photograph some of the high country lakes along the Tioga road.  I like Siesta Lake, and Tenaya Lake.  From Tuolumne Meadows it is a short hike to Dog Lake. Tuolumne Meadows can also be a good mid-day destination with its wildflowers and reflections in the Tuolumne River.

• • • 

Thank you Lewis for an inspiring post.

Explore the light,
Rick

Fix Creative Fatigue and Go on Safari

© Rick Sammon
I have two articles in May/June issue of Digital Photo magazine. One on fixing creative fatigue and one on digital wildlife photography. Check 'em out.

One idea to fix creative fatigue: play with plug-ins and awaken the artist within. Above I used the Polaroid Transfer effect in Nik Color Efex Pro to remove some of the true color from the scene.

Click here to get a discount on Nik and some of the other plug-ins I use.

When you remove some of the true color, you remove some of the reality. When you remove some of the reality, your picture can look more creative and artistic.


One idea for wildlife: shoot wide and make a photograph that shows the animal in its environment.

In the shot above I applied the Spicify filter in Toapz Adjust (another favorite plug-in) to the sky.

Explore the light,
Rick

P.S. Here's some more thoughts on getting inspired and motivated.

Have Some Plug-in Fun This Weekend - $ave a few bucks with my discount codes

Topaz Adjust/Portrait Smooth
Plug-ins expand the capabilities of Photoshop, Lightroom, Aperture, etc. They also expand your creative horizons.

Plug-ins are relatively inexpensive - and you can even save a few bucks by using my special codes below.

Here are my favorite plug-ins, favorite plug-in images, and favorite plug-in tips. 

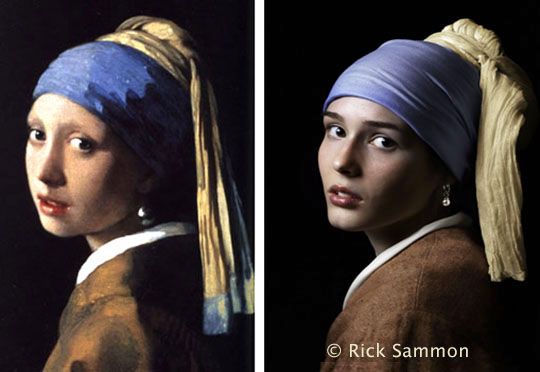
For my picture, "Girl with a Pearl Earring," I applied Topaz Adjust/Portrait Smooth on the top layer (the original was on the bottom layer) and then I faded the Opacity to reduce the effect.


Topaz B&W Effects

The newest plug-in that I am using is Topaz B&W Effect. Click here to read about it.

Photomatix Plus Topaz Adjust

HDR Efex Pro

My latest, favorite plug-in: Nik Software’s HDR Efex Pro. Save 15% if you use this code: RSAMMON upon check-out on the Nik web site. Actually, you can save 15% on all Nik plug-ins - including Color Efex Pro! Just use the same code. 

HDR Efex Pro tip: Use the Control Points and Curves to fine-tune your image – and to save time touching up your images in Photoshop, Lightroom or Aperture.

 Photomatix Plus Topaz Adjust
The image above was created with Photomatix - with a touch of Topaz Adjust. You can save 15% when you order Photomatix by using this code: ricksammon.

Photomatix tip: Adjust the White Point and Black Point sliders first. If your highlights are washed out with even with the White Point slider moved all the way to the left, you missed capturing the entire dynamic range of the scene with your original HDR sequence.

Topaz Adjust

Topaz Adjust is just too cool. Above I used the Spicify Effect. Below I used the same effect, but greatly reduced the noise. Click here to order Topaz Adjust. Hey, save a bundle when you order a Topaz bundle.

Topaz Adjust tip:  Press the Reset tab each time you work on an image - unless you want your previous effect applied to your current image.
 
Topaz InFocus

Topaz InFocus is a relatively new plug-in from Topaz Labs. Click here to read about InFocus.

InFocus tip: Don't over-sharpen your images. The more you sharpen, the more noise you'll get in your images.

Bokeh
Check this out. Want to turn a picture like the one on the left into a picture like the one on the right? 

It's fast and easy with Alien Skin's Bokeh 2. You can save 15% when you order any AlienSkin plug-in by using this code upon checkout: RSA0901.

Bokeh tip: Spend the time in Photoshop making a VERY careful selection.

 Aline Skin makes more cool plug-ins. Click here for info.

Nik Silver Efex Pro

A cool way to create a black and white digital images is with Nik Silver Efex Pro. Save 15% off if you use this code: RSAMMON upon check-out on the Nik web site.

Silver Efex Pro tip: Experiment with the different color filters to see how they can enhance the tones in your images.

Explore the light,
Rick

When You Are Through Changing, You Are Through

© Rick Sammon
"I'm not hip and young, and I really don't fit in."

"I think we have learned all we can learn."

These comments were made my two photographers I know - both of whom are younger than I am.

My advice to these very good photographers would be to think about this well-known quote: When you are through changing, you are through."

© Rick Sammon
We need to change, especially in this world of social media. 

We need to change (and to keep up) with new plug-ins and versions of Lightroom and Photoshop.

We need change to grow. We need change to keep healthy . . . because "learning is health."

And on the topic of health, we need to be physically healthy to be mentally healthy.

Exercise. 

© Rick Sammon
If you need some inspiration to change, just look at a butterfly . . , which starts out as a crawling sack of goo and is magically transformed into a beautiful flying creature.

I took these three pictures are of the same (exact same) animal: a dagger wing.

So if you feel as though you are through, please think again. As Dr. Wayne Dyer suggests in his book Real Magic, we are in control of our own reality to a great degree

A closing thought (another famous quote): It's never too late to be who you could have been.

Explore the light,
Rick

P.S. You'll find more inspirational quotes and pictures of butterflies in my Life Lessons We Can Learn From Mother Nature and Butterfly Wonders apps.


Do You Have Strong Images?


There are many types of images:
- pretty
- nice
- fun
- artistic
- moving
- dramatic
- and . . . strong.


Different elements make a strong image:
- color
- lighting
- contrast
- subject
- lens
- composition and so on.

If you have a strong image, share a link in the Comments section here on my blog. If you don't have a strong image . . . try to make one this weekend.

Explore the light,
Rick