landscape photography

Now Available: Master Landscape and Seascape Photography

My latest on-line class - Master Landscape and Seascape Photography - is here!

Click here to see a free preview (Black-and-white photography).

Introductory offer for blog readers! Use this  code - landscapes - to save $10 on the $29.99 class.

The one-hour seminar (like taking a private lesson from me in your home) is a narrated keynote slide presentation that includes more than 225 images and tons of tips gained from my travel to almost 100 countries.

The seminar is actually two seminars in one: a landscape/seascape/coastal photography seminar and a travelog. You'll learn how to photograph from dawn to dusk - and you'll get some ideas on where you can make some awesome landscape and seascape images.

It's a learn-at-your-own-pace seminar that you can stream or download and view again and again.

Got questions? Everyone who attends/views one of my seminars is a student for life. That means seminar attendees can email me questions for the rest of my life.

If you are new to my teaching style, here are some videos - on-line lessons that will help you with your landscape photography:
Composition - the strongest way of seeing.
Having fun with filters.
Lenses for landscape photography.
My camera settings vs. your creative vision.

Screen Shot 2015-02-15 at 10.57.44 AM.png

Here is the timeline for the class:
00:00 Introduction
01:50 Mood & Feeling 
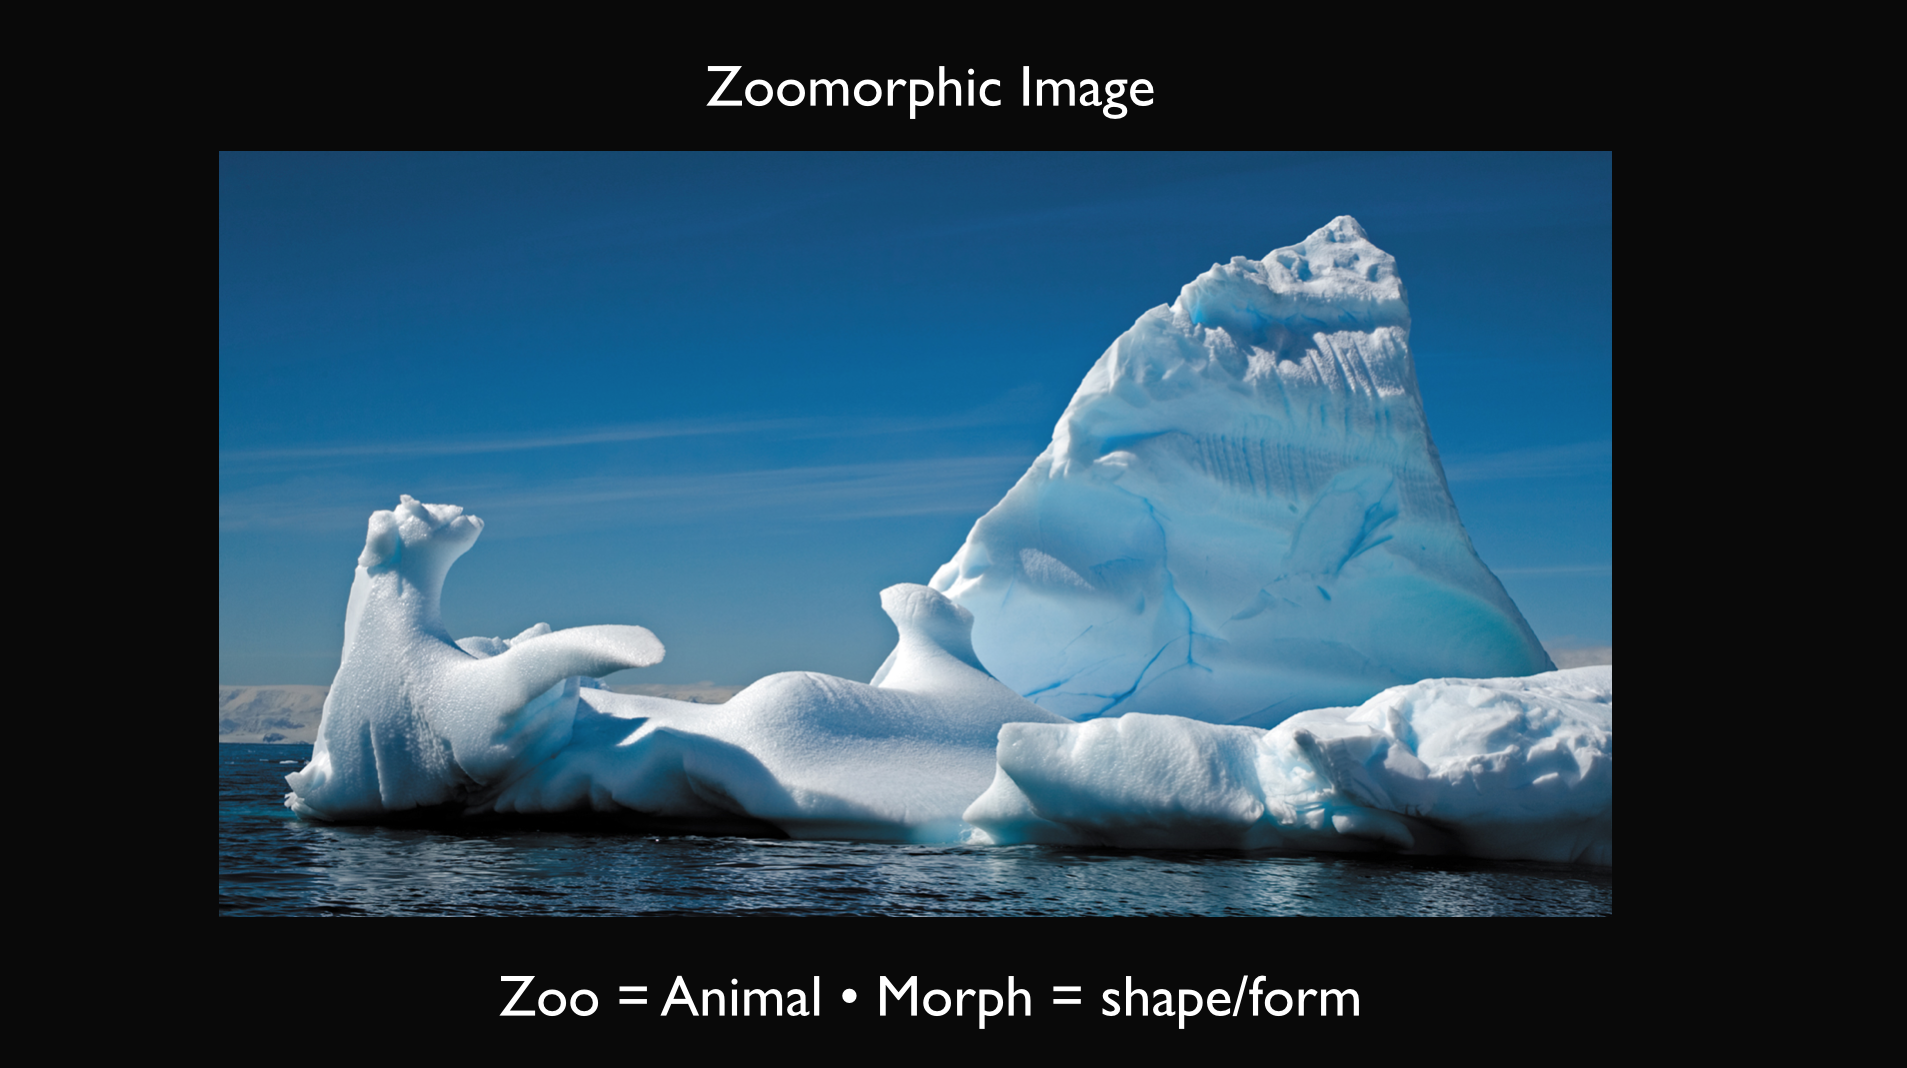
02:43 Why We Photograph – Types of Images
05:56 Basic Concept: Get Everything in Focus
07:50 Basic Concept: Get a Good Exposure
10:05 Basic Concept: Separation
11:58 Basic Concept: Image Enhancements
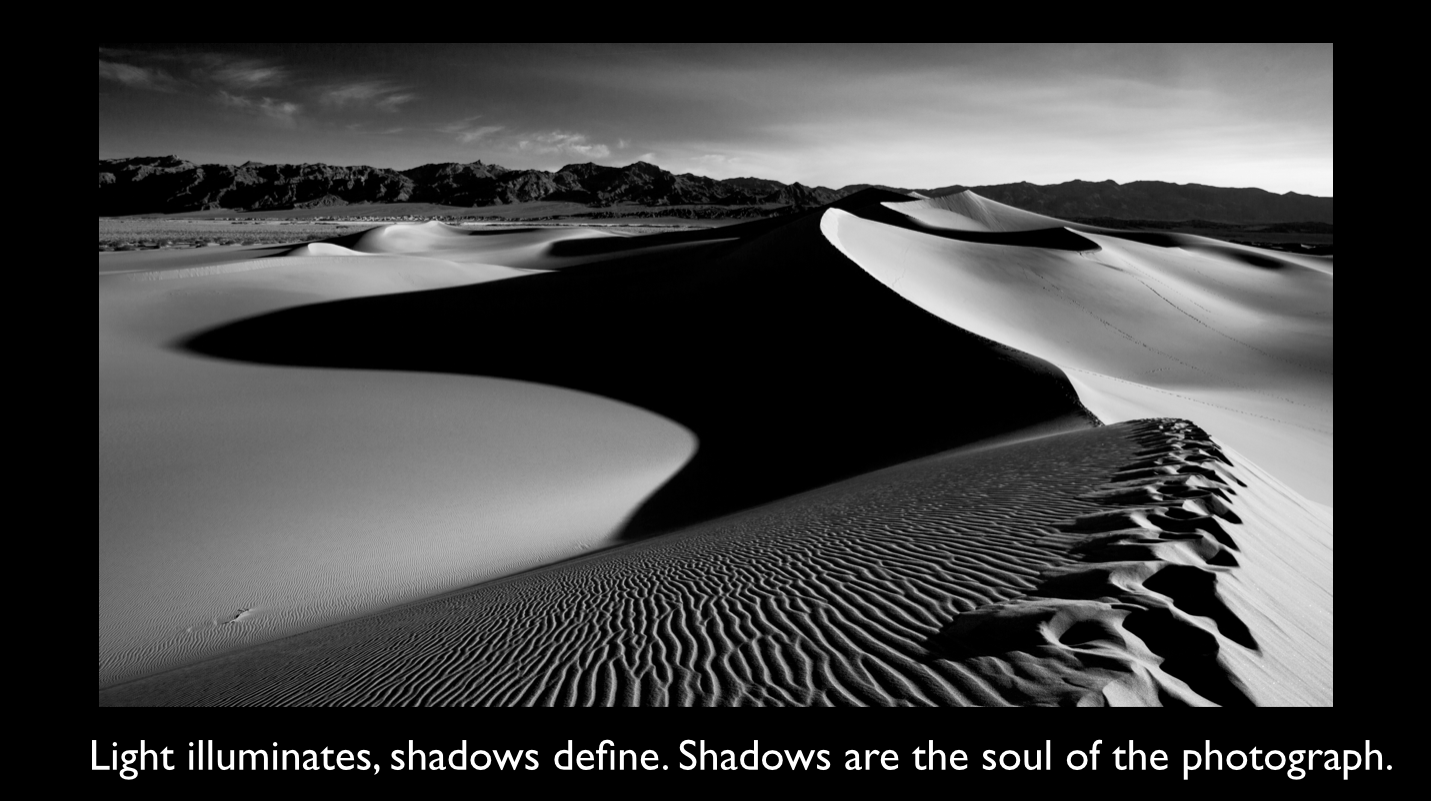
14:21 Black-and-White Photography
19:14 Time of Day – See The Light
24:03 What If You've Only Got One Shot?
26:15 HDR
30:58 Storytelling With Lenses
33:36 The One-Lens Shoot
36:21 Close Ups
38:56 Stay in Shape
39:37 Blurring Water
41:31 Panoramas
45:54 Composition
49:41 Cropping
51:05 Filters
51.50 Sunrise and Sunset
53.46 Reflections
54.35 Thank you!

Screen Shot 2015-02-15 at 10.57.53 AM.png

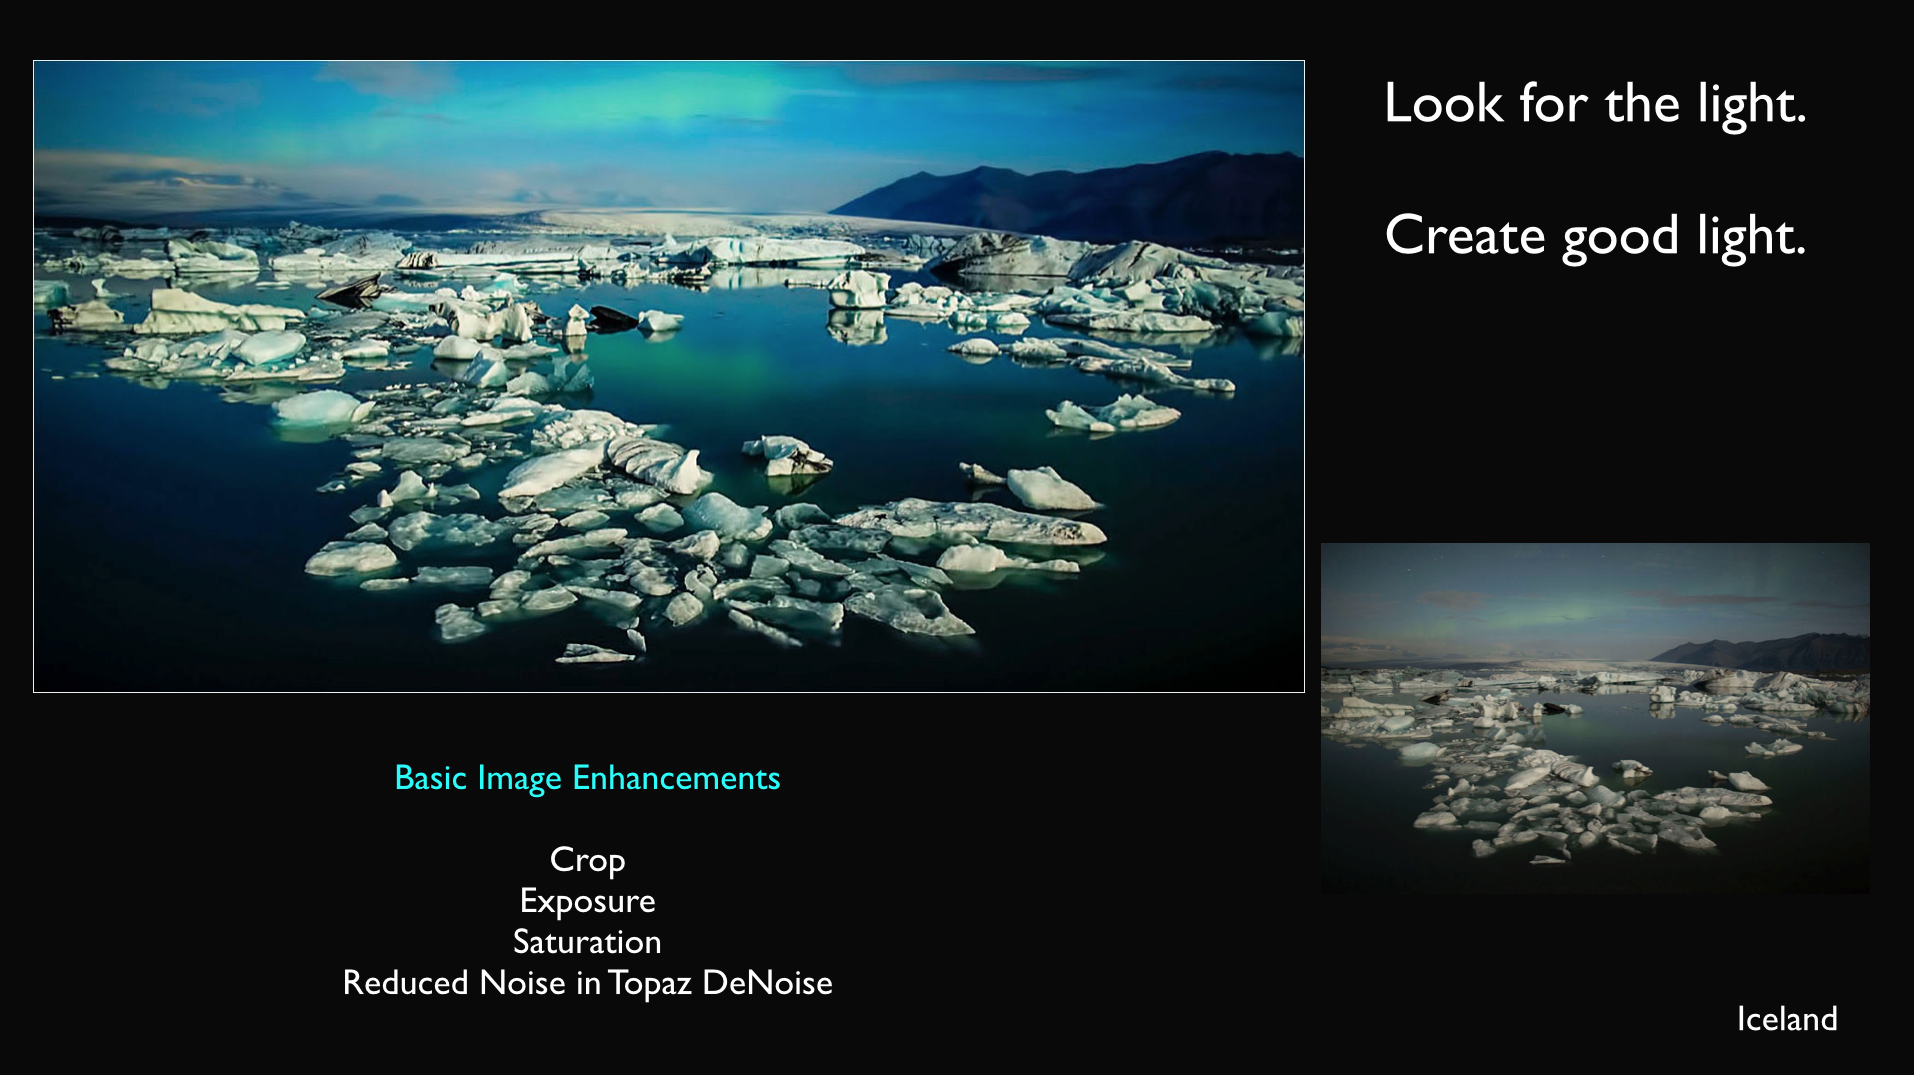
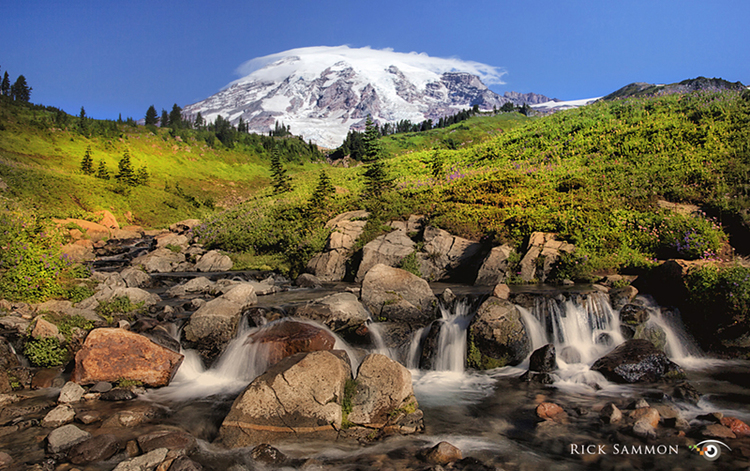
During the class you will explore the following locations: Iceland, Holland, Death Valley, North Wales, Mt. Rainier, Goblin Valley State Park, Oregon Coast, Mono Lake, Antarctica, Alaska, Laos, Slot Canyons, Monument Valley and Bryce Canyon.

This is not just a slide show of pretty photographs. For each photograph I give a photography, location or digital enhancement tip.

I hope you enjoy the class - and please don't be shy about emailing me questions.

Click here to order the class.

Explore the light,
Rick

P.S. For more tips on composition, see my KelbyOne class, Composition - the strongest way of seeing

Two Old West Photo Workshops Coming Up in 2015

Do you like to make images of the Old West - and cowboys and horses? If so, I have two workshops coming up that I know you will enjoy:

wyoming.jpg

Casper, WY "Old West Shoot"
and
Telluride, CO "Ghost Towns, Waterfalls and Fall Landscapes"

The horses above are just two of our models in Casper!

In Telluride, CO, we'll be photographing ghost towns. I took the shot above in Bodie State Park (great ghost town) in California. We'll use the same HDR techniques in Telluride. That is, make an HDR image that does not look like HDR.

For HDR, I still recommend Photomatix. Click here to get a discount on Photomatix.

Photographing landscapes and waterfalls are also on the schedule for Telluride. In and around picturesque Telluride, I'll share with you long exposure techniques, which I used for the above photograph that I took on a past Mt. Rainier photo workshop.

In Casper, we have a very, very special shoot – complete with a horse and cowgirls – in the world famous Wonder Bar. That's where I took the above photograph last year. Great fun!

On both workshops, we'll be chasing the light – the main element in every photograph. There will also be plenty of time to process our images.

Yes, we will work hard, but we will also play hard.

I hope to see you in the Old West.

Click here to see all my photo workshops.

Explore the light,
Rick

P.S. Click here to see my e-books and on-line classes on landscape photography.

Today's Guest Blogger: Alex Morley

1. ProxyFallsforRickSammon.jpg

Thank you Rick for asking me to do a blog on waterfall photography. Waterfalls are among the most fascinating features of the natural world, but they can be challenging to photograph. Here are some basic steps to get your readers started on making beautiful waterfall images.

1. Find waterfalls near your home. Do an online search and ask local park officials about local streams. Even small waterfalls can be beautiful. You can also travel to places that are known to have wonderful waterfalls such as Iceland (on my to do list), New England, and the Southeastern USA. Many of the most astounding and beautiful waterfalls are where I live in Oregon. We have hundreds of them. There are a few areas here with large concentrations. Most notable are the Columbia River Gorge and Silver Falls State Park.

Opening Image: Proxy Falls, Oregon Cascades. ISO 100, 1.3 secs., f/20.

2. Shoot on overcast days. In order to get that soft silky look, cloudy skies are best. Avoid direct sunlight.

3. Shutter speed.  To get that creative silky soft flowing effect you will need to shoot at least ¼ second or slower.  I will experiment on each waterfall at many shutter speeds.  Some of my favorites are as slow as 2 seconds or even longer. 

2,KatmaiBearforRickSammon.jpg

Above: Katmai Bear. A fast shutter speed, 1/250 or greater, shows the water detail. Kodachrome 64 slide film, 1/250 sec., f/8. Katmai, Alaska.

3.LostCreekforRickSammon.jpg

Above: Lost Creek. 1/4 sec. or slower smooths the water. ISO 200, 1/4 sec., f/20. Lost Creek Falls, Oregon Cascades.

4. Use a tripod; it is an essential tool for long shutter speeds.

5. Shoot several images. The flow of water changes constantly so each image will be a little different.  You will notice this in the spray, and also in the outflow pond at the bottom of the waterfall.

6. Cut down on the light.  In order to get that slow shutter speed you have to limit the light coming into the camera. First of all use the lowest ISO for your camera. Then set the aperture at f18 or higher. Put on a polarizing filter.  This combination is often enough to work well on darker overcast days, especially in the forest. If you still need to cut out more light use a neutral density filter to block out light. These come in different densities. I use a 2- or 3-stop filter. I also like the Singh-Ray vari ND filter, which allows me to use different strengths of darkness by rotating the filter to let just the right amount of light through.

7. Slow down. When you arrive at a great waterfall, you will often be in awe… Enjoy it for a while.  Then look around and take some time to think about a good composition. Move to get a side angle. Use a wide angle, then use a telephoto to get in close to parts of the waterfall.  At many of the waterfalls here in Oregon, you can walk BEHIND the falls and get a totally different perspective.

4. BehindLowerSouthFallsforRickSammon.jpg

Left: Behind Lower South Falls. Walk behind the falls if you can for a new perspective. ISO 200, 1/6 sec., f/20. South Falls, Silver Falls State Park, Oregon.

8. Shoot in manual. This way you can control the shutter speed, aperture and ISO precisely. And watch your histogram carefully.  The water often gets blown out, and you want to be able to recover detail.   

If the whites are jammed up too far on the right of the histogram you may not be able to recover details, so cut down the exposure an f stop or two.  

Expose for the highlights.  There are many techniques for bring out detail in the water, the simplest is to use the white and highlights sliders in Lightroom. 

I often use curves and mask the layer in Photoshop to paint in selectively.  The new Lightroom 5 has an improved adjustment brush that works really well for this, too.

5. CoorsWaterfallforRickSammon.jpg

Left: Coors Waterfall. Black-and-white shows the details of the water and rocks in a different way. Subtracting color makes the image rely on form and tonality alone. ISO 200, 1 sec., f/20. Coors Falls, San Juan Mountains, Colorado.

Have fun searching out waterfalls. Some of your most rewarding and artistic photos can be of waterfalls. 

Alex Morley
Web site.
facebook.
Google+

• • • • • 

Thank you Alex! Great job!

Alex and I are running a Oregon Coast Photo Workshop Caravan this fall. It's full, but you can get on the waiting list. Info my Workshops page

"Hand of Man" vs. "Hand of God" Photographs

© rick sammon.jpg

Famed black-and-white landscape photographer Ansel Adams did not like to take photographs that showed "the hand of man," that is, photographs that included man-made objects or objects arranged my man. He enjoyed taking "hand of god" photographs.

In my landscape photography and on my landscape photography workshops, I like to to take both types of pictures. "Hand of God" pictures can be awe-inspiring, while "hand of man" pictures can be fun. They can also tell a story.

rick sammon ©.jpg

How do you feel about "hand of man" vs. "hand of god" photographs? I'd like to hear your thoughts?​

I took these images yesterday and today here in the Great Sand Dunes National Park and Preserve in Colorado. I'm here working on an awesome new on-line educational landscape photography project. Shoot me an email to get on the info list . . . and stay tuned!

Top image: ​Canon 5D Mark III, Canon 14mm lens. Nik Silver Efex Pro - the best way to make a black-and-white image. Info on on my Save on Plug-ins page.

Bottom image: Canon 5D Mark III, Canon 24-105mm IS lens.

Explore the light,
Rick

• • • • •

This post sponsored by x-rite. X-Rite is the global leader in color science and technology. The Company develops, manufactures, markets and supports innovative color solutions through measurement systems, software, color standards and services.

If you want accurate color, check out these cool x-rite products:
ColorMunki
Passport Color Checker

New Educational Project in the Works

rick sammon sand dunes.jpg

I haven't been blogging lately for two reasons:

1 - the internet in my hotel is slooooooooow;

2 - I am working on an exciting new educational project in the Great Sand Dunes National Park and Preserve. Here's a shot from day 1 of the project. Stay tuned for more info on the project . . . and on landscape photography.

This shot: HDR, Canon 5D Mark III, 15mm lens.

Explore the light,
Rick