

Hello out there and welcome to another Shoot with Spike Saturday segment. Let’s jump right in!
As many nighttime shooters know, the Milky Way is not around to photograph for about another month or so (depending on where you are). And even then it can be hard to endure those extremely early morning hours. So today, I will introduce a new technique along with some quick editing procedures.
I will quickly walk you through my process from start to my finished piece. The image above is my final edit, but let’s take a look at how I got here. The first thing you should know is that there is a time of the month to do these shots. If your goal is to capture the most amount of stars in the sky, then shooting while the moon is in a new phase or well below the horizon works best. If you want to illuminate your foreground naturally, a 20-35% moon can work nicely. Similar to shooting the Milky Way, you will ideally want to be away from the light pollution. Using the North Star (Polaris) will yield the results you see here, with a pin point being the center mark. The farther away from the North Star that you shoot in the sky, the longer your streaks will be. In the southern hemisphere, you would use the Southern Cross constellation for a center point of rotation.
Once you find your location, aside from your camera, you will need a tripod and an intervalometer. Some camera bodies have this feature built in. To capture star trails, you need to either take one very long exposure or take several exposures and combine them in post processing. I prefer to shoot several 30-second exposures and merge them in post processing. This method allows me a few advantages such as dealing with airplane trails in an efficient way and not having to worry as much about movement in the frame while shooting. It’s much easier to deal with accidental movements and other surprises in a single 30-second frame (amongst many) instead of having a single hour exposure compromised.
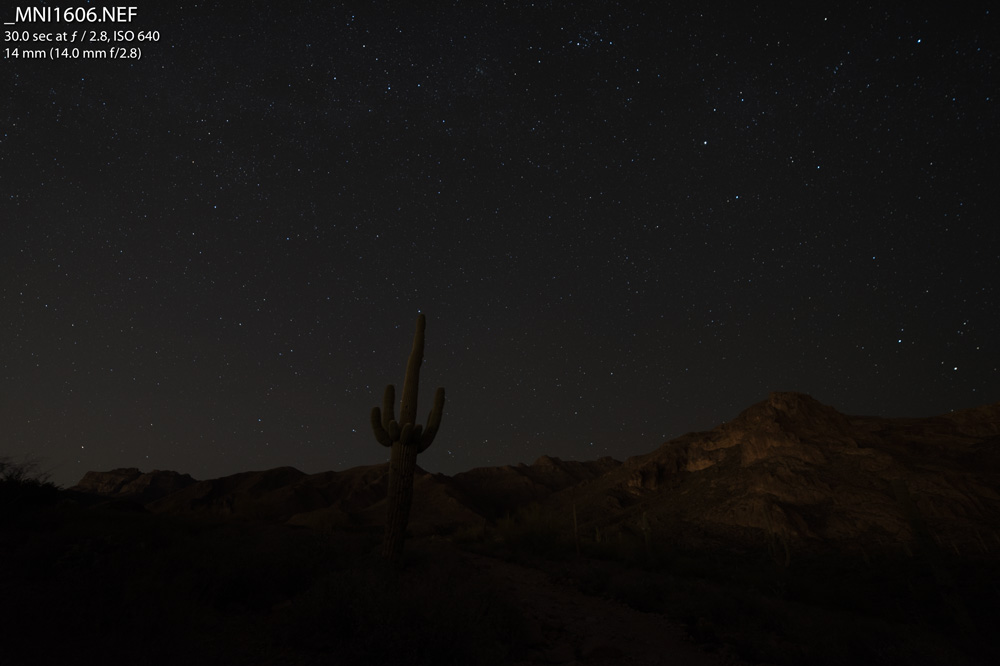
Next up will be your settings for these 30-second exposures. For my finished piece up top, I used 202 images, all with the same camera settings. My aperture was wide open on my lens at f / 2.8 with 640 ISO. Typically, you will not go above 1000 ISO for star trail captures. As expected, all of these images should be shot on a tripod, and you should not move or disturb the camera while shooting. I would suggest shooting at least 15 minutes’ worth of photos, but the more images you shoot, the longer your trails will appear. Below is a single raw file, before I have done anything to it.
Although the stars can appear as small white specks, be sure not to blow the stars out on your exposure. If so, you could lose valuable data within your image, so keep an eye on your histogram. Every star out there has a temperature. If you are looking to show some color within your final piece, this will be an important note. You can bump up the vibrancy on the final piece and showcase the colors nicely.
Now that you have your images transferred to your computer, we need to get them all into Photoshop. For my particular workflow, I import into Lightroom, select the images I will use, and “Open all layers in Photoshop.” The only adjustment I will make before sending my stack of images to Photoshop will be white balance, which will be applied to all images I am exporting. Lens distortion and sharpening I will do at the end, after merging my layers. Once my images are neatly stacked inside of Photoshop (1 image = 1 layer), I select all images except the very bottom one and change my layer blend mode to “Lighten.” Instantly you will see your star trails! If you are not using Lightroom, you can use the script action within Photoshop to import as layers. This is found under the file menu.
The following screenshots below demonstrate my images as they leave Lightroom, and then I change my blend mode as the first step once all of my images are layered upon each other and then the results of the blend can be seen.


You may also see some planes flying through some of the frames of your shots. With this method, these are a breeze to manage. You can create a layer mask on the specific image that the lights/trails of the plane appear. This is achieved by using the icon at the bottom of your layers panel or up top using the layers menu. Then select the paint brush tool and use the color black to brush away the plane trails or lights that you do not want visible. Due to your blend mode setting, the trail will disappear and reveal the photos underneath that do not contain the planes. If you brush too much or need to modify a spot, using white has the opposite effect and will restore your current layer as you brush over again. Be careful not to brush over any stars themselves. Otherwise, you can create gaps in the trails, and it's usually a good thing to avoid these.

Make sure you are using the brush on the mask, and not the image itself. You can use this technique for any light source disturbing your scene such as headlights or headlamps too for example. While you have your many layers, only worry about cleaning up the distractions. Afterward, you will merge all layers into one and make your final adjustments.
For my final adjustments, I increased the contrast and lightened my foreground up some with a brush while in Photoshop as well. I boosted the vibrancy a small bit to bring some color into my sky, along with adding a slight vignette. If you opened your files as layers via Lightroom, you could save within Photoshop after merging and your updated new file will appear in the catalog there instantly after completing the save. Be aware that this entire method can push your computer to its limits, especially with dozens of images, but if you are willing to take the time the time to do so, the end results can be spectacular!
Lastly, I will encourage everyone to download some apps to help out and set your shot up. There are several free apps for moon phases that will also display rising and setting times. And then there are numerous apps for finding Polaris in the sky to plan your shots as well!
Thanks Rick for having me today! Happy shooting to all and to all a good night!
-Spike (Check out my site.)