127 Already On "Rick's List" for Summer Shoot

Well, I think we can accommodate a few hundred more photographers (no kidding) on my NYC summer shoot, so there is still time to sign up. It's fun and free!
Click here for info.

I created the opening image for this post from the image above - and saved a fortune on a fish-eye lens!

Know how? It was more than cropping. I first made the image a square in Photoshop, by making the height and width the same. Then I made a circular image - using the Elliptical Marquee tool. Good fun!


Explore the light,
Rick

Round 3: Battle of the Close-up Photography Tips: Pons vs. Sammon. Today: Go Wide or Go Tele

Photograph by Rick Sammon
All this week: the Battle of the Close-up Photography Tips: Juan Pons vs. me! 

Hey, this is all in good fun!

Away we go! 

As you'll see today, Juan goes close, while I go wide.
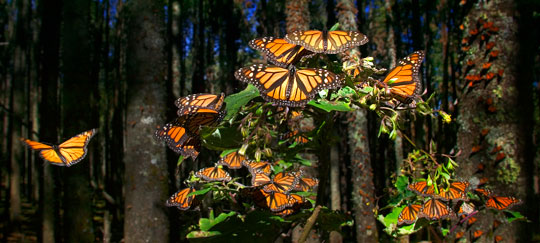
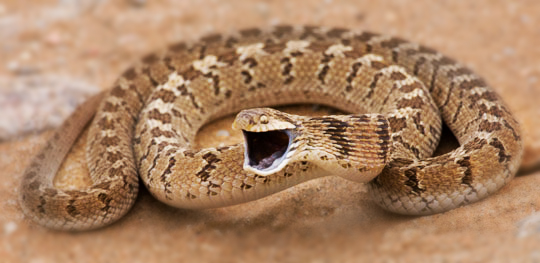
Me: Use wide-angle settings on your zoom lens for close-up photographs.
For my picture, I used a Canon 16-35mm lens set at 16mm on my Canon 1D Mark II. My aperture was set at f/16. I was only two feet or so from the butterflies in the foreground.
I took the picture in Michoacan, Mexico where the monarch butterflies from North America spend the winter. It was quite an experience to be in a colony of 30 million - yes million - monarch butterflies. You can see more of my pictures from Michoacan, as well some of my favorite butterfly pictures, in my book, Flying Flowers.

All my gear is listed on my Gallery and Gear page.
The main advantage of using a wide-angle lens for close-up photography is that you'll get tremendous depth of field - way, way more than you'll get with a macro lens. For max depth of field, use a small aperture and focus 1/3 into the scene.
Photograph by Juan Pons
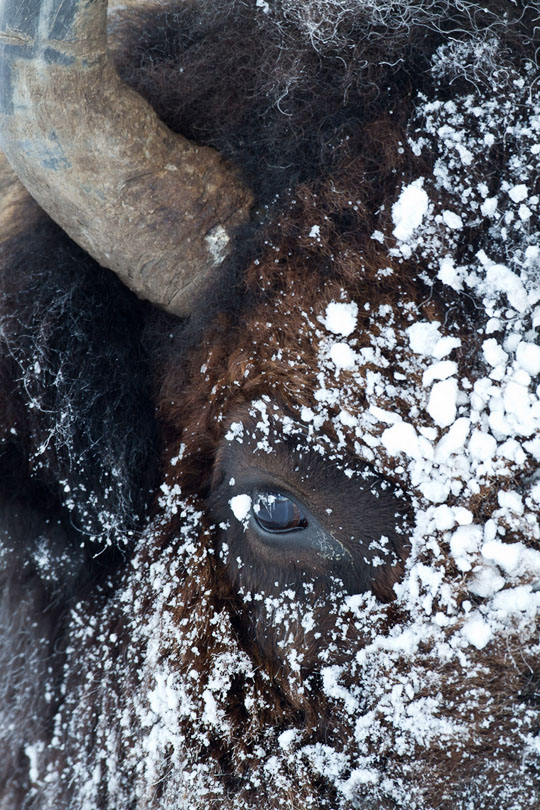
Juan: Sometimes getting closer than you originally intended can create a completely different but very interesting and engaging image. As I was photographing this ice and snow covered bison in Yellowstone National Park, the bison kept walking towards me, and the closer he got, the larger he became in my viewfinder.

Although I started with the idea of making an image of the bison in the harsh winter environment, I decided to embrace the situation and instead of moving further back or changing lenses I decided to make some extreme closeups of this impressive animal. Out of the entire sequence of images of this bison, this, the extreme close up, ended up being my favorite by far. Yes, not the image I started with, or had in mind, but certainty a great image.

What, oftentimes, works very well with extreme close ups, is that their subjects are not instantly recognizable and as a result they challenge the viewer a bit while they are trying to figure out what is in the image. Once they "discover" the subject, the image itself transforms in their mind's eye, and they end up discovering new aspects, angles and "meanings" to the image that may not have occurred to them from the very beginning.

So as my friend Rick likes to say: "If you think you are close, get closer!"

I photographed the bison above with a Canon EOS 7D and Canon EF500mm f/4 lens.
I needed to keep to a safe distance from this big bull bison) at F/5.6 and 1/50th of a second at ISO 400 taking advantage of the nice natural diffused light of an overcast sky.

• • • 
For more info on close-up photography, and photography in general, check out my apps. Click here to start the photo fun! Juan and I co-developed Butterfly Wonders (which features a section on close-up photography) and Life Lesson We Can Learn From Mother Nature.

Explore the light, 
Rick

P.S. If you want to share this post, simply click on the twitter or facebook icons below.

New iPad 2, New IOS 4.3 and Upgraded Light It!

We're all excited about the release of the iPad 2 and IOS 4.3!

To celebrate the release, both Rick Sammon's Light It! and Light It Light! have been upgraded to take advantage of AirPlay streaming to the AppleTV. You can now play all the video lessons wirelessly to your HD TV connected to an Apple TV via both the iPad and iPhone Light It apps.

Rick Sammon’s Light It! is an iPad app that’s designed to help you make professional-quality digital SLR people pictures – without spending a small fortune on professional lighting accessories.

The app (packed with 1.5 GB of info) includes both video lessons and before/after photographs. Due to the size, we suggest you download the app first to your computer and then transfer to your iPad.

More good news: Until the end of March 2011, the iPad version is only $2.99!

For info, see the app page of my site.
Explore the light,
Rick

P.S. Light It II is in the works!

Round 2: Battle of the Close-up Photography Tips: Pons vs. Sammon. Today: Snake Eyes

Photograph by Juan Ponn
All this week: the Battle of the Close-up Photography Tips: Juan Pons vs. me! 

Hey, this is all in good fun!

Away we go!

Juan: Maintain eye level with your subject.

When photographing wildlife up close it is essential to maintain eye level with your subject. As human beings we are used to seeing the world from the 5ft - 6ft view point, so shots from this point of view oftentimes end up looking ordinary. Getting down low, up high, or sideways in order to establish eye level with your subject is a sure-fire way to establish a connection between the viewer and the subject.

By the why this is not strictly a close-up photo tip, this tip applies to just about any subject or composition that includes a subject with eyes. Sometimes you can even get a little lower than your subject to make them even more impressive.

I shot the copperhead snake above with a Canon EOS 40D and a Canon EF 180mm Macro lens at F/11 and 1/100th of a second at ISO 800. I was lying down on my belly about 8 feet away from the snake. Not something I recommend you do with a poisonous snake like this copperhead. Although I am not all that fond of snakes, this fellow was very mellow and was not threatened at all with my presence.

• • • 

Photograph by Rick Sammon
Me: I agree with Juan on both tips - as illustrated by both of these photographs. :-)

Photograph by Captain Jack Leggett
And when it comes to getting too close, you don't always need to use a true macro lens to get a nice close-up shot. I used my Canon 100-400mm IS to take the full-frame shot of the snake.

To draw more attention the subject, darken and blur the area around the subject. Also, increase the contrast of the subject, and not the surrounding area. Basically: think and work selectively.

Also, if you want to get closer than a lens allows (minimum focusing distance) use an extension tube:

When it comes to extension tubes, you get what you pay for. No doubt. Same with tele-converters - and of course lenses.

If you like this post, please share it with a friend. All you have to do is click the twitter icon below.

For more info on close-up photography, and photography in general, check out my apps. Click here to start the photo fun! Juan and I developed Butterfly Wonders (which features a section on close-up photography) and Life Lesson We Can Learn From Mother Nature  together.

• • •
Explore the light, 
Rick

P.S. Here's another shot taken during our snake shooting session. Jack! Watch out!!

Photograph of Capt. Jack by Rick Sammon