So You Don't Have Time . . .

Here is a short homily about making the time to do something.

Way back in 1979 I was the editor of Studio Photography magazine. Great fun.

One day, my boss, Mr. Rudolph Maschke, told me to do something.

I said, “I am sorry, Mr. Maschke, I don’t have the time.”

He asked, “Mr. Sammon, who is the most beautiful girl in the world?”

I replied, “Jacklyn Smith,” who was recently featured on our cover.

He said, “Mr. Sammon, if she called you up and invited you to a 20-minute lunch, would you jump on your motorcycle and go?”

I quickly said, “Sure!”

He said, “Get to work, Mr. Sammon.”

His message: If you really want to do something, you’ll find the time. I agree.

Explore the Light,

Rick

Excerpt from my latest book: Creative Visualization for Photographers

Here is an excerpt from my latest book, Creative Visualization for Photographers.

Check out my six-step process for creative visualization (condensed from a longer and more detailed chapter in the book).

Step 1 - Selecting a subject – Never underestimate the importance of a good/interesting subject. My subject here is Fairy Glen in the Conwy Valley, North Wales. Fairy Glen is, indeed, a magical fairytale setting, someplace that reminded me of a scene from the movie, Harry Potter. It was that concept that I visualized during the early morning shoot.

Step 2 - Consider composition – Composition is the strongest way of seeing. When you see a scene you’d like to capture with your camera, think about what you want in the scene, as well as what you don’t want in the scene.

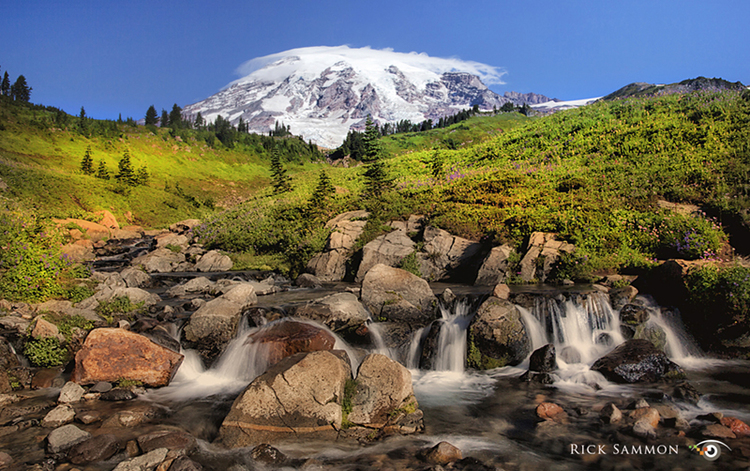
Upon arrival at Fair Glen, my first inclination was to include the sun in the photograph, but then I thought the bright spot in the frame would be too distracting in the end-result photograph, so I eventually cropped it out.

Step 3 - See the light – In the following chapters you will read about seeing the light, as well as HDR (High Dynamic Range) and EDR (Extended Dynamic Range) photography. Once you learn how to see the light, you know if a single exposure is adequate to convey your creative vision, or, for example, HDR is needed, as was the case at Fairly Glen, due to the very high contrast range.

Step 4 – Find your focus – Just because you have an auto focus camera, that does not mean that your camera knows where you want to focus.

In this scene, I wanted everything in focus, from the foreground rocks to the branches in the background. To achieve that goal, I focused 1/3 into the scene and set my aperture to f/22.

Try those setting to achieve maximum depth of field in any landscape (or seascape or cityscape) photograph. When doing so, the wider the lens the more you’ll have in focus. Here I used my Canon 24-105mm IS lens set at 47mm, which is not really a wide-angle setting, but it worked here because of my framing (no rocks or trees close to my lens).

Step 5 – Expertly expose – In the days of film, we used the BLH rule: Bracket Like Hell – and hoped to get one good exposure. Today, it’s much easier to get a good in-camera exposure, thanks to the histogram and highlight alert.

When a scene can’t be captured in one frame, HDR comes to the rescue. Still, you need to take enough pictures to capture that dynamic range. If you don’t you defeat the purpose of HDR.

When setting your exposure, you need to consider the Exposure Triangle: aperture, shutter speed and ISO. Those setting affect how much of the scene is in focus (aperture), if the subject is sharp or blurred (shutter speed) and the amount of noise in your picture (ISO).

Keep in mind that when you change one setting, you affect the other settings. Here I used a low ISO (ISO 100) so I could shoot at a slow shutter speed to blur the moving water.

Try to get it right in camera, and don’t use the S&P technique that some novice digital photographers use. S&P: Spray & Pray.

Step 6 - Process with purpose – Image processing is the final step in conveying your creative vision.

Explore the light,
Rick

I'm Jammin'

Hey All -

After posting this photo on social media, I received more than a few emails about the make and model numbers of my guitars. To keep it simple, here ya go, clockwise, from left to right:

Yamaha 12 String FG-630

Escape Traveler Guitar

Fender Precision Bass

Fender Stratocaster

Washburn H-30

Martin Acoustic/Electric Bass

Crafter Acoustic/Electric TB-Rose

And.. the guitar I am holding (my favorite):
Martin Acoustic/Electric DC -16RGTE

In the background, my keyboard: Yamaha Clavinova

Rock on,
Rick