
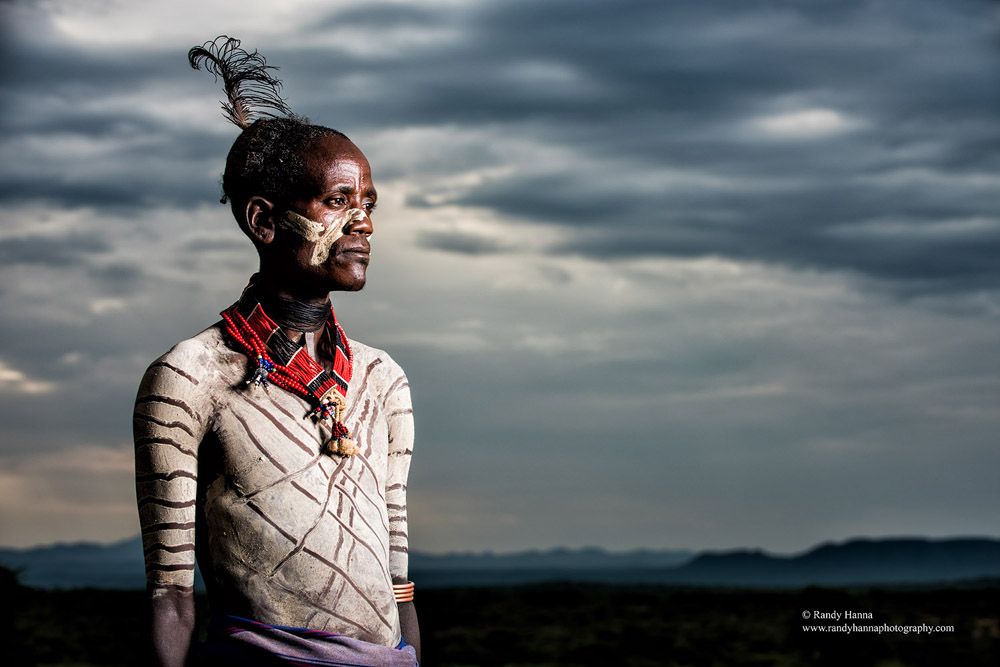
DSLR Full Frame, 70-200mm @ 82mm, ISO 100, f/6.3 at 1/250 sec. Flash: Profoto B1 with flash positioned 45 degrees to the right off camera pointed directly at the subject.
Thank you, Rick, for inviting me to share a few thoughts with your readers as a guest blogger today. Before I get going, however, I'd like say that I very much look forward to our future workshop in Ethiopia - where all the photographs in this post were taken.
I started running photo safaris in the mid to late 1980s when my focus was underwater photography. After being deployed to Iraq in 2004-2005, I found myself in Africa for the first time. Like so many, I fell in love with the cultures, landscapes and wildlife of Africa and have been leading photo safaris to this amazing continent ever since.
One element of my photography that I truly enjoy is capturing the cultures or people of Africa in their natural habitat. In doing so, I usually make use of large off-camera lights to capture the mood of the shot. This setup involves both direct or feathered light from the flash and modifier as well as balancing daylight with the flash.
In the opening image for this post, I decided to underexpose the background or ambient light and rely on the flash to add the “pop” to the warrior and set him apart from the dark background. Based on the white body paint and the dark skin color, I went with a shot of higher contrast. To achieve this, I positioned the strobe at 90 degrees to the right of the camera facing directly into the chest of the warrior. Shooting in manual mode, I did not have to worry about any fancy TTL settings; rather, I just increased or decreased the strobe power to get the balance of light I was looking for.
SHOOTING TIP: Take time to look at the light before you shoot and determine what mood you want to convey with your photograph, then balance the light accordingly. Don’t be afraid to experiment with the lighting, be it natural, reflected, or artificial.
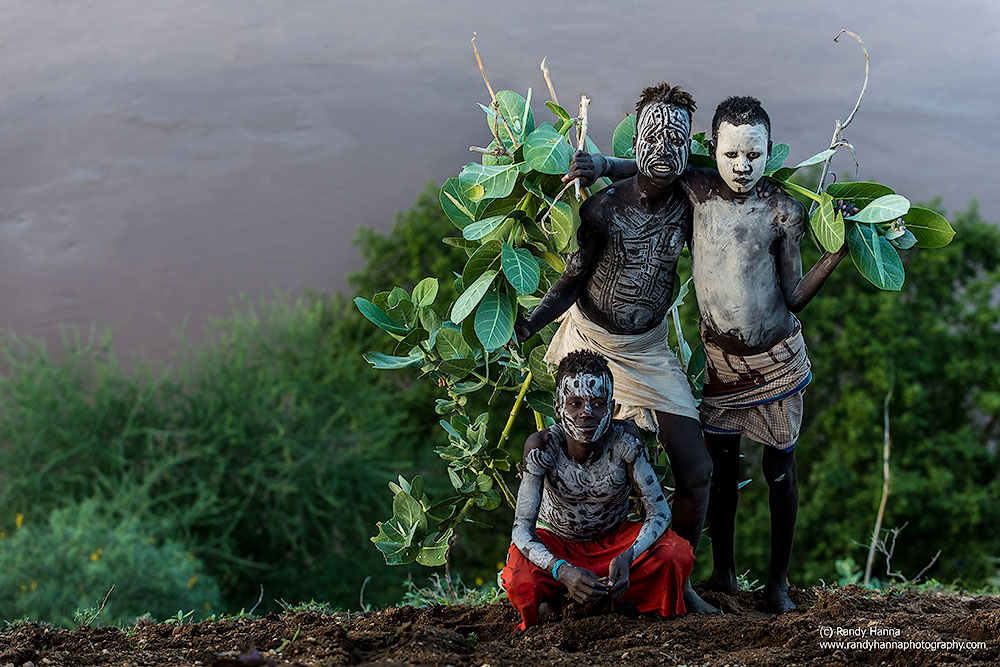
DSLR Full Frame, 70-200mm @ 105mm, ISO 400, f/5 at 1/100 sec.
Just when I thought I was finished shooting, I approached the edge of a small cliff along the Omo River where three young boys caught my eye. They were posing with their painted bodies about half way down the bluff, a location where I never would have expected to see them. One component that I like about this image is the contrast between the green foliage and the white body paint. To minimize distortion from the extreme shooting angle, I decided to lay flat on the ground just above the boys. With only natural light, the exposure was based on the brightest part of the image while bringing out the shadows ever so slightly in post processing.
SHOOTING TIP: Be sure to look ALL around you when shooting, especially in new locations. You just never know but your best image could be the one that is behind you, the one you missed.

DSLR Full Frame, 70-200mm @ 200mm, ISO 100, f2.8 at 1/100 sec. Flash: Profoto B1 with 3ft Octo softbox positioned slightly to the right of the camera.
I’m often heard saying that ‘eyes are the gateway to the soul.’ I’m not sure where I first heard this phrase but it has stuck with me in both my wildlife and cultural photography. When it comes to the eyes, the mind can do funny things. For example, if the eyes of your subject are not in focus, your mind will dismiss the entire image as unacceptable and before you know it, you will be arguing with yourself about how unattractive the image is.
The image below is, again, about balancing light and preserving details. Presented with the bright white body paint (which is actually made from ashes) and the whites of the eyes, I had to pay close attention to the exposure to ensure that both sets of highlights were not blown. A shallow f-stop allowed the background to fade away without conflict while maintaining the focus point on the eyes.
Full frame 35mm, shooting detail, Flash: Profoto B1 with 3ft Ocoto and diffuser with strobe position slightly off camera to the right.
TIP: Always strive to keep the eyes of your subject in tack-sharp focus. No post processing can save a set of blurry eyes. As long as the eyes are in focus, you can work with the rest of the image.
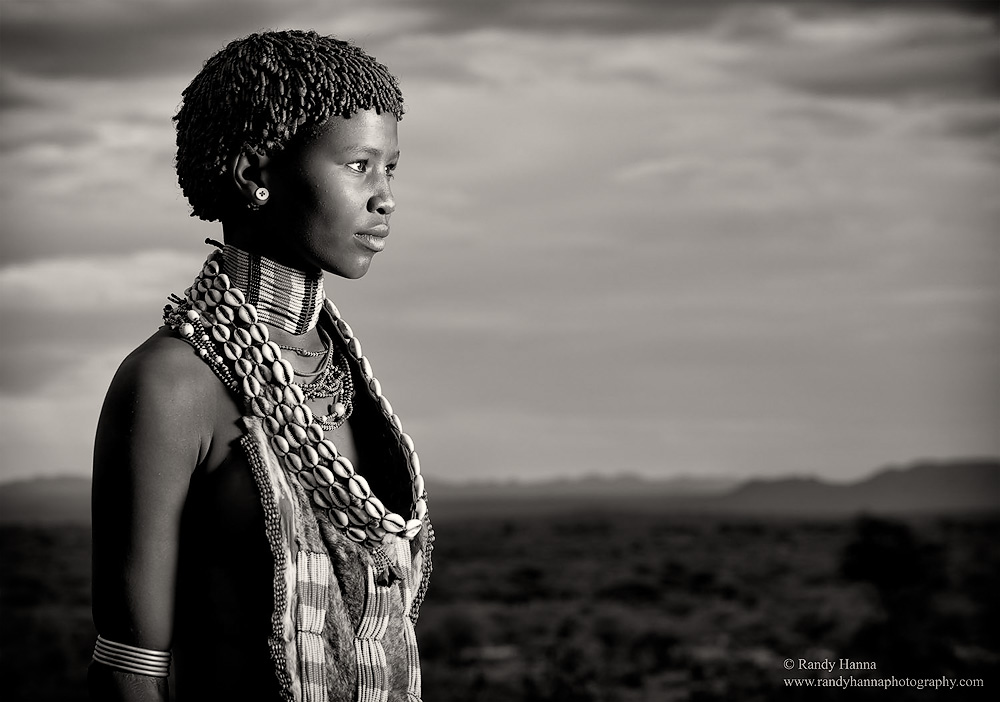
DSLR Full Frame, 70-200mm @ 200mm, ISO 100, f2.8 at 1/100 sec. Flash: Profoto B1 with 3ft Octo softbox positioned slightly to the right of the camera.
I previously mentioned ‘feathering.’ This is a term that studio photographers use to describe a technique when using the very edge of a lighting modifier. In the photograph below, I wanted to create an image with both highlights and deep shadows. To achieve this look, I positioned the flash 45 degrees off camera to the right. However, I turned the flash even more to the right so only the very edge of the softbox caught her right side. This lighting position allowed parts of the left side of the face to fall into shadows while concurrently accenting more of the face. The presence of both highlights and deep shadows creates an image that is both dramatic and pleasing. I also paid attention to the background, placing the horizon near the bottom of the frame to avoid any distractions while still providing depth to the image. When it came to the eyes, I made sure that they were in focus and that I could catch part of the right eye by simply changing the camera angle. I purposely converted this image to black & white to create an image that was ‘time-less.’ Although there are many software programs to aid in the black & white conversion, I almost always prefer to make the conversion by hand in Photoshop because I believe it provides more control.
SHOOTING TIP: Take time to explore your images in black and white. You could surprise yourself when you convert some of your images to B&W. If you don’t like the image in color, give it a try. Google’s Silver Effects is now free and is one of many top-notch conversion programs. Above all, watch your horizons – place them with care.
I’m back in Ethiopia this November with limited openings for a remarkable journey of a lifetime. Click here for info.