Ted Maddux Takes Flight with His Camera

red.jpg

One of the things I like about leading digital photography workshops is that I get to meet some very talented photographers, as well as all around great people. Ted Maddux is both a great photographer and a ton-of-fun guy.

Recently, Ted participated in an air-to-air photo workshop organized by my friend Hal "Bull" Schmitt, who heads up Light Photographic Workshops.  

20130512-_DSC4583.jpg

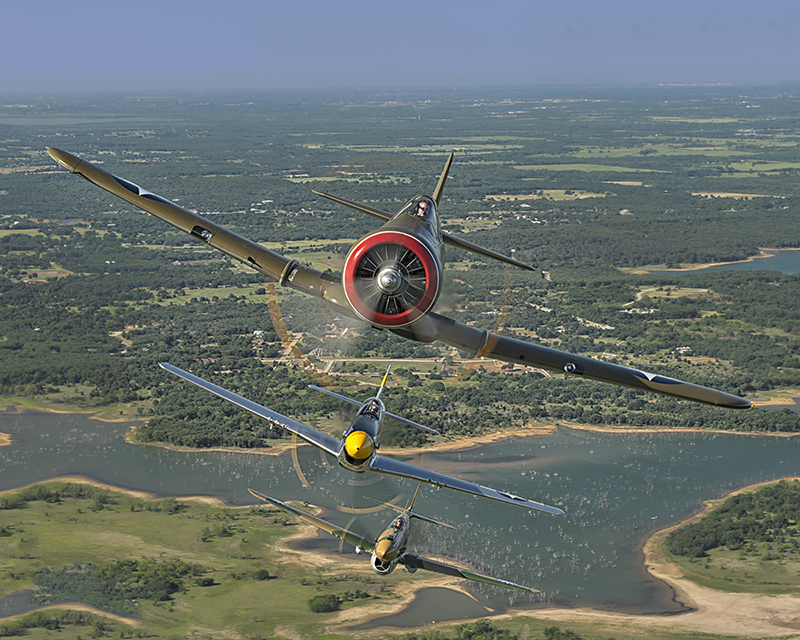
Ted's images were so good that I thought I'd share a few with you. Not bad for a photo enthusiast. :-)

Here's what Ted had to say about the workshop: "

Air to air photography is as good as it gets. The promo read, "Join Hal "Bull" Schmitt and industry leading aviation photographer Scott Slocum for a hands-on, heart-pounding aviation photography experience. I took this workshop with my son-in law (we were both on an Alaska workshop with Rick and Hal). We had an epic trip and will do it again. Expensive, yes. Value, 11 on a scale of 10. A trip you will never forget with some great people. Every person in our workshop had stunning photographs and a great experience. Hal and Scott thanks again."

20130513-_DSC6172.jpg

Bull is currently planning more air-to-air workshops. Stay tuned to Light Photographic Workshops for info. 

And Bull and I are doing a Death Valley Workshop next year. We hope you can join the fun. Ted "Mr. Fun" Maddux was the first to sign up.

20130512-_DSC3519.jpg

Explore the light,
Rick

This post sponsored by x-rite. X-Rite is the global leader in color science and technology. The Company develops, manufactures, markets and supports innovative color solutions through measurement systems, software, color standards and services.

Check out these cool x-rite products:
ColorMunki
Passport Color Checker

Sign Up Early for My Digital Photography Florida Photo Caravan and Save $100

Creative composition and mastering exposure will be just one focus of the workshop.

Creative composition and mastering exposure will be just one focus of the workshop.

The dates are set for my 4th annual Photo Caravan, which starts in historic St. Augustine and ends in sizzling South Beach. It's a digital photography workshop that includes a ton of fun.

Sizzling South Beach at night.

Sizzling South Beach at night.

Dates: January 24 - 30, 2014. Cost is $950 - but we have an early bird special of $850 if you sign up before August 31. Plus, there is no charge for a non-photographer spouse.

A cool HDR shot from the cool Colony Hotel in Delray Beach.​

A cool HDR shot from the cool Colony Hotel in Delray Beach.​

Max number of photographers: 10 - so you get personal advice from yours truly.

You'll learn about: HDR, fill-flash, people photography, landscape and seascape photography, bird photography, sunrise and sunset photography, action photography, Photoshop, plug-ins, close-up photography, indoor photography, nighttime photography, reflectors and diffusers . . .  and more.

​Close-up photography at Butterfly World is on the schedule, too.

​Close-up photography at Butterfly World is on the schedule, too.

Speaking of HDR, above is my favorite HDR image from the workshop, inspired by workshop participant's Bob Sherman's idea. Thank you, Bob!

We'll also cover composition and lighting.

Making vs. taking pictures is also on the agenda.

I'll help you with your people photography, natural light, fill-flash and HDR.​

I'll help you with your people photography, natural light, fill-flash and HDR.​

If you want to learn digital photography from start to finish - with a wide variety of cool subjects, shot in awesome locations (St. Augustine, Merritt Island, Delray Beach and  South Beach), this workshop is for you!

A favorite shot from Butterfly World.​

A favorite shot from Butterfly World.​

FYI: There is no fee for non-photographer spouses. So bring your loved one.

Lots of photo ops in beautiful St. Augustine.​

Lots of photo ops in beautiful St. Augustine.​

I hope to see you in sunny Florida!

You'll love making pictures at the Magic Beach Motel in St. Augustine

You'll love making pictures at the Magic Beach Motel in St. Augustine

See my 2014 Workshops page for more info and to register. 

Explore the light,
Rick

Screen Shot 2012-12-17 at 1.49.33 PM.png


This post sponsored by Adorama - great gear at great prices.

Rick's List: Gear Recos for My Southwest Photo Caravan

rick sammon 2.jpg

Here's another "Rick's List" – my gear recos for my 2013 Southwest Photo Caravan. The workshop is full, but I though I'd post this info again for those who may be traveling to the same locations . . . which are:
- Arches National Park
- Dead Horse Point State Park
- Bryce Canyon National Park
- Zion National Park
- Awesome Junkyard
- Thunderbird Restaurant (you can play golf here if you like)
- And anything else we find to shoot along the way!

We'll also take a late afternoon boat ride on the Colorado river for even more photo opportunities. An authentic BBQ dinner will follow.

My 2014 digital photography workshops are fulling up. They are listed on my 2014 Workshops page.

I'm a Canon shooter, so the cameras/lenses listed here are Canon - but all shooters are welcome on my workshops. We shoot together, process together and have fun together.

© rick sammon.jpg

Cameras 
Digital SLR - for the ultimate creative control

Lenses 
17-40mm lens – for landscapes
24-105mm lens  –  for tighter landscapes
8-15mm lens – for cool shots at the junkyard

093V2503.jpg

Accessories 
Polarizing filter - to darken a blue sky/whiten white clouds and to reduce reflections on water.
Neutral Density filter – for shooting at long shutter speeds in bright light.
Sturdy tripod –  for sharp shots before sunrise and after sunset.
Head-mounted flash light – so you can see what you're doing before sunrise and after sunset.
Powerful flashlight –  for painting with light. The link suggests just one flashlight option. This accessory is not absolutely necessary. On my workshop, we will have a few lights on hand, but the more the merrier.

rick sammon 1.jpg

Camera Bag
Backpack style – because you'll be hiking around.

Computer Stuff 
Laptop – for on-site image processing. Yes! PC users are welcome, too!
Portable hard drive – for backing up your images.
Plenty of memory cards and a card reader –  to record and transfer your images.
HDR program – Photomatix or HDR Efex Pro for HDR image processing.
Power strip – so you can easily plug-in more than one accessory.

rick sammon 2.jpg

Other
Hiking boots
Hat
Sunscreen

This workshop requires some hiking. The hikes are not that long, but they are not that short. :-)  

Recommended Reading/Viewing
My Kelby Training classes on Light and Composition.

Shoot me an email with any questions you have about my workshops.

Explore the light,
Rick

This site powered by (designed and hosted on) Squarespace. Use one-click to get started with your own awesome Squarespace site.   

Today's Guest Blogger: Denise Ippolito

Image 1.jpg

I recently had the good fortune to work with Rick Sammon in France, his fun spirit and wealth of knowledge made the workshop a great success. I wanted to share some of my tips for using a tripod for flight photography, Rick was kind enough to ask me to do a guest blog post, so here goes…

Tripods, Flight and A Handicap? By Denise Ippolito

I took some of the images in this post in Bosque del Apache, where I am leading a workshop later this year. Info here.

I get asked all the time how I, as a woman, have the strength to hand hold my big lens for flight photography. The answer is I don't, I am not able to hand hold my Canon 500mm lens mounted on my Canon 5D Mark III for long periods of time. Yes, I can pick it up, aim it at my subject and shoot away--but only for a limited amount of time before I need to rest my arms. That is about the time when the action starts and I will of course miss something. I don't leave it to chance very often when I am out in the field. Even for static subjects I find that having my big lens mounted on a tripod makes it so much easier to do for long periods of time.

I like to rely on my Gitzo GT3530LS Tripod and yes, I am sponsored by Gitzo, however it is worth pointing out that I have been using Gitzo tripods since I began my career - long before the company ever heard of me. I only seek sponsorship from companies that I like and whose products I use for my own photography. That has been my motto from the start.

Not only do I rely on my tripod but my tripod head plays an equal part in my ability to capture all of my wildlife images. Since wildlife is moving, flying, resting, turning, etc. I need to be on my toes and my gear needs to keep up with me. I now use the Mongoose 4th Generation M-3.6 Action Head w/the Integrated Low Mount Arm & Integrated Flash Arm but I have successfully used the Wimberley WH-200 Gimbal Tripod Head II with Quick Release Base for years.

The only reason for the switch was the weight. The Mongoose is much lighter and it can fit easily in my bag when traveling and since I have been traveling a lot lately that was a strong consideration. I also like the bottom mount Mongoose; the side mount Mongoose heads are awkward for me and require that I hold the lens in mid-air while I attach it to the head; with a bottom mount I can rest the lens on the mount while trying to attach it. Either head allows the smooth fluid movement that I want. Whichever head you choose it is important to balance your lens properly by moving the plate forward or backward as needed.

Having your tripod collar and both controls (pan locking knobs - vertical and horizontal) loosened will allow you to smoothly track your subject for flight or action shots. If you are standing for flight shots it is very important to have your tripod level, your feet spread approx. shoulder length apart and your tripod extended so that you are fully upright - bending over or downward to capture flight shots is awkward. Another tip I use is to pre-focus. I find something roughly at the same distance as where I expect to pick up the birds and pre-focus on that. Now I am able to follow the bird in the viewfinder until I am ready to lock focus on it.

Image 2.jpg

There is a right and wrong way to mount the Mongoose Low Mount or Wimberley Version II head on your tripod. Your controls should be on the left side (whether you are right or left handed) so that when you have your finger on the shutter button with your right hand your left hand is free to work the controls if needed. Having the controls on the right side and having to take your finger off the shutter button makes no sense at all to me. Being ready for the shot and setting up your gear for success is the first step towards making great pictures.

When working with a long lens that is mounted on a tripod, press your head firmly to the eye piece while resting your hand on top of the barrel of the lens above the tripod head.  Some folks like to hold the bottom of the lens; I find this effective when pointing my lens downward but either way will help to eliminate vibration. When photographing action or birds in flight remember to keep your shutter speeds high. I am usually working between 1/1600 sec. and 1/2500 sec. with my ISO never going below 400. This can be a lot to think about when out in the field but believe me it will become second nature and you will not even know you are doing it after a while.

Image 3.jpg

I also don't like having straps flapping in the wind and in front of my camera or controls when my lens is mounted on a tripod. This is something that I see folks playing with all the time in the field and it can be quite distracting.

I also see a lot of folks messing with inferior heads that slip down while they are taking pictures. It's funny how they try to time the slipping - they are often making excuses saying things like yeah, I know it slips but if I catch it just right I'll be okay. That is insanity! If you want quality images you need quality equipment. I once heard someone say that it is not the equipment but the photographer that makes great images and yes that is true, however you wouldn't try to cut a piece of trim molding with a dull bow saw would you? Having the right gear <strong>is as important </strong>as knowing how to use it.

Image 4.jpg

Teleconvertors are great as they allow you to extend your focal length however; they will make acquiring focus much more difficult. I often take my teleconvertor off when trying to capture flight images against a varied background or when your subjects are coming out of nowhere and you only have an instant to lock focus. I also don't use a teleconvertor when the light is not quite bright enough, like in the pre-dawn, etc.. When you can see your subject coming into the frame and you have time to set-up the shot and lock focus then a teleconvertor can be great - you just need to practice using one.

So, do I think using a tripod can be a handicap when it comes to flight photography - the answer to that question is yes!! Absolutely! Hand-eye co-ordination is a very natural thing. Having any instrument in-between that function creates a new learning process that will take a lot of practice to master. Using the techniques explained above and devoting your time to your craft is the most important thing you can do to up your keeper rate and to stay in the game. Yes, a handicap but no, not forever :).

Thank you again, Rick, for having me as a guest blogger! 

Take a Creative Adventure with Denise over on her web site.

This site powered by Squarespace. Create your own cool space. Now. 

Fine Art Print of the Week: Camargue Horses

rick sammon for print.jpg

I'm printing and autographing a limited edition of one of my favorite images of the Camargue horses. 

photo copy.JPG

The photograph will be printed on Ilford Smooth Pearl 11 x 17-inch paper on my Canon PRO-10 printer. iPhone shot above shows position of print on paper and signature.

Price is $149 and includes shipping and packaging. US Shipping only.

Questions: Please email me. Payment is via paypal to ricksammon@mac.com.

Explore the light,
Rick