If I Could Recommend Only One . . .

© Rick Sammon copy.jpg

It's a tough choice, but I was thinking that if I could recommend only one camera, one lens, one accessory, and so on, what would it be? So I got to thinking and put together this list. Here goes.

Camera: Canon 70D - With 20 Megapixeles, built-in wireless, full HD movie and vair-angle touch screen, this is a feature-packed camera at a great price.

Lens: Canon 24-105mm IS lens - This is my go-to lens for people and street photograhy. It's also good for landscapes and environmental widlife photography.

rick sammon north wales.jpg

Filter: Tiffen 2-8 Stop ND Filter -  If you enjoy photographing moving water, this filter will help you get slow shutter speeds even in bright light.

Memory Card: Lexar 16GB Professional Compact Flash Card - Check out my Travel Galleries here on my site. All those pictures were captured on Lexar cards.

Camera Bag: Lowerpro Vertex 300 - This is the bag that has been with me around the world – in rain, sleet, show and ice.

_Rick_Sammon_2.jpg

Lightin Accessory: Westcott 28-inch Apollo - I used this softbox to create my "Girl with a Pearl Earrning image.

Reflector/Diffuser Kit - Well, I guess I have to recommend my own kit: Rick Sammon's On-Location Lighting Kit. It comes with a cool tote and even a diffuser for your flash.

Calibration Device: Color Munki - It does not matter: If you are into true color or your color, you need to calibrate your monitor and printer. This cool device does the trick, quickly and easily.

Tripod: Induro CT214 - Don't skimp out on a tripod. If you do, you'll just wind up getting a better one . . . eventually.

rick sammon wales.jpg

Ballhead: Induro BHL1 - For flexibility in the field, for vertical and horizontal shots, this ballhead can't be beat for the price.

Camera Strap: Black Rapid - Yes! It does take some time to get used to seeing your camera hang upside down, but this strap offers the fasting shooting possible.

Portable Hard Drive: Western Digital Passport 2TB - On the road you gotta back up. It's a must. This portable drive not only stores your images, but it can be password protected.

Home Hard Drive: Western Digital Thunderbold 4TB - If you are as hyper as I am, this Thunderbold drive - with 1280 MBps (10GBsp) - is for you.

Printer: Canon Pro 10 - This wi-fi printer, with a resolution of 4800x 2400, produces beautiful color and black and white images - thanks, in part, to its Chroma Optimizer.

Web site: Squarespace -  I switched to Sqsuarepsace a little over a year ago. Squarespeace makes it soooo easy for me to post, update, blog, add images and so on. What's more, it's fun!

Expore the light,
Rick

Today's Guest Blogger: Anthony Woodhouse

AWP1.jpg

Wow! What an honor to guest blog for the "godfather of photography." Thank you Rick!

Last week, while having a meal at a pub in the Conwy Valley, North Wales with a great group of photographers on a workshop that I'd arranged with Rick, the subject of viral images came up. I proudly shared one of my images, seen above, and when Rick saw it he said, "Anthony you've got to do a guest blog." I thought he was kidding, but here I am writing a post. As Rick would say, "How cool is that!"

Capturing the image

The featured image for this post was created while on holiday in Disneyland, Paris. While my wife took our three kids on Space Mountain for one last ride before the ride closed, I took the time to go out and get this shot. Earlier in the day I used Rick's Photo Sundial app to figure out where and at what time the sun was going to go down. I knew I wanted the castle in the image, so I set up at a spot I'd selected earlier and waited for the light to change.

The image was captured without a tripod. I used a rock and a crushed Coke can to get the camera level, then pressed down hard on the camera body in the hope there wouldn't be movement - not ideal but sometimes you've got to make do with what you have to hand.

When I returned home I began processing the image in Lightroom 4. I started out with the image below. I was shooting in manual mode and exposed for the highlights. As you can see from the histogram, there's no clipping in the highlights. There is, however, a little clipping in the shadows, but this can be easily recovered in Lightroom.

AWP2.jpg

Settings were: ISO 100 to minimize the noise in the image. Shutter 0.8. Focal length 25mm (it was at 24mm, the widest the lens would go, but must have moved on the Coke can!) Aperture f22 (I wanted as much of the scene to be in focus, so I used a small aperture and focused one third into the scene to get a good depth of field). Camera, Canon 5DMK2 lens 24-70 f2.8  

Post Processing

To start the post processing, I enabled lens correction, which corrected distortion, chromatic aberration, and lens vignetting. Then I did the following (in order of the sliders).

Moved the temperature slider to intensify the color of the sky and to increase the overall warmth of the image. Reduced the exposure to darken the whole image. Increased the fill-light to recover details in the shadows. Reduced the blacks to improve the contrast. (TIP: Hold down the Alt key when moving this slider to show clipping so you don't go too far and send your blacks to pure black). Increased the brightness and contrast. Increased clarity to really make the image pop. Increased vibrance (this increases the vibrance of the colors that aren't already saturated and leaves the already saturated colors).

As Rick would say, "The name of the game is to fill the frame," but in this case I decided to follow another one of Rick's tips – "Cut the clutter" – and cropped the image to the 16:9 format for a stronger composition.

Then I added a vignette with a large enough feather to draw the eye to the center of the image, and finally brightened the castle with an adjustment brush to increase the exposure to make it really stand out.  

AWP3.jpg

Below are my before and after images. Kinda cool what you can do in Lightroom!

AWP4.jpg

Thanks again for the opportunity, Rick.

Your readers can lean more about my work on my web site

1291-43195.jpg

Join My 2014 Iceland Adventure: Small Group, Big Fun - Awesome Photo Opportunities

rick sammon iceland.jpg

I am taking a small group of photographers (8 to 10) to Iceland in 2014 for a photo adventure that can't be beat. Dates are October 6 to 16.

I'll take to you locations where you can make pictures like the images I've posted in my Iceland Adventure gallery.  I'll also help you process your images in Lightroom and Photoshop.

What could be cooler! 

Shoot me an email for information on this exclusive adventure. 

Explore the light,
Rick

Today's Guest Blogger: Rob Dweck

dweck001.jpg

Welcome back Rob! It's great to see your wonderful work here again. Take it away. - Rick

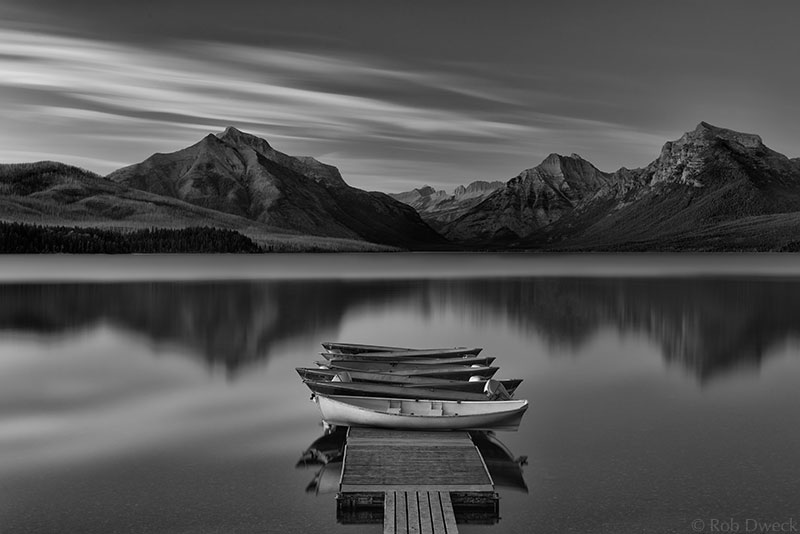
After my previous guest blog appeared here, Rick asked me to do another post showing how I processed the opening image. I realized that showing each adjustment could result in a very long post, so I’m breaking it down to the essential steps to keep it from becoming a novel.

The workflow I used for this is fairly typical of my process, although it can vary depending on the image. It all starts with the RAW file that you see below. Usually when I begin working on an image I have a clear idea of the final print. In this case I had originally envisioned a color image and hadn’t intended to convert it to black and white. After working on the color version, I decided to open it in Nik Silver Efex Pro. I instantly saw the potential as a black and white and continued in that direction.

dweck002.jpg

I imported the RAW file into Adobe Photoshop Lightroom where I made global adjustments to white balance, levels, contrast (using the tone curves) and exposure. Although Lightroom has some tools for targeted adjustments, I prefer doing those in Photoshop where I have more control.

I exported the file and opened it in Photoshop and began the cleanup phase. With a 314 second exposure, noise will almost always be an issue, so the first step was reducing it with Nik’s Dfine plug-in. Going through the image at 100% magnification I removed dust spots and any other artifacts that were present. Then I needed to remove everything that I felt didn’t belong in the image: The sign on the dock, The boat moored to the right of the dock, the pole in the water, the lights on the shore of the lake and other minor distractions were all carefully removed using the healing brush and clone tools.

dweck003.jpg

The next step was making and saving selections of each area of the image in which I wanted to make targeted adjustments. The four main components of the image are the sky, mountains, water and the boats and dock, so each component was selected as you can see in the channels window on the bottom right. I also made additional selections for the interiors of the boats as well as the interior and exterior of the yellow boat in front. By saving these selections, I could later apply adjustments to specific areas of the image without affecting the other areas. All of these selections greatly increase the size of the file, but I feel it’s a worthwhile tradeoff.

dweck004.jpg

Above is the image converted it in Nik Silver Efex Pro. The image was beginning to take shape, but still far away from the final image I envisioned. This is where all of the selections from the previous step come into play.

dweck005.jpg

Using the selections I made earlier, I made curves and levels adjustments on each area of the image. I also added adjustment layers to reduce some halos around the bottom of the dock and in the sky. A luminosity mask was also added to fine tune the highlights. (Luminosity masks provide a powerful way to make adjustments based on brightness levels. For an introduction to these techniques see the tutorial by Tony Kuyper at http://goodlight.us/writing/luminositymasks/luminositymasks-1.html)

One of the most important effects I was aiming for with these adjustments was to create more depth in the image. Since a photograph is a two dimensional representation of a three dimensional scene, shaping the light in processing can give the illusion of depth by guiding the viewers eye through the image. Many of the adjustments were done to accentuate the distance between the dock in the foreground and the mountains on the other side of the lake.

Some of these adjustments were just small tweaks while others were stronger and more obvious. When combined, they dramatically alter the tones in the image. Vincent Versace likens Photoshop to a sledgehammer that should be used as nail file. It provides many powerful tools that it’s easy to go overboard and destroy your image. Using it to carefully fine tune an image with several subtle adjustments will often get more satisfying results.

dweck001.jpg

The finishing touches were some dodging and burning on the mountains and a vignette around the entire image. The important considerations here were getting a good balance of tones between the mountains and the sky and keeping the subtle texture of the rocks in the water at the bottom of the frame. If the vignette was too dark, that texture would be lost.

The process from RAW conversion to finished print took over 10 hours – maybe even closer to 20 hours. The RAW file provided a jumping off point for me to create my own interpretation of the scene. I actually have several versions - there is a color version, which I initially preferred over the black and white, but I soon came to like the black and white version better. I have been fine-tuning the color version for a while after I realized that it wasn’t fully cooked yet. Maybe you’ll see that one in a future post.

To see more of my work, please visit my website.

• • •  

My site is hosted on Squarespace. Give these guys a try. Awesome sites and customer service. 

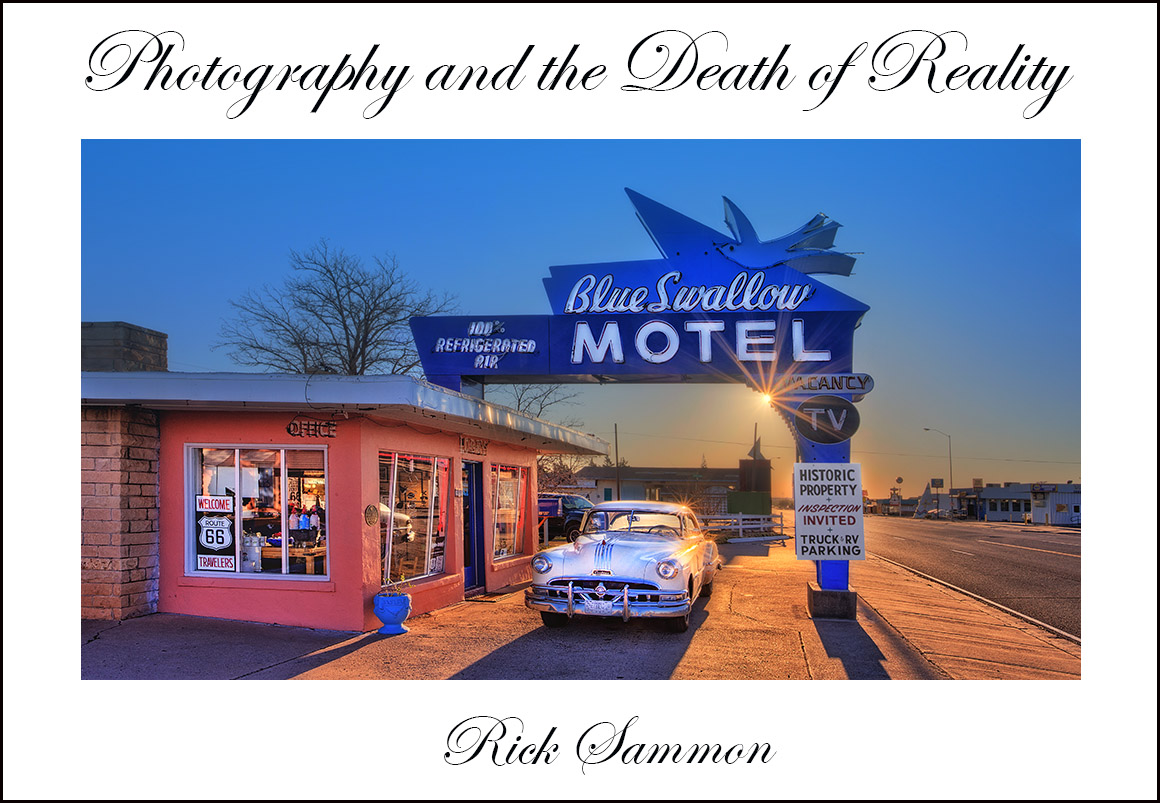
Perhaps My Next Book: Photography and the Death of Reality

death of reality rick sammon.jpg

Photography and the death of reality.

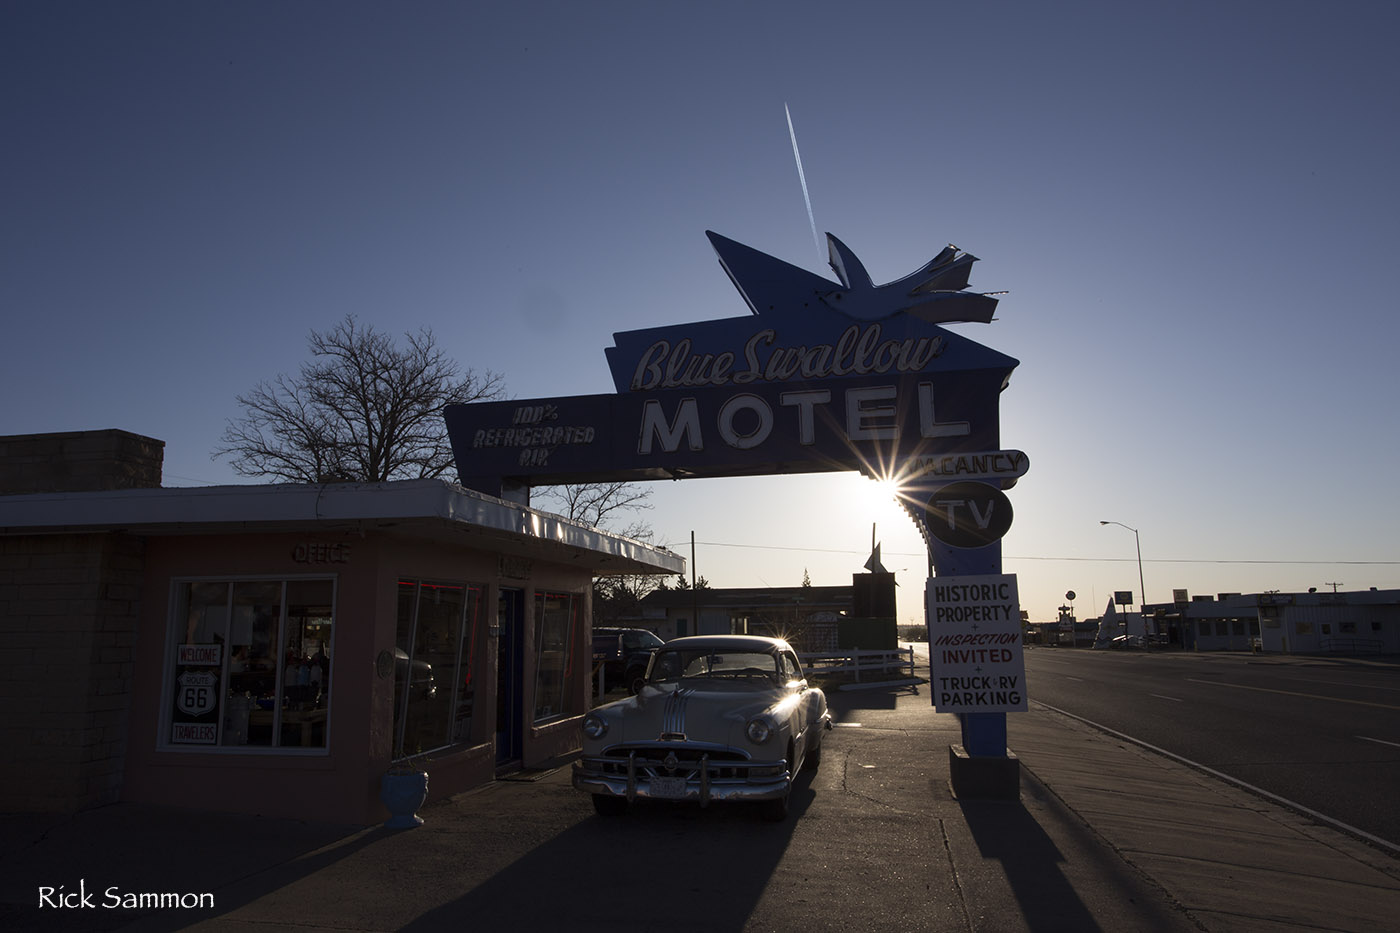
It is not a new concept, but I think about often. A photograph, even if it is not digitally enhanced (or chemically enhanced), removes some of the reality from a scene simply by the mechanics of cameras and lenses. When a photograph is digitally enhanced, be it a photograph of a fashion model or street scene, then reality is really on the way out.

Do you agree that photography is causing us to lose touch with the reality of how a scene, person, animal and so on really looks?

Rick Sammon 1.jpg

Here is just one example.  See what I mean?

What are your thoughts on photography and the death of reality?  Post a comment.

Explore the light, and your own reality. 
Rick

P.S. John Lennon: Reality leaves a lot to the imagination.