What You'll Need for My November 2013 Wales Photo Walk/Workshop

rick+sammon+1a.jpg

My free 2013 Wales workshop starts a week from today. Can't wait to meet the new group, make new images, and work with my co-leader for this project, awesome local photographer Pierino Algieri.

Here's the basic schedule:

 Nov 5
- Group meets at 5 PM for welcome and slide show.
- Optional group dinner at 7 PM.
Nov 6
- Free Walk. We'll shoot in the AM and process in the PM. Processing will take place in the hotel in the late PM.
Nov 7
- Free Walk in AM, process and group slide show in the PM. Optional good-bye dinner with group.

rick sammon wales 1.jpg

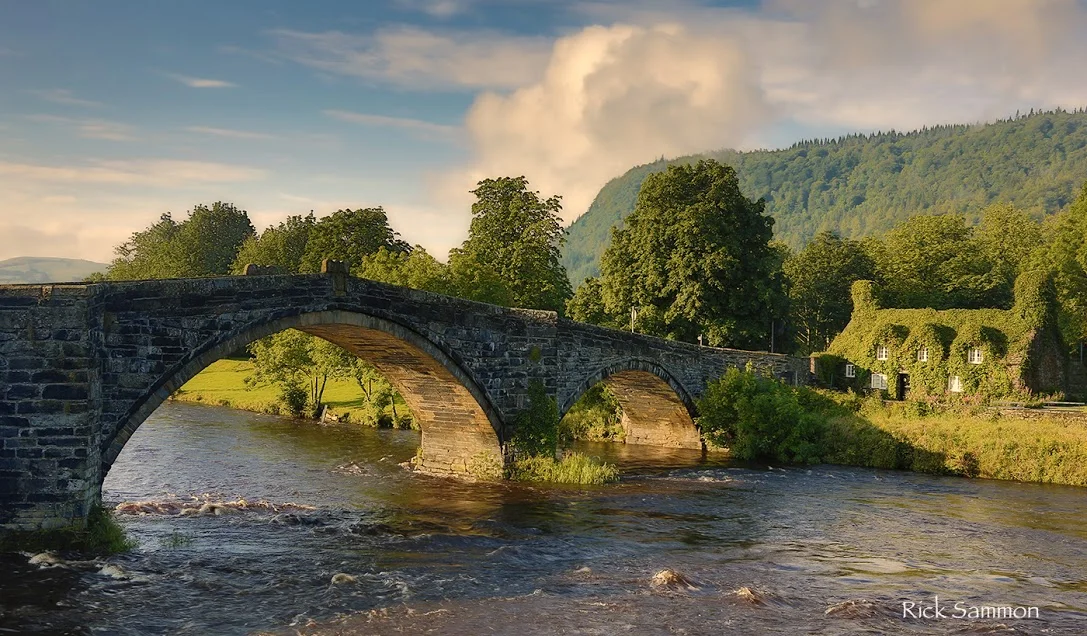
I took the pictures in the post on my 2012 Wales trip. We can't get to all these locations this year. We will, however, shoot in picturesque settings.

rick+sammon+3a.jpg

Here's the digital SLR gear I recommend, and why: 

• 17-40mm lens - for landscapes and waterfall shots
• 24-105mm lens - for landscapes and people photographs
• 70-200mm lens - for white horse shots (if we see them, which is not always possible)
• tripod - for HDR shots
• ND filter - for pictures of waterfalls
• polarizing filter - to darken a blue sky and whiten clouds
• lens cleaning cloth - to keep your lens clean.

All my gear is listed on My Gear page. 

For this walk you will also need good, waterproof hiking boots and a rain jacket/hat. 

rick sammon .jpg

If you plan to process your images (for the group slide show), you'll need your laptop, loaded with your favorite image-editing programs. If you shoot HDR, you'll need an HDR program - and know how to use it. All my plug-ins are listed on my Save on Plug-ins page.

Shows Sammon Group I.jpg

Last year, some folks shot with point-and-shoot cameras - and even iPhones. That's cool, too.  Above is one of our fun group pictures.

This year's sponsor is Visit Hiraethog. Visit their web site and you'll see why I keep returning to photograph in wonderful Wales.

A big thank you to Anthony Woodhouse, Rural Tourism Project Officer at the Conwy Government for organizing this educational and fun event.

All my 2014 digital photography workshops are listed here. 

Explore the light,
Rick

Rick+Sammon+2a.jpg

P.S. The videos I made last year are on my On-line Classes/Videos page 

Day 5: Alaska Photo Workshop Week

Click images to enlarge.

In preparation for my Alaska Adventure digital photo workshop, listed on my 2014 Workshops page, I designated this week on my blog as Alaska Photo Workshop Week. Each day I posted a few images, taken on my previous adventures, along with some tips.

Today is the last day in my series. Scroll down to see my previous posts.

Hal Schmitt, my friend and lead instructor at Light Photographic Workshops, and I are co-leading this photo adventure. We will help you make and process wonderful images in Lightroom and Photoshop - and have a ton of fun. 

Day 3: Go with a great guide/naturalist.

You may be there greatest photographer who ever lived, but if you don't have a good guide/naturalist, you may miss many great photo opportunities, and probably will not maximize your shooting and processing time when visiting a new location. This is why, wherever I go, I always work with the best guide/naturalist/tour operator.

Our guide/naturalist/boat captain on our Alaska Adventure is Captain Dennis Rogers. Dennis knows the waters, and he knows animal behavior. Those skills help his guests make great wildlife and scenery images, from dawn to dusk.

Get a good guide/naturalist and you are on your way to making good photographs. 

rick sammon alaska.jpg

Hal and I hope to see you in Alaska.

I hope you enjoyed this series.

Explore the light,
Rick

This site created with Squarespace. Create your own space. Today!

Day 4: Alaska Photo Workshop Week

Click image to enlarge.

In preparation for my Alaska Adventure digital photo workshop, listed on my 2014 Workshops page, I'm designation this week on my blog as Alaska Photo Workshop Week. Each day I will post a few images, taken on my previous Alaska adventures, along with some tips.

Hal Schmitt, my friend and lead instructor at Light Photographic Workshops, and I are co-leading this adventure. We will help you make and process wonderful images in Lightroom and Photoshop - and have a ton of fun.  

Day 4: Set Goals 

I am big on setting goals, which is something I talk about in my recent interview on Kelby Training. When you set a goal, you'll have a greater chance of making meaningful images.

For example, my goal one morning on a past Alaskan Adventure with Hal was to get a full-frame shot of a bald eagle complete with its reflection in the water. Setting that goal, I only framed my shots in a relatively small, very calm section of the bay in which the boat was anchored. Shooting in one section of the bay reduced the number of variables, mainly differences in light, exposure, rippled/calm water and the background. Once the correct exposure was set, all I had to do was point, focus and shoot . . . in that small area.

While the bald eagles that I were photographing were landing in that section of the bay, many other bald eagles were flying around the boat. There were flying against different backgrounds, in different light and at different distances. Sure, I missed a few shots, but I did achieve my goal.

Of course, you can have image processing goals, such as creating dramatic black-and-white images. All the plug-ins I use to create black-and-white images are listed on my Save on Plug-ins page.

Set goals my friends. It's kinda fun. 

I hope to see you here on my blog tomorrow - and Hal and I hope to see you in Alaska.

Explore the light,
Rick

This site created with Squarespace. Create your own space. Today!


Day 3: Alaska Photo Workshop Week

Click image to enlarge.

In preparation for my Alaska Adventure digital photo workshop, listed on my 2014 Workshops page, I'm designation this week on my blog as Alaska Photo Workshop Week. Each day I will post a few images, taken on my previous adventures, along with some tips.

Hal Schmitt, my friend and lead instructor at Light Photographic Workshops, and I are co-leading this adventure. We will help you make and process wonderful images in Lightroom and Photoshop - and have a ton of fun. We will also teach you the magic of plug-ins, which are listed on my Plugs-ins page.

Day 3: Get the Eye in Focus

Check out the eyes of these birds in flight. They are sharp, as are the eyes of the bald eagles in my previous posts in this series.

In wildlife photography, if they eyes are not sharp and well lit, I feel as though I've missed the shot.  Of course, there are exceptions to that philosophy, but that is my general feeling.

Here's what I do to get the eyes in focus: 
• Set my Canon 5D Mark III camera on the AI servo mode, which tracks the subject right up to the moment of exposure.
• As a general rule, set a shutter speed of at least 1/1000th of second. I sometimes shoot at a slightly slower shutter speed to get a bit of motion/blur on the bird's wingtips.
• Stop down two stops from the minimum aperture, which gives me more depth of field than if I were shooting wide open.
• Choose the fastest frame rate.
• Set my focus point on the subject, so that the subject, and not the background is in focus.
• Take lots of shots :-)

I hope to see you here on my blog tomorrow - and Hal and I hope to see you in Alaska.

Explore the light,
Rick

This site created with Squarespace. Create your own space. Today!

Day 2: Alaska Photo Workshop Week

Click images to enlarge.

In preparation for my Alaska Adventure digital photo workshop, listed on my 2014 Workshops page, I'm designation this week on my blog as Alaska Photo Workshop Week. Each day I will post a few images, taken on my previous adventures, along with some tips.

Hal Schmitt, my friend and lead instructor at Light Photographic Workshops, and I are co-leading this adventure. We will help you make and process wonderful images - and have a ton of fun.

Day 2: Crop Creatively 

When I used to write books, I would send my image to the publishers with a note: "Crop my pictures and you are a dead man." :-) 

You see, I did not want my pictures cropped one bit by someone else. That's because cropping has a big impact on an image. 

Yes, I compose each and every image very carefully, because as Edward Weston said, "Composition is the strongest way of seeing." But I also crop, because as I say, "Cropping gives us a second chance at composition. "

My basic cropping tip: Follow your heart. Don't get locked into the 8x10 or 13x19 or whatever format. Just crop to your heart's content. If you are going to print and frame your image, make a custom mat, or leave white space around the image.  

Also remember one of the differences between painting and photography: painting is additive, photography is subtractive. So don't be shy about subtracting. 

To learn more about composition, check out my Kelby Training class, Composition - the strongest way of seeing

I hope to see you here on my blog tomorrow - and Hal and I hope to see you in Alaska.

Explore the light,
Rick