Photomatix

One-Hour Canon EOS 5Ds Shoot: Making “Images with Impact”

Click images to enlarge.

When I teach a photo workshop, I begin by asking each participant, “What is your goal?” I ask that all-important question because setting a goal is important if you want to get a high percentage of good images.

Different photographers have different goals. I thought I had heard ‘em all, until a few years ago. One of my workshop participants, Gary Potts from Las Vegas, Nevada, responded, “I want to make images with impact.”

I helped Gary (a very good photographer by the way) achieve his goal. Gary, like many of my photo workshop participants, helped me, too. Now on my photo workshops, I often give the assignment: make images with impact.

Guess what? I often give myself that same assignment. That is what I did when I spent about an hour with Gary and my wife Susan at Techatticup, Nevada during Photoshop World 2015.

Here are my favorite images from the shoot, along with camera/lens info and some suggestions for making images with impact.

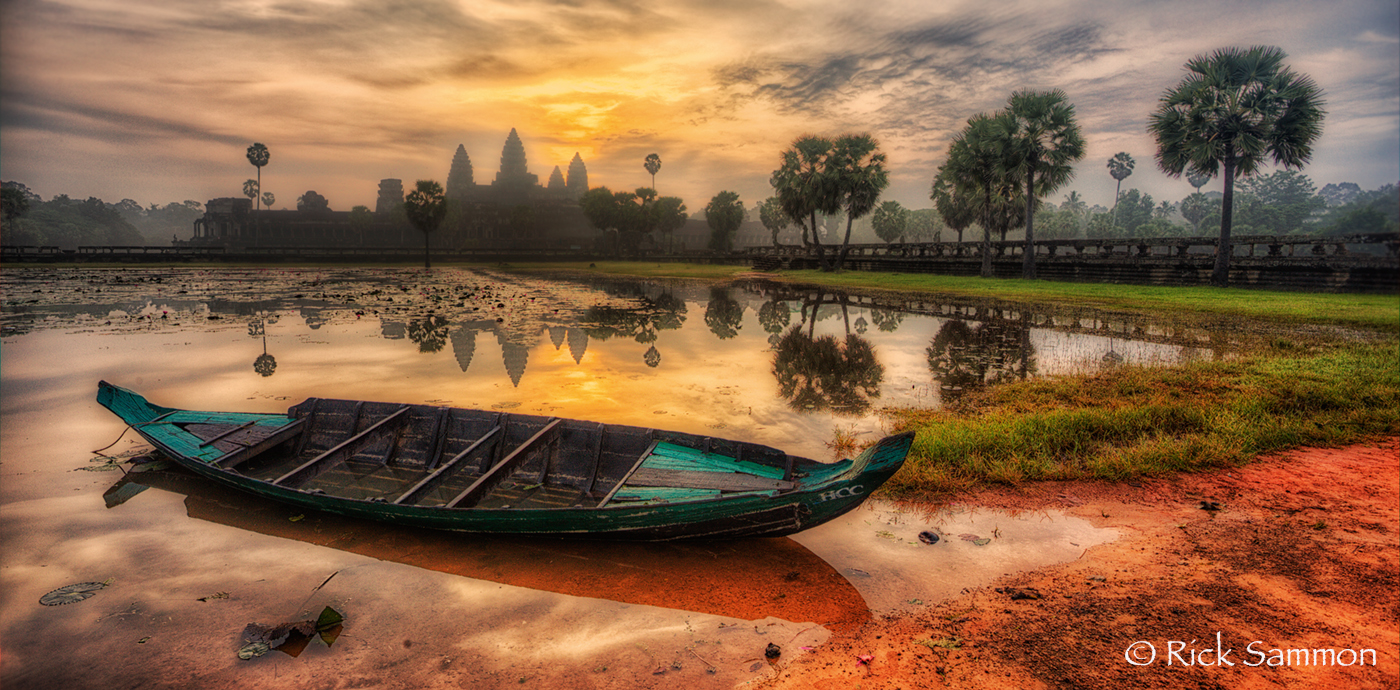
1) Opening Image - Alter time. When we alter time, but using a very fast or very slow shutter speed, we remove some of the reality from a scene. When we remove some of the reality, an image can have more impact. In the opening image for this post, I altered time by applying the Radial Filter/Zoom in Photoshop to the sky area of my photograph. That filter created the impression that my exposure was several minutes long (needed to blur very slow moving clouds), when in fact it was 1/200th sec.

To alter reality even more, I applied the Duplex Filter in Nik Color Efex Pro, which added a painterly-look to the image.

Info: Canon EOS 5Ds, Canon 14mm lens.

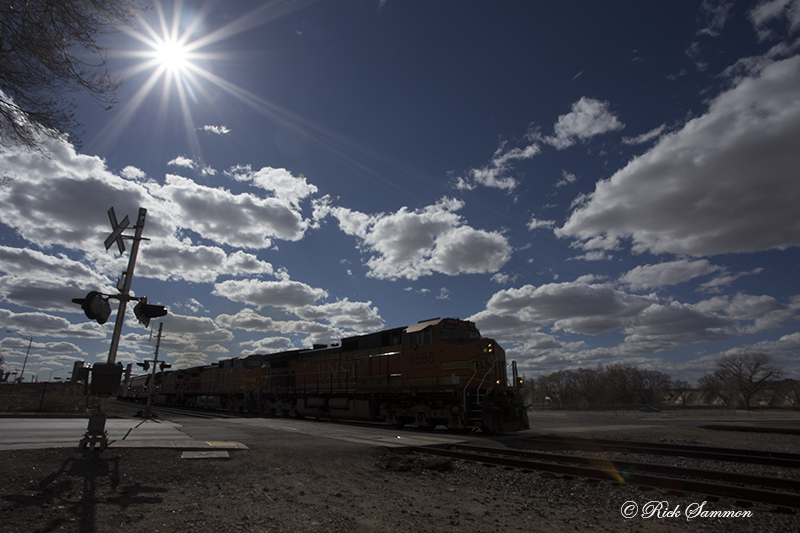
2) Above – Shoot HDR. I teach HDR on all of my photo workshops. When I teach HDR, I stress the importance of capturing the entire dynamic range of the scene: from the darkest area to the lightest area. This image was created from a seven-exposure set of RAW images. (Bracketing with 5Ds is quick and easy.) Notice how you can see into the shadows yet the highlights are not blown out. I used Photomatix (my #1 recommended HDR program) to create my HDR image. You can get a discount on Photomatix on my Plug-ins page.

Info: Canon EOS 5Ds, Canon 14mm lens.

3) Above – Get Up-Close-and Personal. If you want the person looking at one of your images to feel as though he or she was right there with you when you took the shot, shoot close to the main subject. Wide-angle lenses let us shoot close, the wider the lens, the closer you can get and still get good depth-of-field.

Wide-angle lenses also let you get everything in the scene in focus, which is how a scene looks to our eyes. The combination of shooting wide and close, and getting everything in the scene in focus, can produce an image with impact. And yes, the dramatic sky in this image, as well as the sky in the follow image, helps to create an image with impact . . . but remember: it’s the way the sky is captured (with a super-wide angle lens here) and processed that adds impact.

This is an in camera HDR (0 EV, -2 EV and +2 EV) image. For this and the following in-camera HDR image, I chose the Art Vivid mode.

Info: Canon EOS 5Ds, Canon 14mm lens.

4) Above – Go Ultra Wide. Following up on using wide-angle lenses, if you want an image with impact, going ultra wide can help. Ultra wide-angle lenses not only help us capture extra wide areas of a scene, but they also bend light and subjects in a cool and interesting way, which can produce an image with impact, as illustrated by the way the clouds are dramatically captured in this in-camera HDR (0 EV, -2 EV and +2 EV) image.

There is something else about this image that creates an image with impact: incredibly sharp detail, which is a testament to the capture quality of the camera’s 50.6 MP image sensor. And speaking of the camera's capabilities, the in-camera HDR is awesome.

Canon 5Ds, Canon 14mm lens.

 5) Above – Combine Techniques. This image combines a few image-with-impact techniques: shooting HDR (Photomatix again), going ultra-wide (Canon 15mm lens), getting it all in focus, adding some texture and color in Nik Color Efex Pro, and having an interesting subject, which of course helps us create an image with impact.

Info: Canon 5Ds, Canon 15mm lens.

6) Above – Use Plug-ins. Plug-ins can help create images with impact. Plug-ins can also help us awaken the artist within. I used the BuzSim filter in Topaz Simplify (also listed on my Plug-in page) to create this painterly-quality image, which is a close-up of a section of the rusting truck in the vertical image above. Yes, shooting close-ups is also a technique for creating images with impact, especially when you fill the frame with color and detail.

Info: Canon 5Ds, Canon 24-105mm IS lens.

If you want more tips, tricks and techniques for making images with impact, as well as some image-processing techniques, check out my latest (and 36th book), Creative Visualization for Photographers.

If you like photographing old cars, check out my Capture the Classics workshop in Atlanta (where I took this image) later this year. Good fun in an awesome location.

If you can’t make a photo workshop, check out my KelbyOne on-line classes.

Explore the light,
Rick

Get My HDR Book For Free - and Get a Discount on Photomatix

Much to my surprise, and talk about big surprises, one of my 36 books, Rick Sammon's HDR Photography Secrets for Digital Photographers is free on this site.

Be that as it may . . . if you are new to HDR photography, or if you are looking for an awesome HDR image processing program, you can get a 15% discount on Photomatix, the HDR program I used to process almost all of the images in my book, including the cover, on my Play & Save on Plug-ins page.

Need a quick getting started lesson on Photomatix? Check out my video on YouTube.

Want even more HDR info? Check my iHDR app over on My Apps and Books page.

I also teach HDR on my workshops.

Explore the light,
Rick

Goodbye HDR! Hello EDR?

1 © Rick Sammon.jpg

Goodbye HDR! Hello EDR?

Digital HDR (high dynamic range) photography has been around for years. Before digital HDR, film and wet darkroom photographers, including Ansel Adams, created HDR-like images by using various techniques – including, but not limited to, burning and dodging.

I've always liked a good HDR image, mostly where the image does not look as though it was processed with an HDR program such as Nik HDR Efex Pro and Photomatix - the two HDR programs I use to create images that don't look like HDR images . . . if that makes sense.

Info on those programs, both of which I teach, is on my Save on Plug-ins page. 

HDR, as you may know, has gotten a bad rap. Do a Google search on "I hate HDR" to see what people are saying. (As an aside, I had a bad wrap a few weeks ago at a roadside deli. The tortilla was soggy, as was the lettuce.)

2 © Rick Sammon.jpg

Recently, someone said about my work, "He's overly fond of HDR." Perhaps that's because I teach HDR, in addition to teaching natural light photography and speedlite photography, on my workshops. Or maybe it's because I have an HDR app - iHDR. That's only one of my 12 apps. Most of my apps feature straight, non-HDR shots.

Fact is, I only shoot HDR about 10 percent of the time. Anyway . . . .

I still like  HDR - the shooting part and the processing part. Mostly, my goal these days is to create an image that does not look like an overly processed, or "over cooked," image. That said, I have been known to go over-the-top when it comes to HDR. That was, and is, good fun.

3 © Rick Sammon.jpg

Because HDR has such a bad rap, I thought I'd change the name of my HDR images to EDR images. EDR stands for Extended Dynamic Range.

To bring out the detail in that top left scene, HDR shooting and processing was needed to create the image on the top right. By the way, we shoot at this temple on my Rick's Backyard Workshop, which is a ton of fun.

© 6 Rick Sammon.jpg

Even the opening  image for this post is an EDR image. I created it in Lightroom by cropping and then by adjusting the Shadows, Highlights, Contrast, Exposure, Whites, Blacks, Clarity and Saturation . . . and then by making it a black-and-white image. The train was moving fast when I took the shot. So I guess you could say this is a one-shot HDR image, but now I'm calling it a one-shot EDR image.

4 © Rick Sammon.jpg

By the way, many of my fellow pros are now using Lightroom and Adobe Camera RAW to create HDR, oh I mean, EDR images. It's amazing how, with these programs we can open up shadows and tone down highlights to create EDR images. So much so that you don't need to shoot and process HDR in medium contrast situations.

5 © Rick Sammon.jpg

In extreme lighting situations, such as the one above, a series of images is needed and processing in an HDR program is required.

©  rick sammon.jpg

Above is also an EDR image that I made in Iceland. It's a JPEG HDR, with a bit of tweaking, of three RAW files that I took with my Canon 5D Mark III, which has built-in HDR. My tweaking included using the Detail Extractor filter (which I call the HDR simulator filter in Nik Color Efex Pro).

rick sammon.jpg

So whatta ya think my friends? Should we replace the term HDR with EDR? Hey, maybe I could write another book or do another app!

In reality, it really does not matter what we call HDR/EDR. Because what's in a name?  Art is art and a photograph is a photograph. My guess is that not many people asked Ansel Adams, "How much burning and dodging did you do on that image?"

Leave a comment here in the Comments if you'd like. I'd like to hear from you. 

FYI: When I first heard about HDR and saw some cool HDR images, I thought HDR stood for High Do-it-Yourself Rockin' Images. :-) 

Explore the light,
Rick

rick sammon camargue horses 8.jpg

P.S. When it comes down to it, I think I like photographing people the most. Check out my World Portraits gallery to see some of my favorite images. However, my favorite recent photograph is this one of several Camargue horses running toward me at top speed.

Photomatix Pro 5 is Here - for the best HDR ever.

rick sammon-1.jpg

Good news for HDR photographers: Photomatix Pro 5 is the best version every for the best HDR. New features include: Contrast Optimizer Tone Mapping for realistic-looking results, new Fusion method for real estate photography, multiple batching settings, and an option to enable fusion from a single RAW file. All very cool features. If you can't wait to order Photomatix, click here to get to my Play & Save on Plug-ins page.

Screen Shot 2013-11-20 at 7.38.53 AM.png

To test drive Photomatxi Pro 5, I reprocessed one of my favorite HDR sequences, taken in the Colony Hotel in Delray Beach on my Florida Photo Caravan workshop.

Screen Shot 2013-11-20 at 7.34.55 AM.png

Here's a look at the new interface, and here are a few quick tips: work with the histogram displayed, play with presets, start by adjusting the black and white points to control the shadows and highlights in the scene, use lighting adjustments to eliminate halos - the dead giveaway to a poorly processed HDR image.

You can download Photomatix Pro 5 (and save 15%) from my Play & Save on Plug-ins page. All of my favorite plug-ins are listed on that page.

Explore the light,
Rick