Speedlites

Good Fun and Learning at My Latest Sammon Speedlite Session

rick sammon.jpg

Photographers who attend my photo workshops know that I like to make learning fun while making pictures (rather than just taking pictures). I demonstrated that philosophy during my Canon/Westcott speedlite session yesterday at Adorama's New York City store.

Photo by Richard Cohen. That's me behind the lens!

Photo by Richard Cohen. That's me behind the lens!

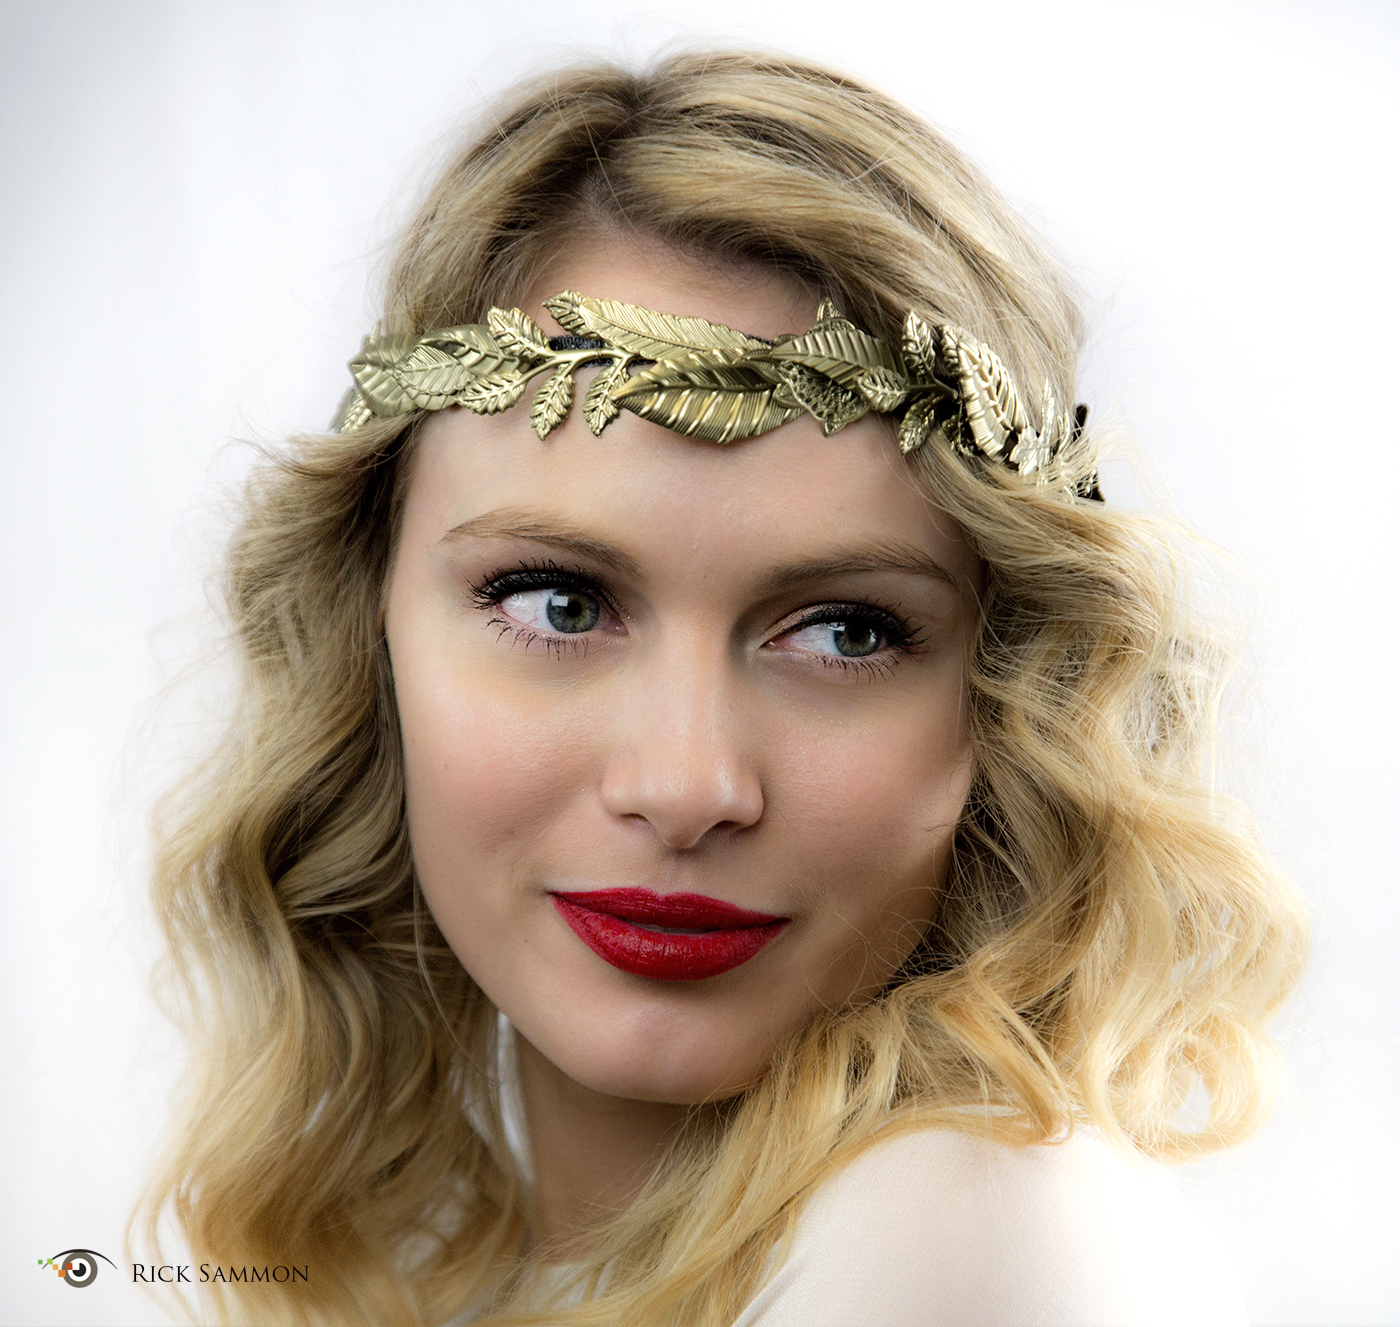
Yes, we had a great model, Rebecca West, and great gear. But what about shooting in a relatively small space in a busy store – in front of a standing-room-only crowd on a Tuesday afternoon? A challenge, yes – but a good one. I love challenges. As I said to the crowd at the opening of my presentation, "If you can make a good speedlite portrait here, you can make one anywhere."

The opening image for this post is my favorite image from the shoot. My gear for this portriat:
• Main light (positioned above Rebecca): Westcott Rapid Box 26-inch Octo Softbox - with Canon 600EX-RT speedlite
• Fill light (positioned beneath model) Westcott Eyelighter
Canon ST-E3 Speedlite Transmitter
Canon 24-105mm IS lens (my favorite lens)
Lexar 32GB Compact Flash card.

I shot tethered into Lightroom on my MacBook Pro using a Tether Tools cable.

All of the images here were taken with my speedlites set on the ETTL mode. Hey Joe Brady - I know you love manual, but I'm an ETTL guy. I mentioned our video during the shoot.

The exposures for all the images in this post were fine tuned, quickly and easily, from my camera with the Canon ST-E3 wireless transmitter.

I converted my color file to black-and-white with Macphun's Tonality Pro. Click here to see all my plug-ins.

Photographs by Richard Cohen

Photographs by Richard Cohen

Speaking of challenges (which I often see as opportunities), I often like to give audience members the opportunity to shoot during my speedlite sessions – after I set up the lighting gear and offer some quick tips. Above are two photographs by audience member (and first-time in-studio speedlite shooter) Richard Cohen.

Left: Westcott Apollo 28-inch softbox (Canon 600EX facing toward the back of the softbox and zoomed out all the way) placed to the side and slightly behind Rebecca. Thanks Jack Reznicki for showing me this technique.

Right: Westcott Apollo 28-inch softbox placed in front of and to the side of Rebecca, and a Canon 600EX-RT held directly behind Rebecca's head.

Nice work, Richard!

Thanks to all those to attended my seminar, and thanks to Adorama for hosting the event.

For more basic lighting tips, see my iPad and iPhone app, Light It!

I hope to see you on one of my workshops. I promise you, you'll learn a lot and have a lot of fun.

Explore the light,
Rick
P.S. I also give private speedlite (and Photoshop and everything else) lessons. Shoot me an email for info.

Westcott Shoot-and-Scoot Weekend

 Click to enlarge images.

My friends know me as the "shoot and scoot" photographer. At home and around the world, I like to shoot fast - and then move on to the next location or project.

This past weekend I had two, two-hour Westcott shoot-and-scoot photo sessions: One on Saturday and one on Sunday.

Saturday: For the first hour we shot at my house. For the second hour we shot at a local bed and breakfast.

The concept: to illustrate that you don't need a ton of expensive lighting gear and an expensive studio to get great shots – if you have the right gear and a bit of photo know-how.

Above: I shot tethered to Lightroom, so I could check my shots. My lighting set-up: Three Westcott SpiderLites (daylight-balanced constant lights) and the relatively new Westcott Eyelighter.

The background: Westcott soft cloth white background on a Westcott lighting sand.

I like the Eyelighter because it adds a beautiful catch light to a subject's eyes – and because it can reduce/eliminate shadows on a subject's face.

My camera gear for all the shots: Canon 5D Mark III and Canon 24-105mm IS lens. All my camera gear is listed here.

Above: I took this shot with the same lighting set-up minus the Eyelighter. Of course, it's not fair to compare apples to oranges (as in a different pose, which changes the mood, as well as where shadows fall). I just wanted to share this photograph with you to show you the effects of the Eyelighter. What's more, I like this shot, too. It has a different feel than the Eyelighter photograph.

Above: Here are two more with-and-without the Eyelighter images. Guess which one illustrates the benefits of the Eyelighter?

Again, I know its not fair to compare apples to oranges. Of course, I could have created more flattering light in the photo on the right – by repositioning the lights.

The background: a piece of red fabric that I picked up at local arts and craft store.

Above: It's always good to show the model your shots on the back of your camera. It makes the session more personal.

Above: Another Eyelighter shot. This image illustrates how the model's outfit and background can change the mood of a photograph – as did the red background.

Above: Here's my favorite shot from my Saturday bed and breakfast shoot.

Above: My lighting set up: One Canon 600EX- RT speedlite in a Westcott Rapid Box. I triggered my speedlite – wirelessly – with my Canon ST-E3 speedlite transmitter. I shot on the Manual exposure mode and adjusted my , ISO shutter speed and aperture so that I was able to capture some of the ambient light in the room and background.

All my lighting and camera gear is listed here.

A note about processing my model images: To soften the her skin, I reduced the Clarity in Lighroom.

So you may be asking, "Why only a two-hour shoot?" Well, I only had the model for two hours. I did, however, set up the gear in my house before the model arrived, but that took only 15 minutes.

Above: My favorite shot from my Sunday session: a one-light shot of my nephew and his girlfriend. For this awesome couple, I wanted more dramatic lighting with strong shadows. So using only one light was the answer.

My background: Westcott soft cloth black background on a Westcott background stand.

Above: Here's a behind-the-scenes shot, with all the Spiderlites turned on. For my shot, the Spiderlight on camera left was turned on.

Want to learn more about lighting, check out:
- my on-line classes
- my apps
- join a photo workshop.

Explore the light,
Rick Sammon - the shoot-and-shoot photographer :-)

Check Out This Great Canon 70D Deal

Screen Shot 2014-01-26 at 2.28.13 PM.png

Check out this great deal on the following gear:

Canon EOS 70D DSLR Camera 3 Lens Kit with EF-S 18-135mm F3.5-5.6 IS STM Lens, EF 70-300mm f/4-5.6 IS USM Lens, and EF 40mm f/2.8 STM Pancake Lens - Bundle - with Canon Speedlite 600EX-RT Flash - 32GB Class 10 SDHC Card, and Camera Bag

Regular Price $3035.94 Price in Cart $2449.00 + Free Shipping and 2% Adorama Rewards.

Kit includes the following Items

ICA70DK1, CANON EOS 70D DIGITAL SLR W/18-135, USA

CA70300ISNU, CANON EF 70-300MM F/4-5.6 IS USM, USA

CA4028, CANON EF 40 F2.8 STM LENS, USA

CA600EXU, CANON 600EX-RT SPEEDLITE, USA

IDSSD32GE10B, SANDISK 32GB EXTRM SDHC 45MB/S C10, BULK

LPA170, LOWEPRO ADVENTURA 170 SHOULDER CASE, BLK


Today's Lighting Tip: Drag the Shutter

rick sammon.jpg

Wanna add a sense of motion to a still photograph? Dragging the shutter is one technique.

Here's how to do it. 

First, you'll need to be shooting in relatively low light – so you can shoot at a slow shutter speed. If the light is too bright, use a Tiffen ND (Neutral Density) filter.  

Set your camera on Manual and dial in an exposure that's about one f/stop under the correct available light exposure. Set your shutter speed, for starters, to 1/8th of a second. Depending on how fast you move, you may have to increase or decrease the shutter speed.

© rick sammon.jpg

Turn on your speedlite and set it to TTL. 

Now.... start moving your camera from left to right (or vice versa or up and down) and while you are moving, take a shot. The speedlite will give you a sharp shot of the subject, and the available light entering your camera will be give you a blurred image of the subject and the background.

Have fun with this technique. It takes a while to get it right.

new PR 1.jpg

You'll find more lighting tips in my apps

Explore the light,
Rick


Six Days of Speedlite Tips: Day 2

rick sammon a.jpg

It's Day 2 of my Six Days of Speedlight Shooting Tips here on my blog. Scroll down for previous speedlite posts.

Today's tip: Create Terrific Top Light.

Concept: Position the light directly above the subject. Use "voice activated" light stands to save on real light stands. Use a softbox with a recessed diffusion panel to soften and direct the light. Moving the softbox a few inches can dramatically change where the shadows fall and how much of your subject is illuminated. I talk more about shadows (and light) in my Kelby Training class: Light - the main element in every photograph. Info on my On-line Classes page.

_MG_8487.JPG

After you make your photograph, play with plug-ins. My original photograph is top left. I used the Monday Morning filter in Nik Color Efex Pro to create the image on the top right. All my plug-ins are listed on my Save on Plug-ins page.

Screen grab of Nik Color Efex Pro main window.

Screen grab of Nik Color Efex Pro main window.

Recommended Gear:
Canon 5D Mark III
Canon 24-105mm IS lens
Westcott Apollo Softbox kit
Canon 600EX-RT Speedlite
Canon ST-E3 Speedlite Transmitter
Tether Tools kit

Explore the light,
Rick

This post sponsored by Westcott. Check 'em out for all your lighting needs.

Screen Shot 2012-12-11 at 11.56.55 AM.png