seascape photography

Why Breakthrough Photography Magnetic Filters Rock

Check out the filter I am holding in the above picture. That's right. There are no filter threads - because it's magnetic. Kinda cool!

So you may be asking, "What's so cool about about a magnetic filter and a magnetic filter holder?" Well my friends, here's the answers:

1) Screw-in filters can get "frozen" in place and can be difficult, if not impossible, to remove – except by a pro service center or with a filter wrench.

2) Screw-in filters can get cross-threaded. 

3) Screw-in filters that are tricky to thread can slip out of your hand and smash on the ground. Seen that!

4) When photographing at night in cold conditions and while wearing gloves, it can be difficult to screw in a filter.

Screen Shot 2018-08-12 at 2.25.19 PM.png

For these reasons, and after testing the Breakthrough Photography Magnetic Filters, Magnetic Ring Prototype, Magnetic Wheel Prototype, and because Breakthrough Photography makes the best color-accurate ND filters, awesome polarizing filters, and a cool Night Sky filter, I've totally switched to their magnetic filter system. Here's a very quick look at the system.

IMG_9161.jpg

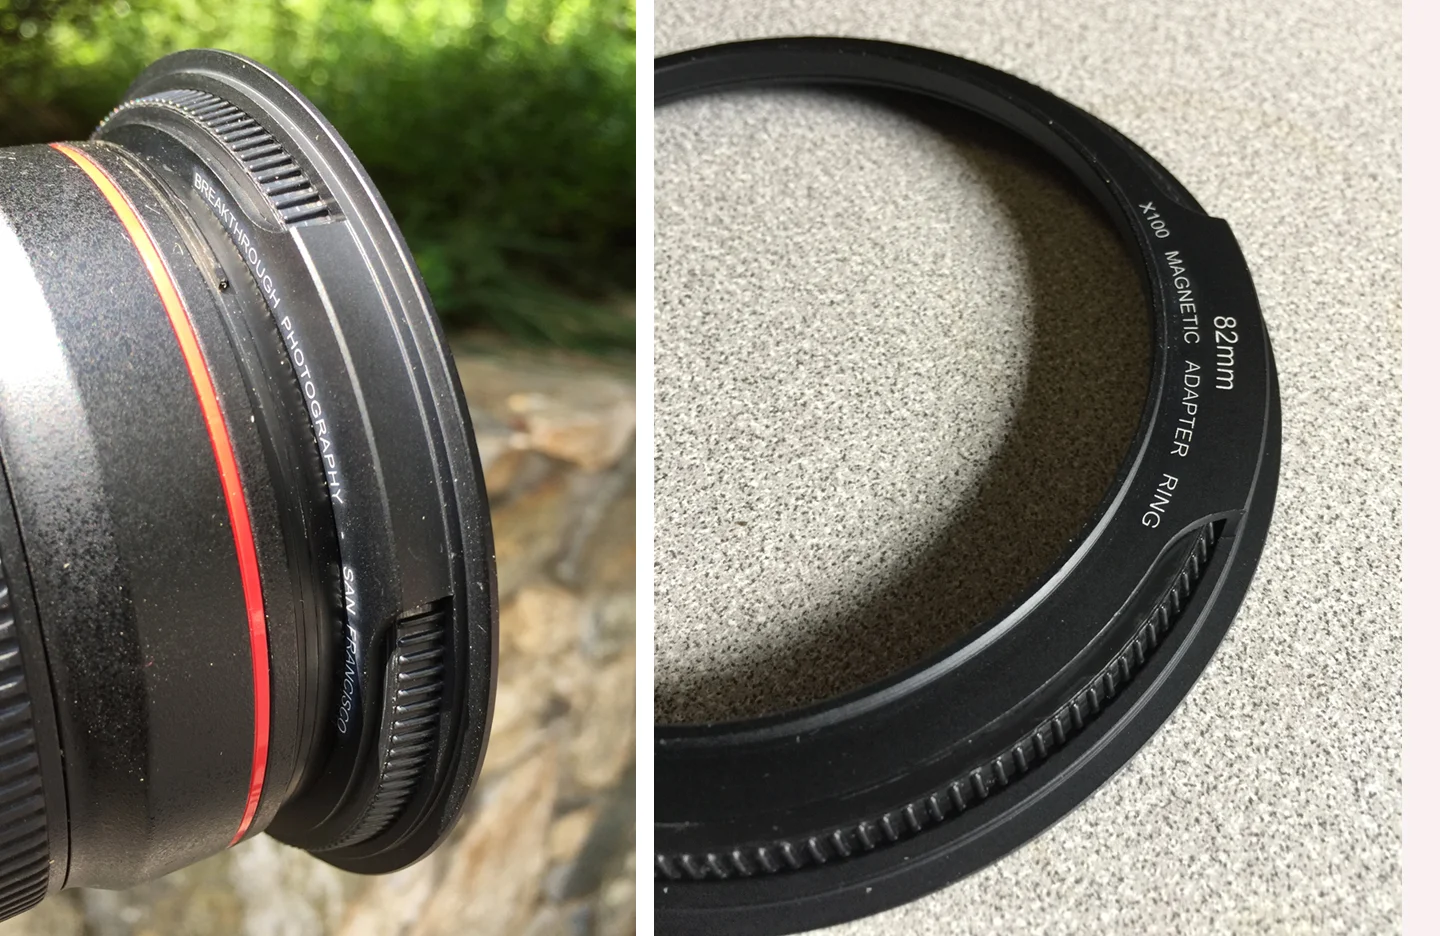
After you screw the Magnetic Adapter Ring (again I'm using a prototype) onto your lens, all the magnetic filters snap into place - and can be easily removed. Can you still "dial in" the amount of polarization once a polarizing filter is in place? Sure. Simply use the inner ring to choose the amount of polarization.

Here's a quick tip: When you travel, keep the filters in their original cases, and mark each case so you can easily choose the filter you need for a certain situation.

Screen Shot 2018-08-12 at 3.24.02 PM.jpg

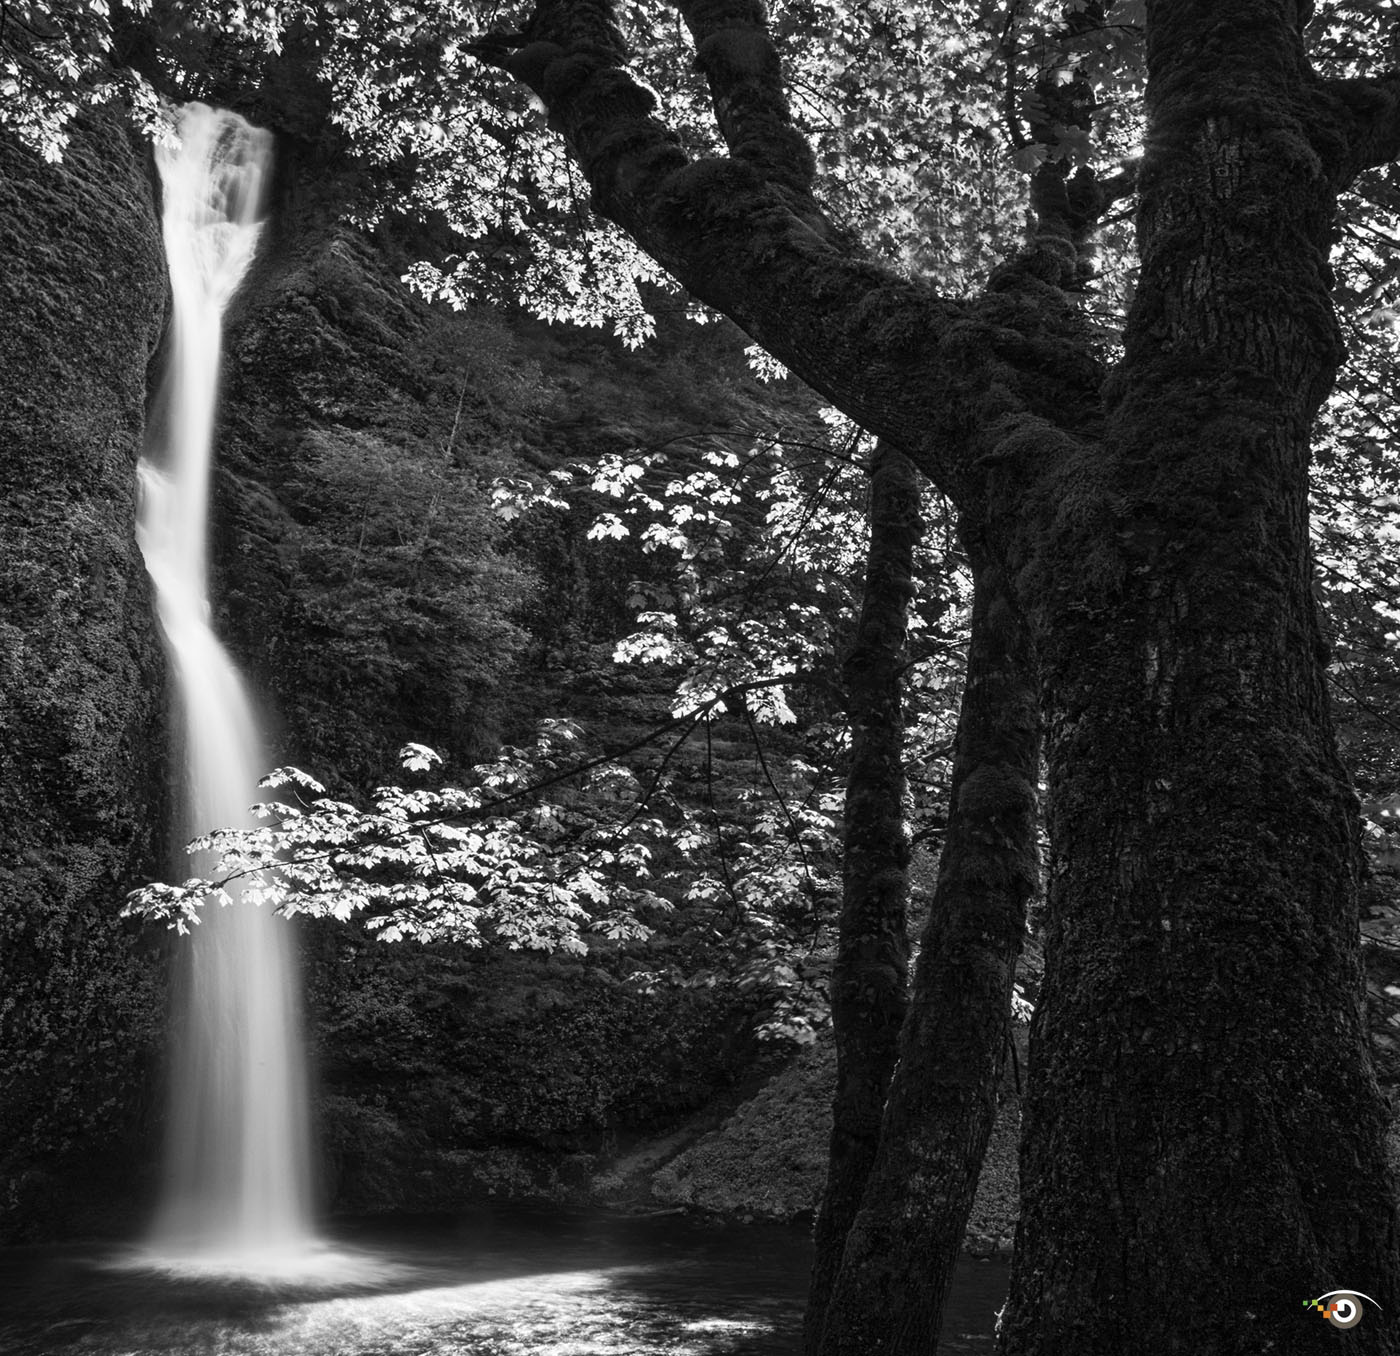
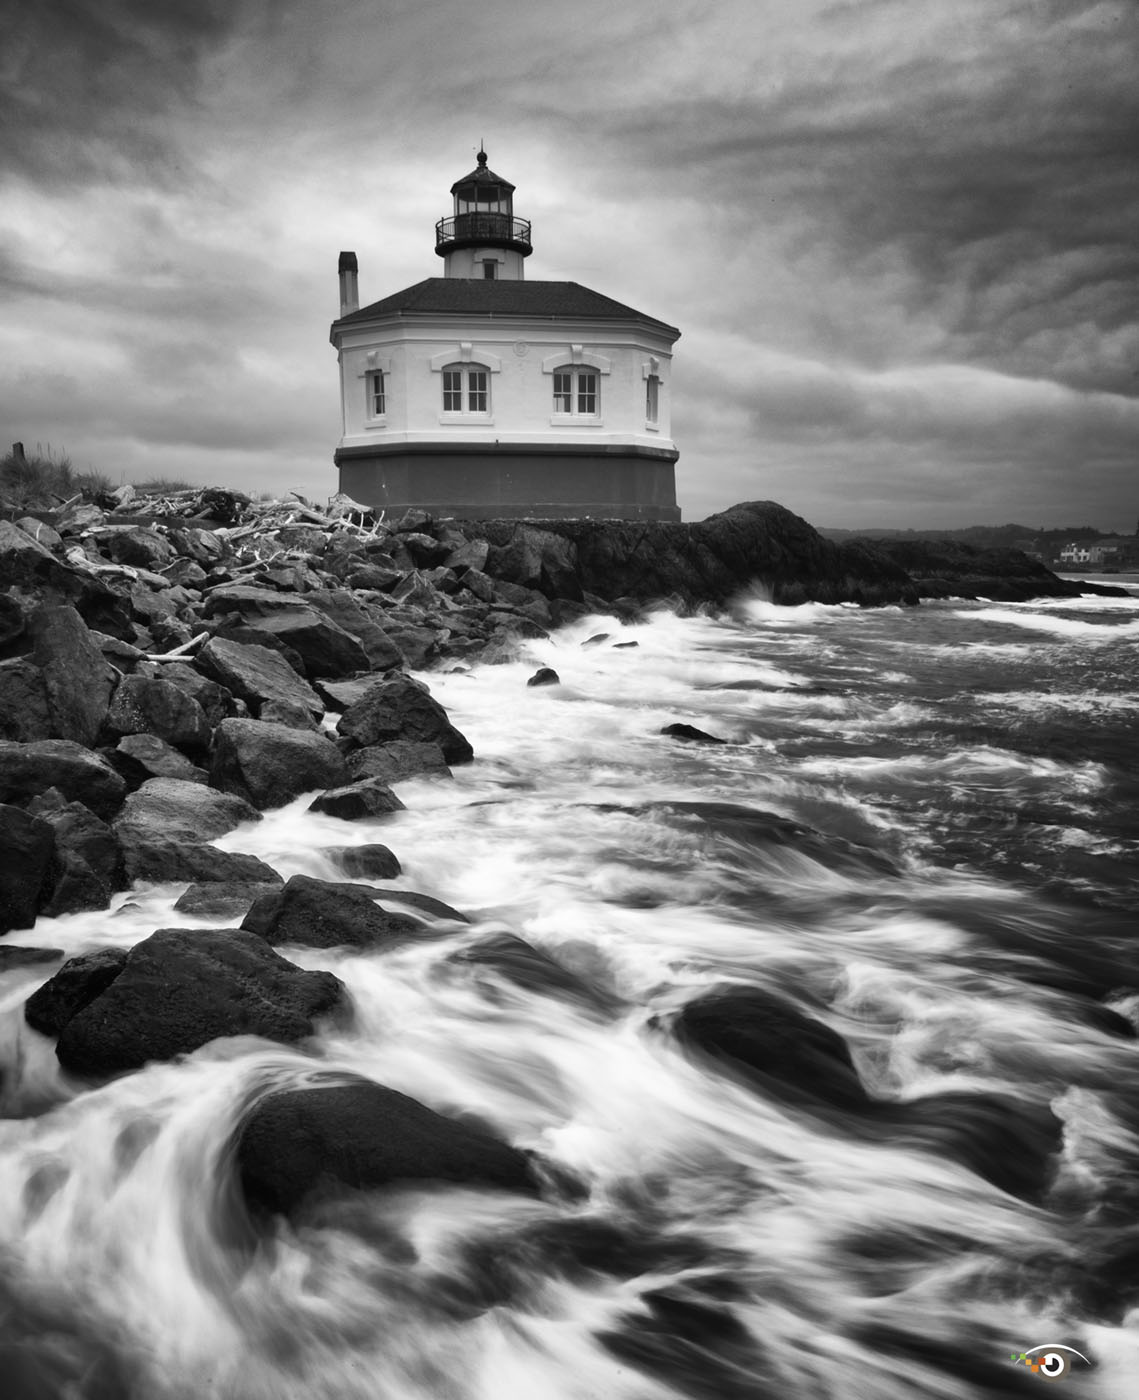
Speaking of ND filters, if you want to get the blurred water effect when photographing in bright light, a ND filter is a must. Read more in my book, Evolution of an Image.

IMG_9186.jpg

Because I have Canon lenses with 82mm and 77mm filter diameters, I travel with two Magnetic Adapter Rings – each marked in bag so I can grab on the go and shoot fast.

Hey! If you like long exposures, Breakthrough Photography offers a e-free book on Long Exposure photography. Click the image above to order.

If you'd like to learn more about creative photography, check out my KelbyOne on-line classes.

Explore the light,
Rick

Capture the Beauty of Flowing Water

"Water, water everywhere." - From the Rime of the Ancient Mariner.

Photographers at all levels like to photograph moving water - in waterfalls, streams, rivers and along the seashore.

Taking a snapshot is easy, but making a compelling photograph requires a creative mind, some basic tips and some important accessories.

In this post I'll share with you some tips for photographing moving water, as well as my favorite accessories.

Let's start with accessories.

To create the blurred water effect, you'll need a sturdy tripod, because you need to shoot at a slow shutter speed - and slow shutter speeds require a motionless camera if you want the surrounding area to be sharp. Here's a photo of me photographing a waterfall in the Columbia River Gorge.

I'm using my Canon 5D Mark III and 24-105mm IS lens on my Really Right Stuff  tripod.

The opening photograph for this post and the photograph below were also taken in the Columbia River Gorge . . . where I may do a workshop in the future. Shoot me an email for info.

Don't cheap out on a tripod. You get what you pay for. Same goes for a ball head, which is also an important accessory.

Another all-important accessory for waterfall photography is a Neutral Density (ND) filter or a set of ND filters. I use both.

ND filter reduce the amount of light entering your lens, letting you shoot at slow shutter speeds even in bright light.

You can buy variable ND filters, a set of ND filters and special ND filters. Which should you use? As usual, the answer is, "It depends."

I use and recommend Tiffen ND filters. In the above photo of me shooting, I'm using a Tiffen 77mm 0.9 ND filter, part of my three-ND filter set that also includes a ND 3.0 and ND 1.2 filter.

In my backpack I have a Tiffen 2-8 stop Variable ND filter, in addition to my set of fixed ND filters. I used that variable ND filter when I photographed this waterfall in Iceland. A variable ND filter is useful when you want to experiment with different slow shutter speeds. It's also less expensive than a set of fixed ND filters.

The downside to a variable ND filter is that in certain strong-light situations, you may need to dial back the full effect, or else you may get a dark spot in your image. In other words, you may not be able to use a 2-8 stop ND filter at the 8-stop setting.

The brighter the light, the more powerful the ND filter you need. In very bright light, you may need to stack ND filters (along with a polarizing filter) or use a very long exposure ND filter, like the new Tiffen XLE filter.

Speaking of a polarizing filter, I used my  Tiffen polarizing filter to reduce the glare on the water in this Iceland waterfall photograph. A polarizing filter also reduces the amount of light entering the lens so you can shoot at slow shutter speeds.

Let's move on to some tips.

You don't want to shake your camera during a long exposure, because that may cause a blurry photograph. For a steady shot, use a cable release, app or your camera's self-timer. I used my camera's self-timer for this photograph of Thor's Well on the Oregon Coast.

For my Thor's Well photograph, I also had my camera set on the highest frame rate, because the water was flowing into the well very rapidly, and the scene was changing second to second.

The next and obvious question:  "What's the best shutter speed to use to create the blurry water effect?" Again, the answer is, "It depends." It depends on how fast the water is moving and on your desired effect. I used a shutter speed of 0.4 seconds for this photograph of a lighthouse on the Oregon Coast.

The direction of the flowing water is also important to the success of a photograph. I think the outward flowing water adds to the drama of my lighthouse photograph.

I photographed this waterfall in the Columbia Gorge at a shutter speed of six seconds.

So here is the idea when it comes to the shutter speed: everything looks good on a small screen (your camera's LCD monitor). Experiment to your heart's content with different long shutter speeds.

When it comes to exposure, you want to expose for the highlights - the brightest parts of the image. Have your histogram and highlight alert activated. Make sure you have no "blinkies."

For more on exposure, check out my KelbyOne class, Light - the main element in every photograph.

I took the above photograph of the New Croton Dam in Croton-on-Hudson, NY during my Rick's Backyard Photo Workshop. I hope you can someday make that workshop. It's a ton of fun!

Here's another shot of the New Croton Dam. Here I used Mother Nature's ND filter: nightfall. :-)

HDR can also be used for flowing-water photographs. This is an HDR photograph I made of Fairy Glen in the Conway Valley in North Wales. It's featured in my new book on Creative Visualization.

Here's another HDR image from the Conwy Valley in North Wales. I used the Duplex filter in Nik Color Efex Pro to remove some of the reality from the scene.

When you are shooting in and around water, you want to keep your feet dry. Rubber boots are a good idea, but so are NEOS overshoes. I'm wearing them in the above photo, as opposed to another photographer who forgot his! You can order NEOS from Outdoor Photo Gear. You can get plastic bags at the supermarket . . . .

You also want to keep your filter clean, because a single drop of water can look like a big blog in your photograph. Keep a micro fiber cloth handy at all times to keep the filter dry.

When it's misting and raining, you need to keep your entire camera dry. I've found OP/TECH rain sleeves do the job. I am using one in this photo, which my friend Diane Eubanks took on my Iceland photo workshop.

One final tip: It's the surrounding area that tells the story of the waterfall - so shoot wide-angle as well as close-ups shots.

For more tips on landscape and seascape photography, check out my on-line class, Master Landscape and Seascape Photography.

For in-the-fiend training, I hope you can join one of my photo workshops, perhaps in Mt. Rainier in 2016 - where I took this photograph.

Explore the light,
Rick

Sit Back, Relax and Enjoy Some Landscape and Seascape Photographs – and Mellow Guitar Music

I just put together a video featuring my favorite landscape and seascape photographs, along with some mellow guitar music that I've been playing lately. Open D tuning by the way.

If you want to learn about landscape and seascape photography, check out my on-line class, Master Landscape & Seascape Photography. Save $10 with this code: rs2015.

Explore the light,
Rick

Guest Blogger Alex Morley Shares Some Amazing Seascape Images From Our 2012 Workshop

Alex_Morley_Yaquine_Lighthouse_Refelction.jpg

Thank you Rick for inviting me to be a guest blogger!

Rick and I will be leading our second photography caravan workshop on the Oregon Coast, a magical place. You will find rocky headlands separated by long sweeping beaches and towering sand dunes. There are sea birds, whales, seals, sea lions, lighthouses, and picturesque fishing harbors.

Info on the workshop, which is almost sold out, is on Rick's Workshops page.

The Yaquina Lighthouse, pictured above, is one of the most beautiful locations on the coast.

Alex_Morley_Newport_Harbor_Moon.jpg

The Newport harbor is a real working fishing port. This was shot with a full moon at the blue-light time of day right after sunset.

Alex_Morley_Strawberry_Stars-&-Kelp.jpg

In Oregon, the coast is public land to 16 feet above average tide level. The entire coast is accessible for photographers.

Alex_Morley_Wall_Anemone_&_Star.jpg

There are many wonderful tide pools to explore at low tide.  Be sure to bring your knee-high rubber boots to wade through shallow pools.  You will have better opportunities to photograph your subjects.

Alex_Morley_Shore_Acres_Wave_B&W.jpg

Unusual sandstone cliffs make Shore Acres a unique place with big waves. It is mesmerizing.

Alex_Morley_Bandon_Gull.jpg

There are several areas along the Oregon coast with amazing seastacks (big rocks isolated in the water by erosion). They are wonderful for photography. This gull was searching for food.  I was fortunate to have ideal backlight during a break in the clouds.

Alex_Morley_Bandon_Sunset_Orange_Gulls.jpg

Sunsets on the coast can be amazing.  This is with a telephoto at 200 mm to compress the birds and the distant seastacks.

The Oregon Coast is a treasure for photographers. High tides and low tides completely change the way an area appears. Along with the changing tides, sunrises and sunsets offer an infinite opportunity for new images.

 Join the Oregon Coast Photo Caravan September 3 - 9 and visit all of these great places. We only have a few openings. Great locations. Great photo ops. Great fun. And no doubt, great new friends.

Alex Morley

www.alexmorleyphoto.com
Facebook:
www.facebook.com/alex.k.morley
Google+:
http://bit.ly/KUzHF4

• • • • •

Thank you Alex for another great Guest Blog post!

To see some videos that we made during our 2012 Oregon Coast Photo Caravan, see my On-Line Training page.

Explore the light,
Rick

This site powered by (designed and hosted on) Squarespace. Use one-click to get started with your own awesome Squarespace site.