Need a projector (with two bulbs) for your camera club, home or office? I'm moving up to a new Canon digital projector and I'm selling my used Canon SX50.
Case and all cables included. Cost: $900 with shipping. Shoot me an email. US shipping only.

Need a projector (with two bulbs) for your camera club, home or office? I'm moving up to a new Canon digital projector and I'm selling my used Canon SX50.
Case and all cables included. Cost: $900 with shipping. Shoot me an email. US shipping only.
“Reality leaves a lot to the imagination.” – John Lennon
When I teach a workshop or give a seminar, I often ask the photo workshop or seminar participants, “Whose realty are you interested in anyway? Yours or another person's perception of reality?”
I go on. I ask, “Do you want to get the sharpest, most realistic image, or do you want to create your own reality in Photoshop, perhaps using plug-ins to produce a one-of-a-kind image?”
Most often, the photo workshop participants go for the strait shot. But I’m thrilled when someone wants to experiment and express his or her creative vision.
I created the image that opens this post in Photoshop. The image below is a straight shot. I took the images in Bosque Del Apache, New Mexico.
One method for creating a creative image is to remove some of the sharpness from a scene. When you remove some of the sharpness, you remove some of the reality, and when you remove some of the reality, you often get a more creative image.
I removed the sharpness from the image with the Midnight filter in Nik Color Efex Pro. (See my Save on Plug-ins page for info on all the plug-ins I use).
The opening image is a composite of three images: the sandhill cranes, the moon and the mountains are all from different files. Creating composites is another way to create your own realty.
Getting back to Nik, I used the Detail Enhancer filter in Color Efex Pro to bring out the detail in the moon.
Get this: I’m writing this post on an airplane at 30K feet. The guy sitting next to me looked the opening picture and said, “Wow, that does not look like a photograph, it looks like a painting.” I said thank you, and told him what someone said about a similar shot that I showed at a seminar. He said, “I don’t like that picture. It looks like a painting.”
The next time you are working on an image, think about the reality that you can create with that image – and create the reality you see in your mind’s eye.
I hope to see you on one of my photography workshops. I teach photography and Photoshop. I can help you create your own reality on your computer monitor. Of course, I can also help you get the sharpest possible images in the field.
Hey, that gives me an idea: Maybe I should run a “Create Your Own Reality” workshop. Or maybe I can talk my friends at Nik Software into a webinar on creating your own reality with Nik plug-ins. Interested? Shoot me an email.
And, I’d love to hear your thoughts on your photo reality. Post ‘em in the Comment here. If you want, include a link to a creative image. To post a comment, you need to go back to www.ricksammon.com - for now.
By the way, one “rule” in wildlife photography is to have some separation between the animals so that the animals stand out clearly in the frame, which is not the case in the opening image for this post. However, if you look closely, you’ll see that all the heads are separated.
In addition, the opening image tells the story of how close the birds fly to each other.
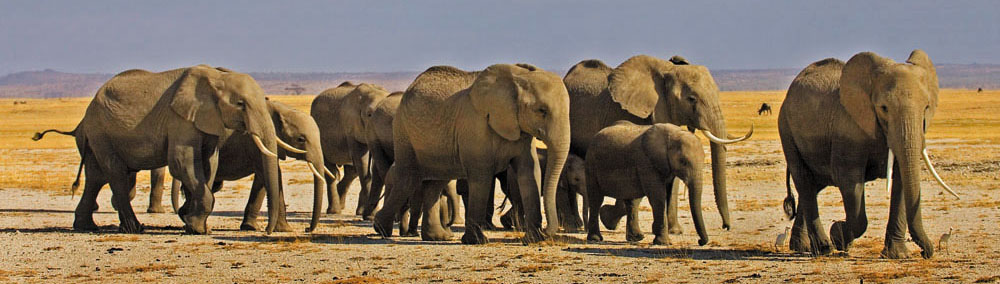
It’s good to break the rules. These images of small heard of elephants that I photographed in Africa tells the story of how the adult elephants protect their young. Not much separation here.
I guess the message of this post is this: Follow your heart and create your own realty, maybe while listening to a John Lennon song on iTunes.
If you like stuff like this, you can subscribe to my blog here.
Explore the light,
Rick
This post sponsored by Adorama - great gear at great prices. Check out their awesome Holiday specials on Canon lenses and Speedlites. Click here for info.
I just put the finishing touches on my 2013 photo workshop schedule. Lots of photo opportunities for you to make - rather than just take - meaningful photographs. And plenty of time to process your images in Lightroom and Photoshop.
To find a workshop for you, click Workshops on the left or click here.
Speaking of workshop, there is a big difference between a workshop and a photo tour.
- Workshops: Designed to get you the very best shots from dawn to dusk. Getting up at 3 AM is no prob.
- Photo Tours: Leave at 9 and set your day around meals.
- Workshops: If you are driving and see something good, stop and shoot.
- Photo Tours: Keep on driving.
- Workshops: Usually cars or 4W drive vehicles.
- Photo Tours: Bus tours.
- Workshops: Hands-on training - daily - by the instructor or instructors.
- Photo Tours: You are on your own.
- Workshops: Photo reviews almost daily.
- Photo Tours: No reviews.
- Workshops: Photoshop and Lightroom advice and help.
- Photo Tours: Computers are not even required.
- Workshops: Group slide show.
- Photo Tours: Only show is to show up for dinner.
- Workshops: Leave on-time for sunrise.
- Photo Tours: Who cares if you are late?
- Workshops: Briefing on each location as to lenses, settings, etc.
- Photo Tours: Very little suggestions by leaders.
- Workshops: Instructors ask you how you are doing.
- Photo Tours: Leaders are there only as tour guides.
- Workshops: If you find something really cool to photograph, the groups changes plans so all can get great pictures.
- Photo Tours: Get to the next stop.
- Workshops: Instructors share their shots on their camera's LCD monitors so others can see and learn.
- Photo Tours: Instructors are often first on the spot.
I hope to see you on one of my workshops someday. See this facebook page to see the work of some of my recent students.
If you like the stuff you see here on my blog, you can subscribe here.
I tell people that my specialty is not specializing, because I like to do it all. However, if you like to specialize in wildlife photography, I can help you with your photography. Please see my On Safari gallery for some of my favorite images.
If you like stuff like this, you can subscribe to my blog here.
Explore the light,
Rick
This site powered by (designed and hosted on) Squarespace. Use one-click to get started with your own awesome Squarespace site.
This post sponsored by Adorama - great gear at great prices.Getting up early to catch a sunrise is the norm on my photo workshops. Staying out late for sunset is also the norm. Sure, the photo workshop participants get a bit worn out by the end of the workshop, but they walk away with some spectacular images.
They ask me how I do it on all my photo workshops. I tell 'em, "I can sleep when I'm dead!"
At sunrise this morning on my Bosque del Apache, New Mexico workshop with Juna Pons, I was thinking about dedicated photographers, that we all chase the light, from morning until night. We'll do almost anything to be in the right spot at the right time to get the best light. It's kinda cool.
But dedicated photographers are also light enhancers. That's relatively easy to do in Photoshop and Lighroom, as well as with plug-ins.
For example, my original file for this image was good, here's how I enhanced it:
• increased the saturation in Camera RAW.
• increased clarity in Camera RAW.
• Used Shadows/Highlights in Photoshop to open up the highlights.
• Use the Detail Extractor in Nik Color Efex Pro to bring out more details.
I teach all this stuff on my workshops. I hope you can join one someday soon. Get some rest before you leave home :-)
On line, I talk about the importance of light in my Kelby Training class: Light - the main element in every photograph. Info on that class is on my On-line Training page. If you like that class, you'll like my class on Composition - the strongest way of seeing.
About the image: I took it with my all-time favorite Canon lens: Canon 24-105mm IS lens, which was mounted on my Canon 5D Mark III. All my gear is listed on my Gear page.
If you like stuff like this, you can subscribe to my blog here.
Explore the light,
Rick
This post sponsored by Adorama - great gear at great prices.
This site powered by (designed and hosted on) Squarespace. Use one-click to get started with your own awesome Squarespace site.
If you want to become a better photographer, I have five different options for you. Some are available in the comfort of your own home, others are available on location.
On-line: Check out my Kelby Training courses on Light and Composition - the two key ingredients that go into the making of a good photograph. The combo of both courses will help you see the light and compose carefully.
On your iPad or iPhone: I have 10 apps that cover dozens of different photographic techniques for indoor and outdoor shooting, in your home, on location and in a studio.
My photo workshops: If you like hands-on training – in photography, Lightroom and Photoshop – these workshops are for you. You'll get great photos, have a ton of fun and make new friends.
My seminars: Most of my seminars are free of charge or cost just a few bucks. Bring your questions. I am there to help.
Tough Love: One-on-one, on-line portfolio reviews.
I'll be upfront and honest with you.
I hope to meet up with you somewhere – on line or in person.
Explore the light,
Rick
This post is sponsored by BlackRapid - the fastest way to shoot.
This site powered by (designed and hosted on) Squarespace. Use one-click to get started with your own awesome Squarespace site.