Day 1: Alaska Photo Workshop Week

Click images to enlarge.

In preparation for my Alaska Adventure digital photo workshop, listed on my 2014 Workshops page, I'm designation this week on my blog as Alaska Photo Workshop Week. Each day I will post a few images, taken on my previous adventures, along with some tips.

Hal Schmitt, my friend and lead instructor at Light Photographic Workshops, and I are co-leading this adventure. We will help you make and process wonderful images - and have a ton of fun.

Day 1: Lens recommendations. 

My reco is to take lenses that will help you "tell the whole story."  Following are the main lenses I recommend, and why I recommend them. (I pack other lenses, such as a fish-eye and macro, but these are my top recos.)

100-400mm IS zoom - This lens is my go-to lens for photographing bald eagles. The bald eagles often come close to the boat and move fast. This lens allows me to zoom in on the action.

70-200mm f/4 - When the BIF (birds in flight) come very close to the boat, I switch to this lens. The birds sometimes come so close that you can get fill-frame shots at the 200mm setting.

400mm DO - I use this lens when the birds and whales are a bit further away from our boat. I often us a 1.4x teleconverter when shooting with this lens to get me even "closer" to the subjects.

24-105mm IS zoom -  I never leave the boat without this lens. It is great for scenery and fun shot. The 24-105mm IS zoom is my main "storytelling" lens - everywhere I go.

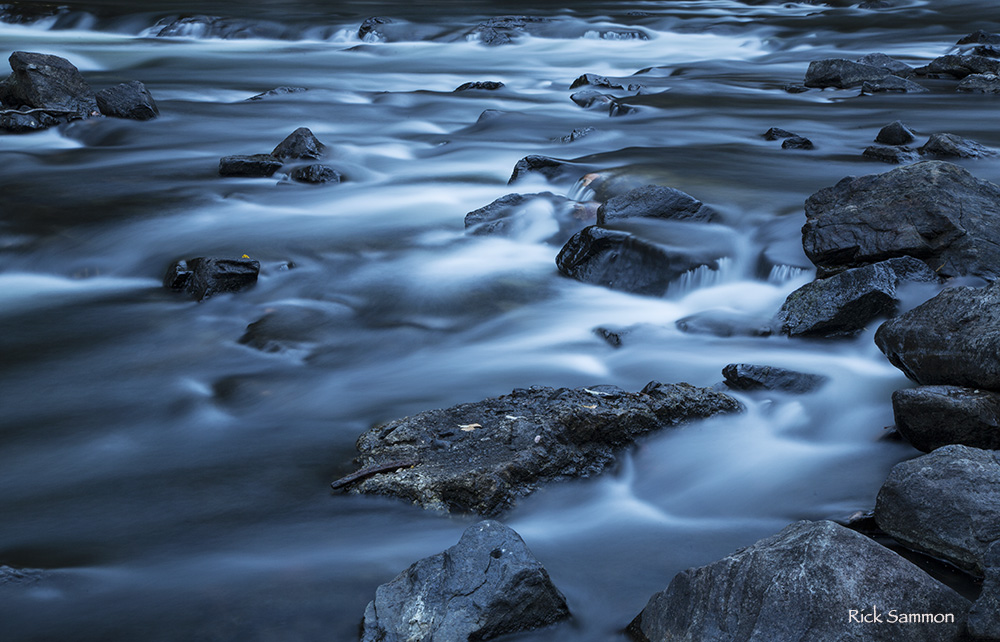
17-40mm zoom - For landscapes, this Canon zoom lens can't be beat. Yes, it's slower than the Canon 16-35mm, but in bright light, you do not need the faster speed.

I hope to see you here on my blog tomorrow - and Hal and I hope to see you on the Northern Song (pictured in this post), our boat for the Adventure.

Explore the light,
Rick

Great Workshop, Great Fun, Great Photographers

rick sammon rapids.jpg

My 5th Annual Rick's Backyard workshop came to a close last night, with a pizza party at our place. Our last shoot was at the New Croton Dan, where we photographed the rapids.

group.jpg

We had great fun with a great group!

rick sammon worshops 1.jpg

The Buddhist temple (above) in Kent, NY was a favorites location, as was the New Croton Dam (below) at night.

croton dam rick sammon.jpg

I hope to see you on one of my workshops some day, in my backyard or around the world. I'll show you how to make pictures, rather than just take pictures.

rick sammon temple.jpg

Explore the light,
Rick

About My Digital Photography Workshops

rs.jpg

I like to make learning fun, which is exactly what do on my digital photography workshops. All my 2014 digital photography workshops are listed here.

We get up early and stay out late to catch the light. We process our images on site and have a group slide show at the end of each workshop.

New to my workshops? Check out these posts:
How Come I'm Not Getting the Shot?
We Have a Ton of Fun
Set Goals
Photo Workshops vs. Photo Tours
Close Encounters and Force Fields on Workshops

On my workshops we grow as photographer and make new friends. We share our images. My students do wonderful work. Here is a link to some of their photographs.

If you have any questions about my workshops, you can always email me. You can also call: 914 271 6132.

If you can't make a workshop, you take a virtual workshop with me on line via one of my Kelby Training classes.

I also give private workshops on location. Shoot me an email for info. I also offer on-line portfolio reviews in my Tough Love sessions.

Important stuff to know.

1) Everyone is welcome on my workshops. but you must know how to use your camera.
2) You must know how to shoot on the Manual Exposure mode.
3)  If you have a PC, please  know where to find stuff. I am a Mac person. We often, but not always, have PC folks on the  workshops who can help  you, but I use a Mac. My workshops are photography workshops, not  computer workshops.
4) You should have Photomatix  Pro and HDR Efex Pro downloaded on your laptop  before the workshop. You  can get a discount on both programs here.
5) Travel/trip cancellation insurance is recommended, as it is for any trip you would take.

Swing By My Lighting & Travel Sessions at PPE in NY: Oct 24 - 26

_G3A1132.jpg

I hope you can swing by one of my sessions at Photo Plus Expo in NYC in Oct. Here's what I will be teaching:

© Rick Sammon.jpg

Canon Booth: Oct 24 at 1 PM and Oct 26 at 11:30 AM. I'll be demonstrating how to make portraits like the ones above - taken in the Canon booth last year with a Canon 600EX RT Speedlite and a Westcott Apollo softebox.

rick sammon milky way copy.jpg

Adorama Booth: Oct 24 at 3 PM and Oct 25 at 11 AM. I will be talking about the gear I used for my travel photography. All my gear is listed here.

rick.jpg

Westcott Booth: Oct 25 at 2 PM. I will be teaching basic at-home and in-studio lighting. 

rs 1.59.18 PM.jpg

If you see me at the show, ask for my 50% discount code for my on-line Great Sand Dunes Photography class. All my on-line classes are listed here.

Explore the light, 
Rick

Into speedlite photography? Check out the tons of speedlite accessories offered by LumiQuest.

Guest Blogger Diane Eubanks on Fish Head Art

Image_1.jpg
Image_2.jpg
Image_3.jpg

Thank you, Rick, for this opportunity!
 
I've been on several workshops with Rick this year, the most recent one being in Iceland. What a beautiful country and awesome experience. I can't wait to go back!
 
One of the first places we visited in Iceland was a huge area where fresh fish are hung out on wooden racks and dried as part of the process in making fish paste for cooking.

All you chefs know what I'm talking about. This area was quite interesting—but what do you do with photos of dead fish? Well, if you're a digital photo artist, you experiment in Photoshop of course!
 
Rick asked me to share the processing steps that took this original image (opening image) to the final one I have named “Fish Head Art”.
 
I am using Adobe Photoshop in Creative Cloud. The first step after making minor adjustments in Adobe Camera Raw was to go into Nik Filters and browse through the presets in Silver Efex Pro 2.

My thinking was that a black and white version of this image would be more appealing. I chose the Underexposed preset and added a blue filter from the right side of the dialog box.

I also increased the Structure from within the same dialog box to 75. After applying the filter, I cycled through the Blending Modes in the Layers Panel in Photoshop until I got to Difference and left it at the default of 100%

I liked the effect, but felt the image had more potential. I duplicated the layer (Control/Command J), changed the Blend Mode in the Layers Panel from Normal to Difference again and left it at 100%

As a final touch I went back into Nik Filters to Color Efex Pro, then to Image Borders in the Presets. I chose Border 12, adjusted the width and applied it. And that was the birth of “Fish Head Art”

I had a lot of fun with this image, but there were certainly more beautiful scenes from Iceland that I didn't have to “transform”.

Below is one of my favorites--brilliant ground cover with a glacier in the background.

If you'd like to take a look at more of my images, please visit my website.

Thank you again, Rick. You always make learning fun on your workshops.

Image_5.jpg