Six Days of Speedlite Tips: Day 2

rick sammon a.jpg

It's Day 2 of my Six Days of Speedlight Shooting Tips here on my blog. Scroll down for previous speedlite posts.

Today's tip: Create Terrific Top Light.

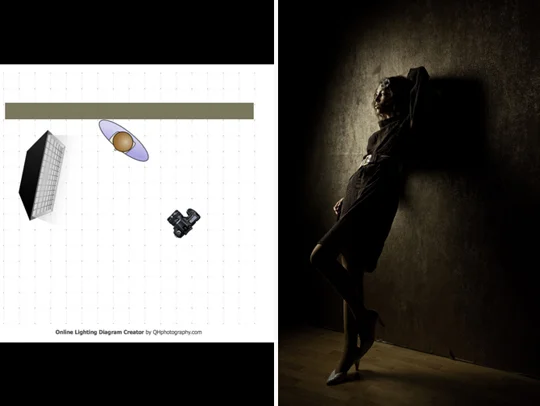
Concept: Position the light directly above the subject. Use "voice activated" light stands to save on real light stands. Use a softbox with a recessed diffusion panel to soften and direct the light. Moving the softbox a few inches can dramatically change where the shadows fall and how much of your subject is illuminated. I talk more about shadows (and light) in my Kelby Training class: Light - the main element in every photograph. Info on my On-line Classes page.

_MG_8487.JPG

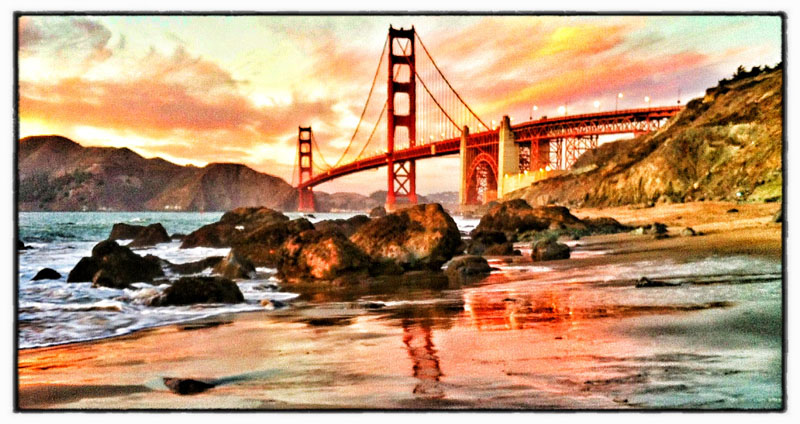
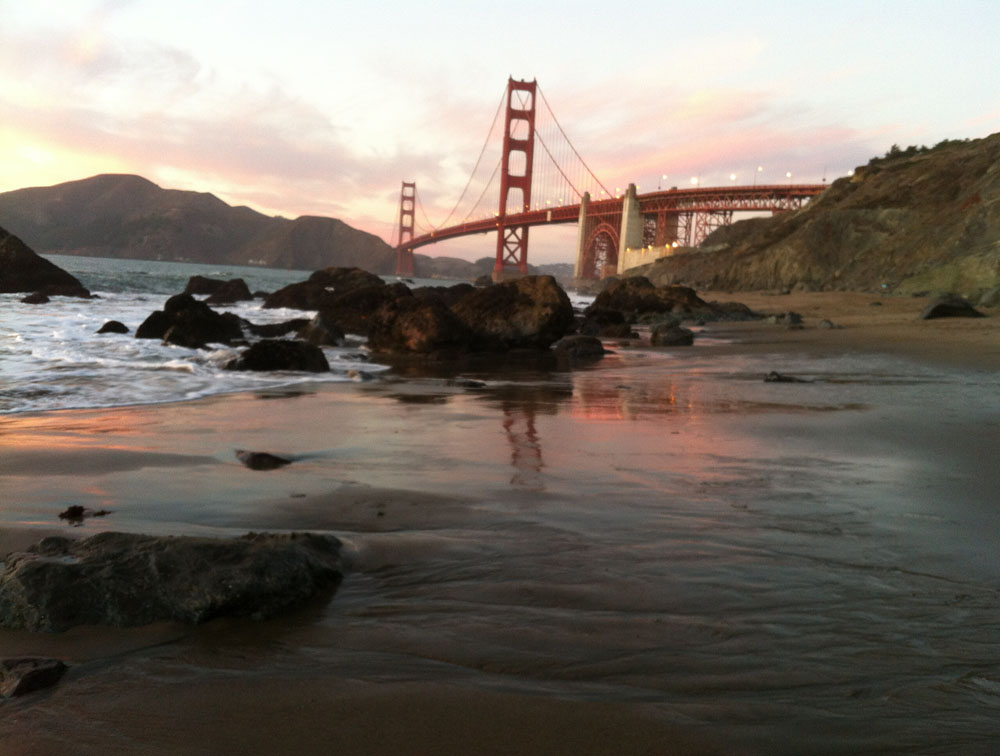
After you make your photograph, play with plug-ins. My original photograph is top left. I used the Monday Morning filter in Nik Color Efex Pro to create the image on the top right. All my plug-ins are listed on my Save on Plug-ins page.

Screen grab of Nik Color Efex Pro main window.

Screen grab of Nik Color Efex Pro main window.

Recommended Gear:
Canon 5D Mark III
Canon 24-105mm IS lens
Westcott Apollo Softbox kit
Canon 600EX-RT Speedlite
Canon ST-E3 Speedlite Transmitter
Tether Tools kit

Explore the light,
Rick

This post sponsored by Westcott. Check 'em out for all your lighting needs.

Screen Shot 2012-12-11 at 11.56.55 AM.png

iPhones Welcome on My DSLR Workshops

Canon 5D Mark III image, processed in Photoshop.

Canon 5D Mark III image, processed in Photoshop.

I've been teaching photographers how to make better digital images with their digital SLRs for about 15 years. We shoot from sunrise to sunset and process our images on site. My workshops are designed for serious photographers, but we also have good fun.

Recently, my wife Susan has been shooting with her iPhone on the workshops. While I share my DSLR techniques, Susan shares her pictures,  showing the students new iPhone apps and accessories.

Canon 5D Mark III, original image.

Canon 5D Mark III, original image.

For those of you who have not been on my workshops, I thought it would be fun to do a post with one of my before-and-after pair of images and one of Susan's before-and-after pair of images.  I think you can see why her pictures and techniques are popular :-)

iPhone image, processed in Nik's Snapseed.

iPhone image, processed in Nik's Snapseed.

The message of this post: all photographers are welcome on my workshops . . . so if your spouse is not as serious as you are, drag him or her along for the fun. 

Original iPhone image.

Original iPhone image.

We hope to see you on a workshop in 2013. All of 'em are listed on my Workshops page.

If you can't make a workshop, I teach 24/7 and 365 - via my on-line Kelby Training classes.

Explore the light,
Rick

P.S. Yes, the DSLR photographers play with plug-ins, too. They are listed on my Plug-in page.

This post sponsored by Adorama - a great place for great gear at great prices. Click here to check out their holiday specials on Canon lenses and Speedlites.

Screen Shot 2012-12-04 at 2.22.14 PM.png

Six Days of Speedlite Tips: Day 1

david by rick.jpg

It's Day 1 of my Six Days of Speedlite Shooting tips here on my blog.

Today's tip: Create Cool Rim Light.

Concept: Position the subject slightly in front of the soft box. Have the subject look straight ahead (in the opposite direction in which the softbox is facing) so you get a profile. Basically, you want the light coming from slightly in front of and behind the subject. If that's confusion, simply see the above diagram.

For the cool image below, I simply combined two rim light shots, flipping the image on the left so it faces right.

master maggie and zoe.jpg

In the shot below, I am positioning the model. For the end-result shots in this post, I shot directly toward the models' left side - the angle at which you are looking at the photograph.

_MG_8484.jpg

You need to experiment with subject position and flash output to get the shot you want. I always shoot on E-TTL and vary the light output with my wireless transmitter, but you can control that in camera, too.

BTW: A softbox with a recessed front diffusion panel is a very important accessory for this technique. It allows you to control the light to a greater degree than an umbrella or an octodome.

Recommended Gear:
Canon 5D Mark III
Canon 24-105mm IS lens
Westcott Apollo Softbox kit
Canon 600EX-RT Speedlite
Canon ST-E3 Speedlite Transmitter
Tether Tools kit.

For more detailed lighting tips, see my Apps. For hands-on learning, check out my workshops.

If you like stuff like this, you can subscribe to my blog here.

Explore the light,
Rick

This post sponsored by Westcott. Check 'em out for all your lighting needs.

This site powered by (designed and hosted on) Squarespace. Use one-click to get started with your own awesome Squarespace site.

Serious Speedlites for Serious Shooters

Croton-on-Hudson, New York artist, Eddi Flemming in her studio.

Croton-on-Hudson, New York artist, Eddi Flemming in her studio.

Later today I'm starting my series: Six Days of Speedlite Tips. As a prelude to the series, I thought I'd re-post a blog post I did earlier this year on my first session with my new speedlite system:  Canon Speedlite 600EX-RT and Speedlite Transmitter ST-E3-RT. Here goes.

To test the new gear, I set out to make a photograph of a person with a very discerning eye: local painter Eddi Flemming. Yes, I wanted to test and get familiar with my new camera (the Canon 5D Mark III) and speedlites, but I also wanted Eddi to be 100 percent happy with the environmental portrait - a picture of the artist in her environment.

Above is the result of the shoot. Eddi loved the color and sharpness of the image. I had the same comments. But I'll add that the new speedlites and transmitter are super easy to use - and the ETTL is super accurate.

RC6C4230.jpg

I used two speedlites for the shoot - one set on channel A and the other on B. Both were set on ETTL.

My main speedlite, positioned to camera left in a Westscott Apollo Orb soft box, was set, via the on-camera transmitter, to 0EV exposure compensation.

My fill light, hand-held by my wife, Susan, was positioned to camera right and was set, via the transmitter, to -2EV for just a touch of fill light.

st-E3-RT.jpg

Adjusting the power output of the speedlites is a fast and easy, "touch-of-a-buttons and twirl-of-a-dial process" with the Canon ST-E3-RT wireless transmitter.

I know a lot of pros who set their speedlites on the Manual mode. However, I have found that ETTL works perfectly for me. As my dad used to say, "To each his own."

RC6C4226.jpg

Above is a behind-the-scenes shot taken by Susan Sammon. She was using a 5D Mark III and Canon 14mm lens. For my shot, I used my Canon 5D Mark II and my Canon 17-40mm lens.

My camera was tethered to my MacBook Pro with my Tether Tools kit.

rick and eddie.jpg

I think Eddi is having a good effect on my photography. Now, when I make a picture, I try to think like a painter - which is something I cover on my workshops. I think more about shadows, and how important they are in a photograph. See the image below.

BB1%2Bcopy.jpg

You'll find lots of lighting tips in my apps.

If you like stuff like this, you can subscribe to my blog here.

Explore the light,
Rick

This post sponsored by Westcott. Check 'em out for all your lighting needs.

This site powered by (designed and hosted on) Squarespace. Use one-click to get started with your own awesome Squarespace site.


Six Gifts For Speedlite Shooters - Six Days of Speedlite Tips Starts Tomorrow

Left: speedlite. Right: no speedlite.

Left: speedlite. Right: no speedlite.

In today's post, I'm listed my top accessories for speedlite shooters. They make great gifts for your loved one . . . and even yourself. Tomorrow you'll find a cool series here on my blog: Six Days of Speedlite Shooting Tips.

Okay, here are my recommendations for the speedlite shooter in your family.

r.sammon.jpg

Westcott Apollo 28-inch Softbox.
With a recessed panel, this softbox lets you soften the light and direct the light, much more so than when using an umbrella.

Honl Gel Kit.
Lets you add color to the light from your speedlite.

Honl 1/8" Grid.
Lets you focus the light. My photograh on the right was taken with a gel and grid.

Tether Tools Essentials Pack.
If you shoot in the studio, this pack lets
you hookup your camera to your computer for larger viewing of your images.

Rechargeable batteries and pack.
Speedlites need power. Rechargeable batteries are the way to go.

Eye-Fi SD Card.
An alternative to shooting tethered, this card lets you transmit picture from your camera to your computer.

I teach speedlite shooting on my group and private workshops.

I hope you can join the speedlite fun someday.

If you like stuff like this, you can subscribe to my blog here.

Explore the light,
Rick

This site powered by (designed and hosted on) Squarespace. Use one-click to get started with your own awesome Squarespace site.

This post sponsored by Westcott. Check 'em out for all your lighting needs.

A behind-the-scenes shot from one of my workshops.

A behind-the-scenes shot from one of my workshops.