Set Your Sights On A New Web Site in 2013

iStock_000004920020Small.jpg

Does your site - your major presence on the web - need a make over? Do your images look as good as can be - on your web pages and in your galleries? Is it easy and fun to update your site? Does your site look original and creative? If you have a technical problem, is customer support there to help?

If you are looking for a new and improved web site for 2013, check out Squarespace. A free trail is only one-click away.

I moved my site to Squarespace back in November. Here's why:

1.jpg

1) Easy-to-use templates – for total creative control over your content.

for blog.jpg

2) Sites look great on any device – so your work is presented in the best possible way on desktops, laptops, iPads, iPhones, or any other device.

There is even a free iPad and iPhone app that lets you move your galleries from your desktop to your mobile device simply by downloading the app.

3) Drag and drop technology – great for hyper people, like me!

Screen Shot 2012-12-06 at 10.08.02 AM.png

4) It's an all-in-one site – so your blog, galleries, events and so on are all in one easy-to-manage and updatable place. Checking stats is easy, too.

5) Customer support is 24/7 – so if you need help, it's away there.

edit pictures.png

6) Photos can be edited within Squarespace before you publish - giving you total control over how your images look on your site.

7) It's fun - which is a big benefit for hard working photographers.

Use one-click to get started with your own awesome Squarespace site. Now :-)

Explore the light,
Rick
Today's Guest Blogger: Chris Smith

Intro image.jpg

I'm sure you'll be blown away by Chris Smith's images in this post. How he got here is kinda interesting.

Chris came to me for one of my "Tough Love" portfolio review session. The first thing I said to him was, "You don't need my tough love." Still, he wanted some advice so we proceeded with the session. After looking at a few of Chris' images, I invited him to be a guest blogger.

Enjoy. – Rick

First, let me thank Rick for having me as a guest blogger. Rick, “The Godfather of Photography,” has been an unknowing mentor to me through his podcasts and his blog throughout my photographic journey. The Digital Photography Experience with Juan Pons and Rick is absolutely the best photography podcast available. Thanks, Rick!

Five Myths of HDR

Photographers have strong opinions when it comes to High Dynamic Range photography. Here are five of the most prevalent HDR myths.

Myth #1.jpg

Myth #1: HDR takes an average image and turns it into a great image

If you want a stunning HDR image, you still need good lighting, composition, and a great subject. Don’t expect HDR software to work miracles on your mediocre images. HDR techniques are not a replacement for good photography.

Myth #2.jpg

Myth #2: You must combine multiple images to make an HDR image

HDR images are often made with a combination of multiple exposures. But you can pull so much data out of a RAW file with Lightroom 4 or Adobe Camera RAW that you truly are creating an image with high dynamic range. Try adjusting an image in these programs by lowering the highlights and increasing the shadows.This skyline image is from one RAW file edited in Lightroom 4 and Photoshop.

Myth #3.jpg

Myth #3: You need to be good at HDR software to make an amazing HDR image

When I create an HDR image, I usually use Photomatix or HDR Efex Pro 2 as my starting point. From here, I use Lightroom or Photoshop to selectively adjust levels, curves, saturation, and color balance. I spend 95% of my time editing an HDR image in non-HDR software.

Myth #4.jpg

Myth #4: A good HDR image must look realistic

When photographers first use HDR software they go too far overboard. Images look like they were taken on a different planet. Eventually, these photographers realize this and try doing everything they can to make their images look more natural and realistic. But don’t go too far the other way. The best HDR images have a touch of a surreal look to them. Find that sweet spot between otherworldly and completely realistic to get the most out of HDR.

Myth #5.jpg

Myth #5: People hate HDR

Many photography purists do not like HDR. But most non-photographers actually love HDR images. This includes people like magazine editors, advertising agencies and people that will buy your prints. Don’t let other photographers dissuade you from shooting HDR. Read Rick’s post, I Hate HDR?, http://www.ricksammon.info/2012/01/i-hate-hdr.html, for a great discussion on this topic.

Do you agree with these five myths? Are there some I missed? Add them to the list in the comments.

At my site, www.OutOfChicago.com I give advice for shooting in the city as well as general photography and HDR tips. Chicago may be the most photogenic city in the world and is one of the best places to practice HDR photography. Look me up next time you’re in town!

 You can find the location of the images in this post here.

• • • • •

Thank you Chris for an awesome post.

Lounge Car-1.jpg

Readers: My friend Glenn Taylor and I are teaching an HDR workshop in Atlanta, Georgia February 28 to March 1st. Click here to check out Glenn's cool HDR images, and to get info on our workshop. That's Glenn's image above. We'll shoot here on the workshop.

This post sponsored by Perfectly Clear - the coolest was to get super sharp pictures with low noise.

Screen Shot 2012-12-17 at 10.12.28 AM.png

Today's Guest Blogger: Rob Dweck

dweck01.jpg

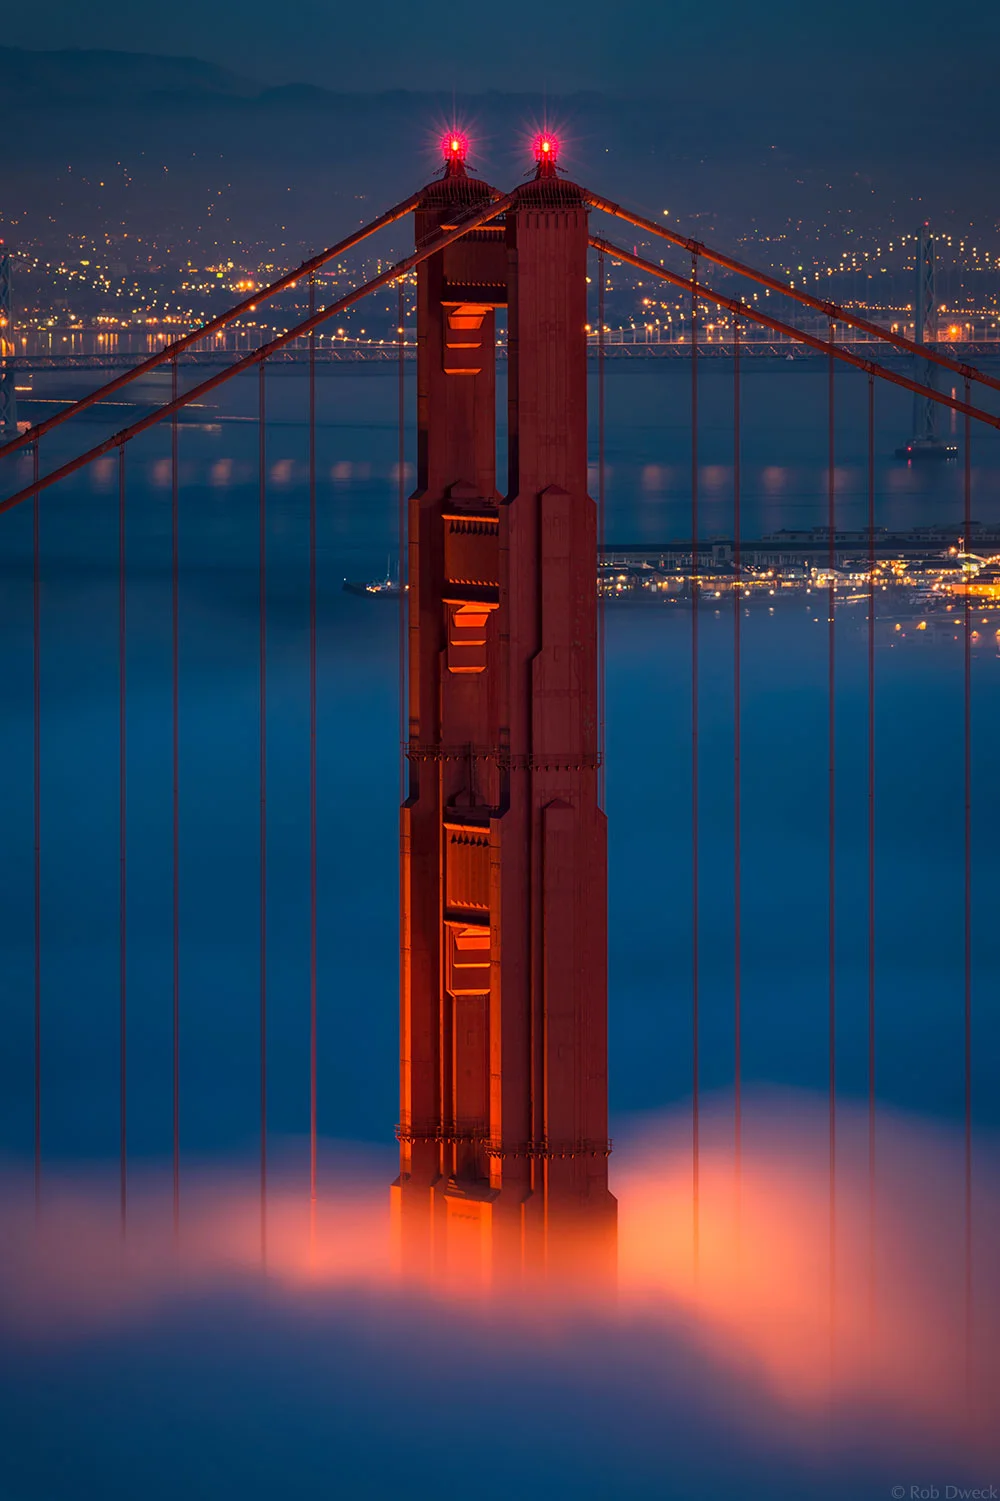
I’m honored to be Rick’s guest blogger once again. My previous post here was all about light. This time around I’d like to share some tips and photos of one of my favorite local subjects: The Golden Gate Bridge. This coincides with the publication of my new ebook which just happens to be all about photographing the bridge.

Of course you can apply these tips to any subject, not just bridges. Which brings me to my first tip:

Find a Subject and photograph it 100 times or more over the course of a year.
Have you ever visited a location for a second time and seen things that you didn’t notice on the first visit? This happens to most of us. When you photograph something at different times of the day and year, you see how it looks in various conditions and the multitude of photographic possibilities that are available.

Even if you don’t live near a beautiful natural or historical landmark, there is always something to photograph. Pick a subject, it could be a place or a person (it’s probably best to get their permission first), or a more general subject: Flowers, leaves, rocks, dogs, etc.., as long as it’s something easily accessible. Photograph this subject at least twice a week for a year at different times of the day and in different weather.

When you do this, several things will happen: You will find many ways to photograph that subject that you hadn’t previously considered. After you do the obvious shots, you’ll look for other ways to shoot it and that’s when you get creative. You will also become much more knowledgeable about your subject, maybe even an expert. As your knowledge of a subject grows, the quality of your photographs of that subject improves. Don’t expect to get a great shot every time, but the growth in your photography will be more than worth the effort.
 

dweck02.jpg

Move your camera.
It sounds obvious, but how many times do you see somebody walk up to something, place the camera in front of their face and shoot at eye level? Have you done this before? I know I have.

Pay careful attention to how the position of your camera affects the image and you’ll find that small changes make big differences. When making this image of the Golden Gate Bridge I positioned the camera close to the ground above the foreground rocks to make the viewer feel like they were standing right there with me.

I was also careful to keep the camera at a 90 degree angle to the ground to keep lines of the bridge towers and cables perfectly straight. When you tilt your camera, vertical lines become diagonal lines. Tilting the camera up or down would give the towers and cables the appearance of leaning, which might be fine in Pisa, but this is San Francisco. Tilt the camera more and the effect becomes even more dramatic. Sometimes you want that type of distortion, but when you don’t, keep your camera straight. (Using a tilt/shift lens can also eliminate this effect.)

dweck03.jpg

Place your subject in between an interesting foreground and background.
The classic landscape formula of foreground, subject and background has been used for ages and isn’t going away anytime soon. When you find a foreground and background that complements your subject it creates context and depth.

In this case, a three second exposure made the waves that lapped the beach appear as streaks that mimic the patterns of the clouds. This creates a harmony that complements the bridge and makes it stand out at the same time.

Be watchful of cluttered foregrounds and backgrounds that distract from the subject rather than enhance it. You want the foreground to lead the eye to the subject, not take it away.

dweck04.jpg

Keep shooting after the sun goes down.
I see this scene play out regularly when I’m in a popular location: A slew of photographers are shooting a beautiful sunset and as soon as the sun disappears, most of them pack up and leave.

As tempting as it may be to head off to a cold beer or dinner, hang around for a little while and see what opportunities open up after dark. The blue hour that immediately follows sunset and precedes sunrise can offer some outstanding colors and creative possibilities that aren’t possible during daylight hours. In fact, every photograph in this post was done after sunset or before sunrise.

I hope you find these tips helpful the next time you are shooting. So what are you waiting for? Go out and make some great photographs!

If you like my tips and photographs, please visit my web site.

• • • • •

Thank you Rob for a super post.

Explore the light,
Rick

P.S. One of the reasons why I switched my site to Squarespace: the ability to vary the layout of blog posts, as you see here. Use one-click to get started with your own awesome Squarespace site today.

This post sponsored by X-Rite - take control of your color with the colormunki.

Screen Shot 2012-12-12 at 10.48.08 AM.png

My Basic Studio/On-Location Speedlite Setup

One Canon speedlite in a Westoctt 28-inch Apollo softbox was used to illuminate this scene.

One Canon speedlite in a Westoctt 28-inch Apollo softbox was used to illuminate this scene.

Today is the last day in my series of speedlite shooting tips. Thank you for following along. Scroll down for previous posts in this series.

As some folks are just starting out, I thought it would be a good idea to share with you my Basic Studio and On-Location Speedlite Setup.

sammon portraits.jpg

But first, here's a practical tip: If you want a dramatic portrait, don't light the entire subject. Uses shadows to add a sense of drama to portrait.

Here's a look at the gear I recommend for setting up a basic studio/on-location speedlite setup.

Screen Shot 2012-12-15 at 12.45.55 PM.png

Westcott Apollo Softbox kit - for shaping the light for an individual portrait.
Westcott Grid for Apollo softbox
- for shaping the light even more.
Westcott Orb Speedlite kit
- for softer, wrap-around lighting and for small groups.
Westcott 6-in-1 Reflector/Diffuser kit
- bounce a speedlite into a reflector or fire it through a diffuser for a larger light source: the larger the light, the softer the light.

Honl Gel kit - for adding color to the light.
Honl Grid
- for shaping the light from a speedlite.
Honl Speed Strap
- for attaching grids and gels to your speedlite.

Westcott Black Cloth backdrop - for low key portraits.
Westcott White Cloth backdrop - for high key portraits.

If you are in the market for a Canon speedlite system, here are my recos:
Canon 600EX-RT Speedlite
Canon ST-E3 Speedlite Transmitter

For serious shooters, I recommend shooting tethered using the Tether Tools kit.

If you like on-line learning, check out my Kelby Training on-line classes. Master composition and learn how to see the light.

s+master+light+it+copy.jpg

You'll find all sorts of lighting tips in my apps.

Good luck with your speedlite photography.

Explore the light,
Rick

This site powered by (designed and hosted on) Squarespace. Use one-click to get started with your own awesome Squarespace site.

Six Days of Speedlite Tips: Day 5 with Frank Doorhof

Dubai 11 November 2012 desert  (125 of 409)-Edit.jpg

"The Doorhof is always open." Translation: My friend and fellow Kelby Training instructor Frank Doorhof is always available to share how-to photo info with photographers around the world.

What's more, Frank's door – literally – is always open. He invited me into his studio in Holland last year for a cool studio shoot.

Frank is an expert on speedlites, so he was a natural choice as a guest blogger for my 6-day speedlite series. Scroll down for previous tips in this series.

Take it away, Frank.

Small flash : How to make a difference and maximize results.

When my friend Rick asked me to give a quick tip on small flash, it did not take me long to come up with an idea to share with you guys.

Dubai 11 November 2012 desert  (115 of 409)-Edit.jpg

We all know the problem: You're on a location and everything goes as planned. You shoot the stuff your client wants and you all go home happy. But how often does it happen that afterward, your client says something like, "You know, the look is great but . . . ."

Well, the following tip will make sure that this problem is solved before it happens. It may also give you more revenue from your shoots.

When shooting on location, always make sure that you deliver two series of pictures: one with speedlites and one with only the natural light. That way, you can deliver two different looks for the price of one. Even if your client says that he/she only wants the strobe versions, just do it anyway because sometimes it's not only the on-site client that makes the final decision.

Dubai 11 November 2012 desert  (75 of 409)-Edit.jpg

The first image in this post was taken with only natural light, and the other two were made using two Canon speedlites. We used two strobes stacked with Rogue Flash Benders from ExpoImaging to light the model.


I set my speedlites to HSS (High Speed Sync) to fight the super bright ambient light –  and to get a moody, almost fairytale atmosphere in the photographs. By stacking the two strobes, I got an increase of one stop of light output, which was not really needed here, but with two strobes, the recycling time is much faster, and the batteries last longer.

Now most of you (including Rick "Mr. Canon E-TTL" Sammon) know that I almost always use light meters. One of the biggest things you can learn you about using light meters is to know when you need them and when not. In this case, I wanted results quick and very variable, because the window of time to shoot this was really limited, so I used manual mode on the camera and E-TTL on the strobes. Annewiek (my wife) was holding the strobes and walked around the model, changing the position of the strobes for different takes.

I knew I only wanted to use two-three shots from this location, so I wanted to maximize my photo choices. To meter everything after each change would limit my time, so in this case E-TTL rocked. However, it's not perfect or consistent, but because you're not shooting a series in a single location and you want to maximize the results, it's a great option to use.

For more photography tips, please visit my web site. While you are there, please check out my instructional dowloads. And remember, the Doorhof is always open.

• • • • •

Thank you, Frank, for your great advice, and for sharing your wonderful photographs.

Explore the light,
Rick
P.S. If you have a speedlite shooter in your family, here are my holiday gift recos.

This post sponsored by X-Rite - take control of your color with the colormunki. 

Screen Shot 2012-12-12 at 10.48.08 AM.png